hive使用
一、Hive的概念
Hive由Facebook开源基于Hadoop的一个数据仓库工具,用于解决海量结构化日志的数据统计,Hive可以将结构化的数据文件映射为一张表,并提供类SQL 查询功能【本质是将HQL转化成MapReduce程序】
Hive的执行原理
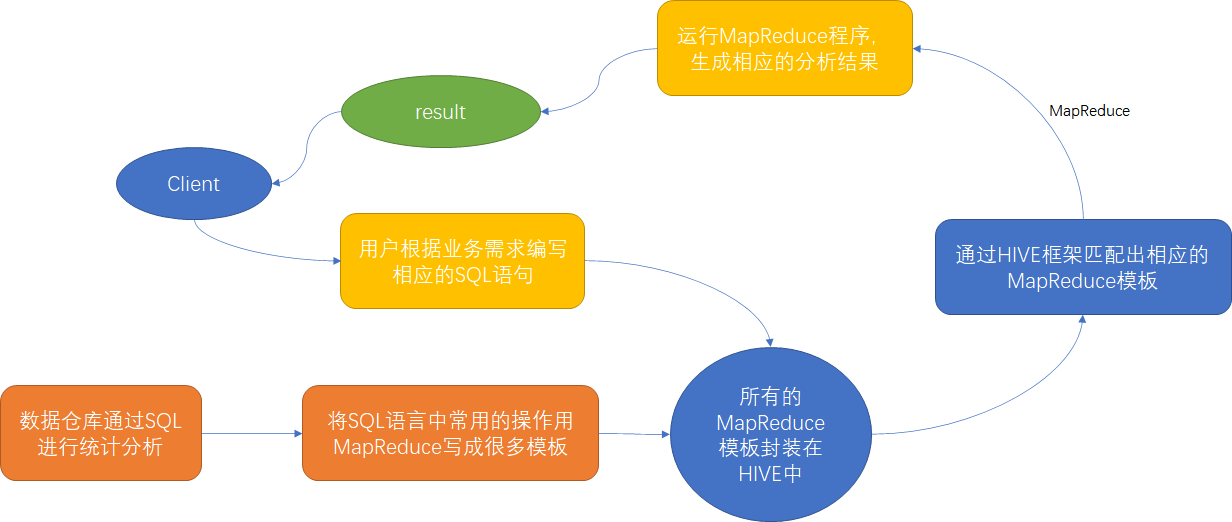
1)Hive处理的数据存储在HDFS
2)Hive分析数据底层的默认实现是MapReduce
3)执行程序运行在Yarn上
Hive的优点:
1)操作接口采用类SQL语法,提供快速开发的能力(简单、容易上手)
2)避免了去写MapReduce,减少开发人员的学习成本
3)Hive 优势在于处理大数据,对于处理小数据没有优势,因为Hive 的执行延迟比较高
4)Hive 支持用户自定义函数,用户可以根据自己的需求来实现自己的函数
Hive的缺点:
1)Hive 的执行延迟比较高,因此Hive 常用于数据分析,对实时性要求不高的场合
2)Hive 自动生成的MapReduce 作业,通常情况下不够智能化,调优比较困难,粒度较粗
3)迭代式算法无法表达,数据挖掘方面不擅长
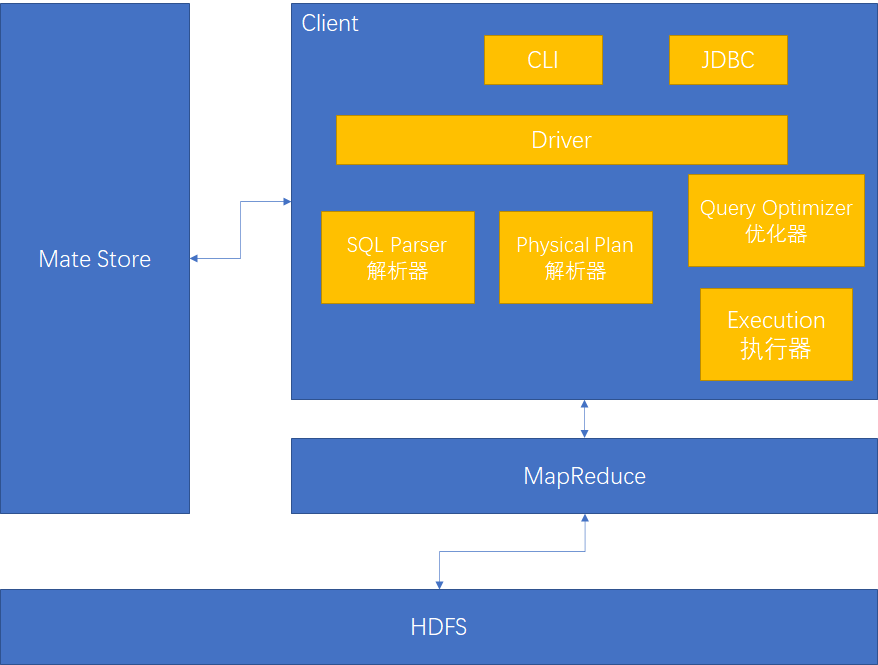
Hive的架构原理
Hive的数据类型
tinyint/samlint/int/bigint/float/doublebooleanstringtimestampbinarystructmaparray
Hive的交互方式
①hive登陆;②HiveJDBC;③hive -e "cmd"直接得到结果;④执行SQL文件bin/hive -f hive_file.sql
二、安装部署&HiveJDBC
安装部署
下载hive解压,配置
第一步:拷贝conf/hive-env.sh.template 为conf/hive-env.sh并配置
HADOOP_HOME=/opt/module/hadoop
export HIVE_CONF_DIR=/opt/module/hive/conf
第二步:拷贝MySQL驱动到hive的lib文件夹下
第三步:创建conf/hive-site.xml文件配置MySQL
<?xml version="1.0" encoding="UTF-8" standalone="no"?>
<?xml-stylesheet type="text/xsl" href="configuration.xsl"?>
<configuration>
<property>
<name>javax.jdo.option.ConnectionURL</name>
<value>jdbc:mysql://192.168.22.1:3306/hive?createDatabaseIfNotExist=true&useUnicode=true&characterEncoding=utf-8&allowMultiQueries=true&rewriteBatchedStatements=true&serverTimezone=Asia/Shanghai</value>
</property>
<property>
<name>javax.jdo.option.ConnectionDriverName</name>
<value>com.mysql.cj.jdbc.Driver</value>
</property>
<!-- hive连接账户密码 -->
<property>
<name>javax.jdo.option.ConnectionUserName</name>
<value>root</value>
</property>
<property>
<name>javax.jdo.option.ConnectionPassword</name>
<value>123456</value>
</property>
<!-- 数据存储在HDFS的目录 -->
<property>
<name>hive.metastore.warehouse.dir</name>
<value>/user/hive/warehouse</value>
</property>
<!-- 返回表头 -->
<property>
<name>hive.cli.print.header</name>
<value>true</value>
</property>
<!-- 返回当前的库 -->
<property>
<name>hive.cli.print.current.db</name>
<value>true</value>
</property>
</configuration>
第四步:配置日志
拷贝 conf/hive-log4j2.properties.template到conf/hive-log4j2.properties
# log目录
property.hive.log.dir = /opt/module/hive/log
第五步:初始化元数据
schematool -dbType mysql -initSchema
HiveJDBC
开启HiveJDBC服务
nohup bin/hiveserver2 > hiveserver2.log 2>&1 &
beeline连接
bin/beeline
# 进入之后连接
# !connect jdbc:hive2://centos162:10000
三、DDL语句
操作数据库语句
-- ########################################## 建库语句 ##########################################
create database db_emp;
create database if not exists db_emp;
create database db_emp location '/hive/resposistion/db_emp';


-- ########################################## 查询库语句 ##########################################
show databases;
desc database extended db_emp;


-- ####################################### 修改属性【添加自定义属性】########################################
alter database db_emp set dbproperties('createOwn'='kun');


-- ########################################## 删库语句 ##########################################
-- 删除语句【删除空数据库】
drop database db_emp;
-- 强制删除
drop database db_emp cascade;


-- ########################################## 切库语句 ##########################################
use db_emp;
操作表
管理表【内部表】:删除时元数据和HDFS存储数据一起删除
外部表:删除时只删除元数据
操作一般表
-- ########################################## 查询表结构 ##########################################
show create table student;
desc student;
desc extended student;
desc formatted student;


-- ########################################## 创建表 ##########################################
-- 直接创建表
create external table if not exists student(id int, name string);
-- 使用别的表的查询数据创建表,不允许使用外部表方式
create table if not exists student_new as select id, name from student;
-- 使用别的表结构创建表
create external table if not exists student_like like student;

-- 创建表使用各种分割
-- 数据格式
-- kangkang,lili_xiangxiang,lili:18_xiangxiang:19,fengtai_beijing
-- YueYue,lili_sisi,lili:18_sisi:19,daxiao_beijing
create table persion_info(
  name string,
  friends array<string>,
  children map<string,int>,
  address struct<stree:string, city:string>
)
row format delimited
fields terminated by ','
collection items terminated by '_'
map keys terminated by ':'
lines terminated by '\n';


-- ########################################## 修改表 ##########################################
-- 表类型转换
alter table student set tblproperties('EXTERNAL'='TRUE');
alter table student set tblproperties('EXTERNAL'='FALSE');

-- 重命名
alter table student_partition_old rename to student_partition_new;

-- 修改列
alter table student_partition change column id stu_id string;-- 增加列

-- 增加列
alter table student_partition add columns(sex int, age int);

-- 替换列【全量】
alter table student_partition replace columns(id string, name string, sex int);

-- 删除表
drop table student_partition;
操作分区表
-- ########################################## 创建分区表 ##########################################
-- 创建分区表
create table if not exists student_partition(id int, name string)
partitioned by (year string)
row format delimited
fields terminated by '\t';

-- 创建二级分区表
create table if not exists student_partition(id int, name string)
partitioned by (month string, year string)
row format delimited
fields terminated by '\t';


-- ########################################## 插入数据表 ##########################################
-- 插入分区表数据
load data local inpath '/opt/module/hive/input/student.txt' into table student_partition partition(year="2019");

-- 插入二级分区表数据
load data local inpath '/opt/module/hive/input/student.txt' into table student_partition_day partition(month="2019-01", day="01");


-- ########################################## 创建&删除&查询分区 ##########################################
-- 创建分区
alter table student_partition add partition(year="2020") partition(year="2018");

-- 删除分区
alter table student_partition drop partition(year="2020") , partition(year="2018");

-- 查看表分区
show partitions student_partition;


-- ########################################## 修复分区数据 ##########################################
-- 上传数据,完成之后因为没有元数据信息所有无法查询
hadoop fs -mkdir  /user/hive/warehouse/student_partition/year=2018
hadoop fs -put input/student.txt /user/hive/warehouse/student_partition/year=2018
-- 方式一:自动修复
msck repair table student_partition;
-- 方式二:手动添加分区
alter table student_partition add partition(year="2017");


-- ########################################## 创建动态分区 ##########################################
-- 开启动态分区功能(默认true)
set hive.exec.dynamic.partition=true
-- 设置为非严格模式(动态分区的模式,默认strict,表示必须指定至少一个分区为静态分区)
set hive.exec.dynamic.partition.mode=nonstrict;
-- 在所有执行MR的节点上,最大一共可以创建多少个动态分区,默认1000。
set hive.exec.max.dynamic.partitions=1000;
-- 在每个执行MR的节点上,最大可以创建多少个动态分区,默认100。
set hive.exec.max.dynamic.partitions.pernode=100;
-- 整个MR Job中,最大可以创建多少个HDFS文件,默认100000。
set hive.exec.max.created.files=100000
-- 当有空分区生成时,是否抛出异常。一般不需要设置。
hive.error.on.empty.partition=false
-- 创建表
create table employee_partition(
  empno int,
  ename string,
  job string,
  mgr string,
  hiredate string,
  sal int,
  comm int)
partitioned by (deptno int)
row format delimited fields terminated by '\t' ;
-- 插入数据,此时不用指定partition的字段值,动态获取
insert into employee_partition partition(deptno)
select empno, ename, job, mgr, hiredate, sal, comm, deptno from employee;
四、DML语句
插入数据
-- ########################################## Load装载数据 ##########################################
-- 数据在本地文件是上传到HDFS,数据在HDFS上是剪切
-- 追加
load data [local] inpath '/opt/module/hive/input/student.txt' into table student;
-- 清空,覆盖
load data [local] inpath '/opt/module/hive/input/student.txt' overwrite into table student;


-- ########################################## Insert插入数据 ##########################################
-- 插入数据
insert into table student_partition partition(year="2000") values("2", "tom", NULL);

-- 使用插入数据覆盖, 注意字段顺序
insert overwrite table student_partition partition(year="2000") select id, name, sex from student_bak;


-- ########################################## 查询并创建数据 ##########################################
create table student_new as select id, name from student;


-- ######################################## 创建表并指定数据文件夹#########################################
-- 创建表并指定存放数据的HDFS文件夹位置,然后上传文件到文件夹即可
create table studeng_new(id int, name string)
row format delimited fields terminated by '\t'
location '/user/hive/warehouse/student_new'
数据导出&数据导入
-- ########################################## Insert导出 ###########################################
insert overwrite [local] directory '/opt/module/hive/input/student.data'
row format delimited fields terminated by '\t'
select * from student;


-- ######################################## Export导出Import导入 ########################################
-- export导出到HDFS上
export table student to '/hive/export/student';
import table student from '/hive/export/student';
清除表数据
-- 必须是管理表才能截断数据
truncate table student;
五、DQL语句
SQL语句应该避免产生笛卡尔积,产生笛卡尔积的条件
- 省略连接条件
- 连接条件无效
- 所有表中所有行互相连接
Oracle、Hive支持满外连接(full join),Mysql不支持满外连接可使用左连接union右连接
排序
-- order by[全局排序,只有一个Reduce]
select * from employee order by sal;

-- sort by[局部排序,多个Reduce,分区字段随机]
set mapreduce.job.reduces=2;
-- 分为两个区,每个区内有序
select deptno,sal from employee sort by sal;

-- distribute by[分区排序],先按照给定字段分区之后再排序
select * from employee distribute by deptno sort by sal;
set mapreduce.job.reduces=3;
select deptno,sal from employee distribute by deptno sort by sal;

--cluster by[当distribute by field sort by field asc相同时可替代]
select deptno from employee cluster by deptno;
分桶查询
-- 创建分桶表
create table employee_buck(empno int, ename string, deptno int)
clustered by(deptno) into 3 buckets
row format delimited fields terminated by '\t';

-- 导入数据
set hive.enforce.bucketmapjoin = true;
set mapreduce.job.reduces = -1;
insert into table employee_buck select empno, ename, deptno from employee;

-- 查询分桶数据
select * from employee_buck where deptno=10;

-- 分桶抽样查询
select * from employee_buck tablesample(bucket 1 out of 6 on deptno);
-- x out of y
-- x: 开始的桶号,基数为1
-- y: 桶数的因子或倍数,如果为因子则为抽取buckets/y个,如果是倍数则为(buckets/y) * buckets个
常用函数
空字段赋值函数
如果第一个参数是NULL则使用第二个参数值,参数个数为固定两个
select nvl(NULL, 100);
时间类函数
date_format时间格式只认-
-- 字符串转时间
select date_format('2020-09-22', 'yyyy-MM-dd');

-- 时间增加,数值可为负数为减
select date_add('2020-09-22', -1);

-- 时间减少,数值可为负数为增
select date_sub('2020-09-22', -1);

-- 两时间相减
select datediff('2020-09-22','2020-09-21');
判断函数
-- case when
select
  classno,
  sum(case sex when "男" then 1 else 0 end) as male,
  sum(case sex when "女" then 1 else 0 end) as female
from emp_sex group by classno;

-- if
select if(mgr = "", "领导", "员工") from employee;
字符串拼接
-- 拼接
select concat("hello", "_", "world");

-- 拼接指定分隔符
select concat_ws("_", "hello", "world");
字段数据汇总
-- collect_set返回一个array
select deptno, collect_set(ename) from employee group by deptno;
explode
explode:将hive一列中复杂的array或者map结构拆分成多行
lateral view:用于和split,explode形成侧写,它将一列数据拆成多行数据
select deptno, ename from emp_dept lateral view explode(enames) table_tmp as ename;
over
OVER():指定分析函数工作的据窗口大小,这个可能会随着行的变化而变化
OVER内可加参数
| 参数 | 说明 |
|---|---|
| CURRENT ROW | 当前行 |
| n PRECEDING | 往前n行数据 |
| n FOLLOWING | 往后n行数据 |
| UNBOUNDED | 起点 |
| UNBOUNDED PRECEDING | 表示从前面的起点 |
| UNBOUNDED FOLLOWING | 表示到后面的终点 |
OVER左侧函数
| 参数 | 说明 |
|---|---|
| lag(col,n) | 往前第n行数据 |
| lead(col,n) | 往后第n行数据 |
| ntile(n) | 把有序分区中的行发到指定数据组,各个编号从1开始 |
| rank() | 存在并列排序,1、1、3、4 |
| dense_rank() | 存在并列排序,1、1、2、3 |
| row_number() | 顺序计算,1、2、3、4 |
/*
 * 数据
 * name sale_date   price
 * Jack	2020-01-01	10
 * Jack	2020-01-02	20
 * Jack	2020-01-03	30
 * Jack	2020-01-05	5
 * Jane	2020-01-01	8
 * Jane	2020-01-02	12
 * Jane	2020-01-08	1
 * Roes	2020-01-08	100
 */


-- 按照名称统计,消费时间排序,计算累加消费
select name, sale_date, sum(price) over(distribute by name sort by sale_date) from business;
select name, sale_date, sum(price) over(partition by name order by sale_date) from business;
/**
 * 结果如下
 * name    sale_date       sum_window_0
 * Jack    2020-01-01      10
 * Jack    2020-01-02      30
 * Jack    2020-01-03      60
 * Jack    2020-01-05      65
 * Jane    2020-01-01      8
 * Jane    2020-01-02      20
 * Jane    2020-01-08      21
 * Roes    2020-01-08      100
 */


-- 查询上次消费和本次消费的总计
select
 name,
 sale_date,
 sum(price) over(distribute by name sort by sale_date rows between 1 PRECEDING and CURRENT ROW)
from business;
/**
 * 结果如下
 * Jack    2020-01-01      10
 * Jack    2020-01-02      30
 * Jack    2020-01-03      50
 * Jack    2020-01-05      35
 * Jane    2020-01-01      8
 * Jane    2020-01-02      20
 * Jane    2020-01-08      13
 * Roes    2020-01-08      100
 */


-- 查询顾客上次购买时间
select name, sale_date, lag(sale_data, 1) over(distribute by name sort by sale_date) from business;
/**
 * 结果如下
 * Jack    2020-01-01      NULL
 * Jack    2020-01-02      2020-01-01
 * Jack    2020-01-03      2020-01-02
 * Jack    2020-01-05      2020-01-03
 * Jane    2020-01-01      NULL
 * Jane    2020-01-02      2020-01-01
 * Jane    2020-01-08      2020-01-02
 * Roes    2020-01-08      NULL
 */


-- 查询消费日期25%为一组的数据
select name, sale_date,  ntile(4) over(sort by sale_data) as percent from business order by percent;
/**
 * 结果如下
 * Jack    2020-01-01      1
 * Jane    2020-01-01      1
 * Jack    2020-01-02      2
 * Jane    2020-01-02      2
 * Jack    2020-01-05      3
 * Jack    2020-01-03      3
 * Jane    2020-01-08      4
 * Roes    2020-01-08      4
 */


-- 消费者自身消费金额排序
select name, price, sale_date, rank() over(distribute by name sort by price desc) from business;
/**
 * 结果如下
 * Jack    30      2020-01-03      1
 * Jack    20      2020-01-02      2
 * Jack    10      2020-01-01      3
 * Jack    5       2020-01-05      4
 * Jane    12      2020-01-02      1
 * Jane    8       2020-01-01      2
 * Jane    1       2020-01-08      3
 * Roes    100     2020-01-08      1
 */
六、函数
查看系统内置函数
-- 查看系统自带的函数
show functions;

-- 显示自带的函数的用法
desc function [funcName];
desc function extended [funcName];
自定义函数
当Hive提供的内置函数无法满足你的业务处理需要时,此时可以考虑使用用户自定义函数(UDF:user-defined function)
根据用户自定义函数分为以下三类:
- UDF(user-defined function):一进一出
- UDAF(user-defined aggregation function):多进一出
- UDTF(user-defined table-generating functions):一进多出
自定义函数步骤
第一步:上传jar到hive服务器
第二步:add jar /opt/module/hive/lib/xxx.jar;
第三步:添加类CREATE TEMPORARY FUNCTION [funcName]AS [className];
UDF函数定义
@Description(name = "lower_concat",
             value = "_FUNC_(param_1,param_2) - Returns concat lower string ",
             extended = "param can be one of:\n"
             + "1. primitive\n"
             + "2. null\n"
             + "Example:\n "
             + "  > SELECT _FUNC_('AAA', 'BBB')")
public class LowerConcat extends GenericUDF {

  private transient ObjectInspectorConverters.Converter[] converters;

  /**
    * 这个方法只调用一次,并且在evaluate()方法之前调用。该方法接受的参数是一个ObjectInspectors数组。
    * 该方法检查接受正确的参数类型和参数个数。
    */
  @Override
  public ObjectInspector initialize(ObjectInspector[] arguments) throws UDFArgumentException {
    // 长度校验
    if (arguments.length != 2) {
      throw new UDFArgumentException("The function LOWER_CONCAT accepts 2 arguments.");
    }
    converters = new ObjectInspectorConverters.Converter[arguments.length];
    // 参数类型校验
    if (!(arguments[0].getCategory().equals(ObjectInspector.Category.PRIMITIVE))) {
      throw new UDFArgumentTypeException(0, "\"primitive\" expected at function LOWER_CONCAT, but \""
                                         + arguments[0].getTypeName() + "\" " + "is found");
    }
    converters[0] = ObjectInspectorConverters.getConverter(arguments[0], PrimitiveObjectInspectorFactory.writableStringObjectInspector);

    if (!(arguments[1].getCategory().equals(ObjectInspector.Category.PRIMITIVE))) {
      throw new UDFArgumentTypeException(0, "\"primitive\" expected at function LOWER_CONCAT, but \""
                                         + arguments[1].getTypeName() + "\" " + "is found");
    }

    converters[1] = ObjectInspectorConverters.getConverter(arguments[1], PrimitiveObjectInspectorFactory.writableStringObjectInspector);
    return PrimitiveObjectInspectorFactory.writableStringObjectInspector;
  }

  /**
    * 处理
    */
  @Override
  public Object evaluate(DeferredObject[] arguments) throws HiveException {
    Text firstText = (Text) converters[0].convert(arguments[0].get());
    Text secondText = (Text) converters[1].convert(arguments[1].get());
    String firstStr = (firstText == null ? "" : firstText.toString());
    String secondStr = (secondText == null ? "" : secondText.toString());
    return new Text(firstStr.toLowerCase() + secondStr.toLowerCase());
  }

  @Override
  public String getDisplayString(String[] children) {
    return getStandardDisplayString(getFuncName(), children);
  }
}
UDTF函数定义
@Description(name = "multi",
             value = "_FUNC_(params...) - Returns concat lower string ",
             extended = "param can be number\n"
             + "Example:\n "
             + "  > SELECT _FUNC_(1,2,3)")
public class Multi extends GenericUDTF {

  @Override
  public StructObjectInspector initialize(StructObjectInspector argOIs) throws UDFArgumentException {
    // 1.定义输出数据的列名和类型
    List<String> fieldNames = new ArrayList<>();
    List<ObjectInspector> fieldOIS = new ArrayList<>();

    //2.添加输出数据和列名和类型
    fieldNames.add("multi");
    fieldOIS.add(PrimitiveObjectInspectorFactory.javaLongObjectInspector);

    return ObjectInspectorFactory.getStandardStructObjectInspector(fieldNames, fieldOIS);
  }

  @Override
  public void process(Object[] args) throws HiveException {
    List<Integer> inputArg = new ArrayList<>();
    for (Object arg : args) {
      inputArg.add(((IntWritable)arg).get());
    }
    Long result = 1L;
    for (Integer aInt : inputArg) {
      result = result * aInt;
    }
    forward(result);
  }

  @Override
  public void close() throws HiveException {
  }
}
七、Snappy压缩&文件格式
Snappy压缩
前提条件:hadoop先编译安装好支持Snappy
开启Map输出阶段压缩
-- 开启hive传输数据压缩功能
set hive.exec.compress.intermediate=true;
-- 开启map-reduce中map输出压缩功能
set mapreduce.map.output.compress=true;
-- 设置map-reduce中map输出数据的压缩方式
set mapreduce.map.output.compress.codec=org.apache.hadoop.io.compress.SnappyCodec;
开启Reduce输出阶段压缩
-- 开启hive最终输出数据压缩功能
set hive.exec.compress.output=true;
-- 开启map-reduce最终输出数据压缩
set mapreduce.output.fileoutputformat.compress=true;
-- 设置map-reduce中map输出数据的压缩方式
set mapreduce.output.fileoutputformat.compress.codec = org.apache.hadoop.io.compress.SnappyCodec;
-- 设置map-reduce最终数据输出压缩为块压缩
set mapreduce.output.fileoutputformat.compress.type=BLOCK;
-- 测试一下输出结果是否压缩文件
insert overwrite local directory '/opt/module/hive/input/employee' select deptno, sal from employee distribute by deptno sort by sal;
文件格式
Hive可使用的文件格式
- SEQUENCEFILE:生产中绝对不会用,k-v格式,比源文本格式占用磁盘更多
- TEXTFILE:生产中用的多,行式存储,也是默认的文件格式
- ORC:生产中最常用,列式存储
- PARQUET:生产中最常用,列式存储
创建不同文件格式的表
-- ######################################## TEXTFILE ########################################
create table employee_textfile(
  empno int,
  ename string
)
row format delimited fields terminated by '\t'
stored as textfile;

-- ######################################## ORC ########################################
create table employee_orc(
  empno int,
  ename string
)
row format delimited fields terminated by '\t'
stored as orc tblproperties ("orc.compress"="SNAPPY");
-- 默认压缩为ZLIB

insert into employee_orc select empno, ename from employee_textfile;

-- ######################################## PARQUET ########################################
create table employee_parquet(
  empno int,
  ename string
)
row format delimited fields terminated by '\t'
stored as parquet;

insert into employee_parquet select empno, ename from employee_textfile;
八、优化
Fetch抓取
Fetch抓取是指,Hive中对某些情况的查询可以不必使用MapReduce计算。例如:SELECT * FROM employee;在这种情况下,Hive可以简单地读取employee对应的存储目录下的文件,然后输出查询结果到控制台。
修改hive-site.xml
<property>
  <name>hive.fetch.task.conversion</name>
  <!--
    none : 全部走MR
    minimal : select * ,limit,filter在一个表所属的分区表上操作不走MR
    more    : select,filter,limit,都是运行数据的fetch,不跑mr[默认值]
    -->
  <value>more</value>
</property>
本地模式
大多数的Hadoop Job是需要Hadoop提供的完整的可扩展性来处理大数据集的。不过,有时Hive的输入数据量是非常小的。在这种情况下,为查询触发执行任务消耗的时间可能会比实际job的执行时间要多的多。对于大多数这种情况,Hive可以通过本地模式在单台机器上处理所有的任务。对于小数据集,执行时间可以明显被缩短。
-- 开启本地模式默认为false
set hive.exec.mode.local.auto=true;
-- 数据量必须小于指定参数才使用本地模式,默认128M
set hive.exec.mode.local.auto.inputbytes.max=50000000;
-- job的map数必须小于参数才使用本地模式,默认4
set hive.exec.mode.local.auto.tasks.max=10;
表查询优化
小表join大表
查询时应该将数据量小的表放在join的左边,这样可以有效减少内存溢出错误发生的几率。实际新版的hive已经对小表JOIN大表和大表JOIN小表进行了优化。小表放在左边和右边已经没有明显区别。
-- 关闭mapjoin功能(默认是打开的)
set hive.auto.convert.join = false;
大表join大表-空key过滤
如果大表的空key太多,而且空key不参与join,则应该在join之前进行子查询过滤掉空key
select * from (select * from bigNullKeyTable where bigtable_id is not null) T left join bigTable on bigTable.id = T.bigtable_id;
大表join大表-空key转换
如果大表的空key太多,但是空key参与join,则可以随机生成join用的key避免数据倾斜
select * from bigNullKeyTable left join bigTable on if(bigNullKeyTable.bigtable_id is null, concat('temp_join_key', rand()) ,bigNullKeyTable.bigtable_id ) = bigTable.id;
MapJoin
如果不指定MapJoin或者不符合MapJoin的条件,那么Hive解析器会将在Reduce阶段完成join,容易发生数据倾斜。可以用MapJoin把小 表全部加载到内存在map端进行join,避免reduce处理。
-- 设置自动选择MapJoin,默认为true
set hive.auto.convert.join = true;
-- 大表小表的阈值设置(默认25M下认为是小表)
set hive.mapjoin.smalltable.filesize=25000000;
Group By
Group By同样的Key会分发给一个reduce,如果Group By的字段数据倾斜较大(一样的集中在几个值上)压力会集中在个别Reduce上。并不是所有的聚合操作都需要在Reduce端完成,很多聚合操作都可以先在Map端进行部分聚合,最后在Reduce端得出最终结果。
-- 是否在Map端进行聚合,默认为True
set hive.map.aggr = true;

-- 在Map端进行聚合操作的条目数目,默认100000
set hive.groupby.mapaggr.checkinterval = 100000;

-- 有数据倾斜的时候进行负载均衡(默认是false)
set hive.groupby.skewindata = true;
当选项设定为true, 生成的查询计划会有两个MR Job。第一个MR Job中,Map的输出结果会随机分布到Reduce中,每个Reduce做部分聚合操作,并输出结果,这样处理的结果是相同的Group By Key有可能被分发到不同的Reduce中,从而达到负载均衡的目的;第二个MR Job再根据预处理的数据结果按照Group By Key分布到Reduce中(这个过程可以保证相同的Group By Key被分布到同一个Reduce中),最后完成最终的聚合操作。
去重统计
数据量小的时候无所谓,数据量大的情况下,由于COUNT DISTINCT操作需要用一个Reduce Task来完成,这一个Reduce需要处理的数据量太大,就会导致整个Job很难完成,一般COUNT DISTINCT使用先GROUP BY再COUNT的方式替换:
select count(distinct mgr) from employee;

set mapreduce.job.reduces=10;
select count(mgr) from (select mgr from employee group by mgr) T;
笛卡尔积
默认情况下笛卡尔积校验时关闭的,可以配置hive-site.xml开启
<property>
  <name>hive.strict.checks.cartesian.product</name>
  <value>true</value>
</property>
当需要使用时可在当前会话开启使用开启笛卡尔积
-- 开启可使用笛卡尔积
set hive.strict.checks.cartesian.product=false;
行列过滤
列处理:在SELECT中,只拿需要的列,少使用SELECT *
行处理:如果能过滤出很多列可先将表执行子查询再JOIN
select ename,deptno from (select * from employee where mgr is not null) emp join department on emp.deptno=department.id;
MR优化
合理设置Map数
-- 决定每个map处理的最大的文件大小,单位为B,默认256M
mapreduce.input.fileinputformat.split.maxsize=256000000;
合理设置reduce数量
-- 每个Reduce处理的数据量默认是256MB
set hive.exec.reducers.bytes.per.reducer=256000000;
-- 每个任务最大的reduce数,默认为1009
set hive.exec.reducers.max=1009;
-- reduce个数设置
set mapreduce.job.reduces=2;
小文件进行合并
-- 默认已合并
set hive.input.format=org.apache.hadoop.hive.q1.io.CombineHive.InputFormat;
并行执行
Hive会将一个查询转化成-一个或者多个阶段。这样的阶段可以是MapReduce阶段、抽样阶段、合并阶段、limit 阶段。或者Hive执行过程中可能需要的其他阶段。默认情况下,Hive一次只会执行一个阶段。不过,某个特定的job可能包含众多的阶段,而这些阶段可能并非完全互相依赖的,也就是说有些阶段是可以并行执行的,这样可能使得整个job的执行时间缩短。如果有更多的阶段可以并行执行,那么job可能就越快完成。系统资源比较空闲的时候才有优势
-- 打开任务并行执行,默认false
set hive.exec.parallel=true;
-- 同一个sq1允许最大并行度,默认8
set hive.exec.plarallel.thread.number=16;
严格模式
<!--
	hive.mapred.mode被废弃,已被 hive.strict.checks.* 设置替代
-->

<!-- ordey by 必须和limit连用,默认false -->
<property>
  <name>hive.strict.checks.orderby.no.limit</name>
  <value>false</value>
</property>
<!-- 分区表查询必须含有分区字段过滤,默认false -->
<property>
  <name>hive.strict.checks.no.partition.filter</name>
  <value>false</value>
</property>
<!-- 笛卡尔积检测,默认false -->
<property>
  <name>hive.strict.checks.cartesian.product</name>
  <value>false</value>
</property>
Hadoop开启JVM重用&推测执行
Hive自身也开启了推测执行
hive.mapred.reduce.tasks.speculative.execution,默认true
执行计划
使用extend分析执行计划,查看MR如何运行
explain select * from employee_partition where deptno=20;
explain extended select * from employee_partition where deptno=20;