Hadoop基础
一、Hadoop和大数据简介
大数据
大数据(BigData) :指无法在一定时间范围内用常规软件工具进行捕捉、管理和处理的数据集合,是需要新处理模式才能具有更强的决策力、洞察发现力和流程优化能力的海量、高增长率和多样化的信息资产。大数据含有特点:Volumn(大量)、Velocity(高速)、Variety(多样)、Value(低价值密度)
Hadoop
Hadoop是一个由Apache基金会开发的分布式系统的基础架构,主要解决,海量数据的存储和海量数据的分析计算问题。广义上来说。Hadoop通常是指一个更广泛的概念即hadoop生态圈。
- Hadoop主要版本:Apache版本【最基础版本】、Cloudera版本-CDH【大型互联网中应用较多】、Hortonworks版本【文档较好】
- Hadoop主要优势:高可靠【数据有副本】、高扩展【方便扩展节点】、高效性【速度快】、高容错【能自动重新分配失败任务】
- Hadoop的组成部分:MapReduce(计算)、HDFS(存储)、YARN(资源调度)、COMMON(辅助工具)
Hadoop的目录和主要文件结构
├── bin【最基本的管理脚本和使用脚本所在的目录,这些脚本是sbin目录下管理脚本的基础实现】
│   ├── container-executor
│   ├── hadoop
│   ├── hdfs
│   ├── mapred
│   ├── rcc
│   ├── test-container-executor
│   └── yarn
├── etc 【配置文件】
│   └── hadoop
│       ├── capacity-scheduler.xml
│       ├── configuration.xsl
│       ├── container-executor.cfg
│       ├── core-site.xml                 【全局配置文件如NameNode的地址、存储目录】
│       ├── hadoop-env.sh                 【环境变量配置文件】
│       ├── hadoop-metrics2.properties
│       ├── hadoop-metrics.properties
│       ├── hadoop-policy.xml
│       ├── hdfs-site.xml                 【HDFS的核心配置文件如副本数】
│       ├── httpfs-env.sh
│       ├── httpfs-log4j.properties
│       ├── httpfs-signature.secret
│       ├── httpfs-site.xml
│       ├── kms-acls.xml
│       ├── kms-env.sh
│       ├── kms-log4j.properties
│       ├── kms-site.xml
│       ├── log4j.properties
│       ├── mapred-env.sh
│       ├── mapred-queues.xml.template
│       ├── mapred-site.xml.template      【MapReduce的核心配置文件】
│       ├── slaves                        【用于设置所有的slave的名称或IP,每行存放一个】
│       ├── ssl-client.xml.example
│       ├── ssl-server.xml.example
│       ├── yarn-env.sh
│       └── yarn-site.xml                 【yarn的核心配置文件】
├── sbin【管理脚本所在目录,主要包含HDFS和YARN中各类服务启动/关闭的脚本】
│   ├── hadoop-daemon.sh     【启动本机NameNode、DataNode以及SecondaryNameNode】
│   ├── hadoop-daemons.sh
│   ├── hdfs-config.sh
│   ├── refresh-namenodes.sh
│   ├── slaves.sh
│   ├── start-balancer.sh
│   ├── start-dfs.sh         【启动NameNode、DataNode以及SecondaryNameNode】
│   ├── start-secure-dns.sh
│   ├── start-yarn.sh        【启动ResourceManager以及NodeManager】
│   ├── stop-balancer.sh
│   ├── stop-dfs.sh          【停止NameNode、DataNode以及SecondaryNameNode】
│   ├── stop-secure-dns.sh
│   ├── stop-yarn.sh         【停止ResourceManager以及NodeManager】
│   ├── yarn-daemon.sh       【启动本机】
│   └── yarn-daemons.sh
├── lib【包含了Hadoop对外提供的编程动态库和静态库,与include目录中的头文件结合使用】
├── libexec【各个服务对应的shell配置文件所在的目录,可用于配置日志输出目录、启动参数(比如JVM参数)等基本信息。】
└── share【各个模块编译后的Jar包所在目录,这个目录中也包含了Hadoop文档】
二、Hadoop安装
前置条件:JDK已安装
编译安装
前置准备:已安装JDK、maven、ant
安装依赖:yum install -y glibc-headers gcc-c++ make cmake openssl-devel ncurses-devel
第一步:安装protobuf
./configure
make && make install
protoc --version
第二步:源码编译
tar -zxvf hadoop-[version]-src.tar.gz
mvn package -Pdist,native -DskipTests -Dmaven.javadoc.skip=true -Dtar
单节点安装
第一步 安装配置
已安装openssl ,openssl-devel,gcc,gcc-c++
Hadoop已解压并创建HADOOP_HOME和加入PATH变量,并将解压的目录权限移交给指定用户
第二步 测试
cp etc/hadoop/*.xml input
hadoop jar share/hadoop/mapreduce/hadoop-mapreduce-examples-[version].jar grep input output 'dfs[a-z.]+'
cat output/*
伪装分布式安装
配置HDFS
第一步 安装配置
Hadoop已解压并创建HADOOP_HOME和加入PATH变量
第二步 配置集群
①配置core-site.xml
<!-- 指定HDFS中NameNode的地址 -->
<property>
<name>fs.defaultFS</name>
    <value>hdfs://centos160:9000</value>
</property>

<!-- 指定Hadoop运行时产生文件的存储目录 -->
<property>
	<name>hadoop.tmp.dir</name>
	<value>/opt/module/hadoop/data/tmp</value>
</property>
②配置hdfs-site.xml
<!-- 指定HDFS副本的数量 -->
<property>
	<name>dfs.replication</name>
	<value>1</value>
</property>
第三步 启动集群:
①格式化NameNode【会产生新的集群id如果和dataNode的集群id不同则找不到以往数据】
hdfs namenode -format
②启动NameNode和DataNode
sbin/hadoop-daemon.sh start namenode
sbin/hadoop-daemon.sh start datanode
③查看是否启动成功
jps
④访问http://ip:50070查看集群状态
⑤测试上传文件和删除文件
# 创建目录
hadoop fs -mkdir -p /user/kun/input
# 上传文件
hadoop fs -put input/* /user/kun/input
# 查看文件
hadoop fs -ls -R /user
# 执行测试
hadoop jar share/hadoop/mapreduce/hadoop-mapreduce-examples-[version].jar wordcount /user/kun/input /user/kun/output
# 查看结果
hadoop fs -tail -f /user/kun/output/part-r-00000
# 删除目录
hadoop fs -rm -r /user
配置YARN
第一步 配置集群
①配置yarn-site.xml
<!-- Reducer获取数据的方式 -->
<property>
  <name>yarn.nodemanager.aux-services</name>
  <value>mapreduce_shuffle</value>
</property>

<!-- 指定YARN的ResourceManager的地址 -->
<property>
  <name>yarn.resourcemanager.hostname</name>
  <value>centos160</value>
</property>
②配置mapred-site.xml
<!-- 指定MR运行在YARN上 -->
<property>
  <name>mapreduce.framework.name</name>
  <value>yarn</value>
</property>
第二步 启动集群
①启动ResourceManager和NodeManager
sbin/yarn-daemon.sh start resourcemanager
sbin/yarn-daemon.sh start nodemanager
jps
②访问http://ip:8088查看集群状态
③执行测试
# 执行测试
hadoop jar share/hadoop/mapreduce/hadoop-mapreduce-examples-[version].jar wordcount /user/kun/input /user/kun/output
配置历史服务器
①配置mapred-site.xml
<!-- 历史服务器端地址 -->
<property>
  <name>mapreduce.jobhistory.address</name>
  <value>centos160:10020</value>
</property>
<!-- 历史服务器web端地址 -->
<property>
  <name>mapreduce.jobhistory.webapp.address</name>
  <value>centos160:19888</value>
</property>
②启动历史服务器
sbin/mr-jobhistory-daemon.sh start historyserver
③访问http://ip:19888/jobhistory历史服务器
配置日志聚集
①关闭NodeManager 、ResourceManager和HistoryManager
sbin/yarn-daemon.sh stop resourcemanager
sbin/yarn-daemon.sh stop nodemanager
sbin/mr-jobhistory-daemon.sh stop historyserver
②配置yarn-site.xml
<property>
  <name>yarn.log-aggregation-enable</name>
  <value>true</value>
</property>

<!-- 日志保留时间设置7天 -->
<property>
  <name>yarn.log-aggregation.retain-seconds</name>
  <value>604800</value>
</property>

<property>
  <name>yarn.nodemanager.aux-services</name>
  <value>mapreduce_shuffle</value>
</property>
③启动NodeManager 、ResourceManager和HistoryManager
sbin/yarn-daemon.sh start resourcemanager
sbin/yarn-daemon.sh start nodemanager
sbin/mr-jobhistory-daemon.sh start historyserver
注:以后执行的任务才能查看聚集日志
分布式安装
部署规划
| Hadoop161 | Hadoop162 | Hadoop163 | |
|---|---|---|---|
| HDFS | NameNode/DataNode | DataNode | DataNode/SecondaryNameNode |
| YARN | NodeManager | ResourceManager/NodeManager | NodeManager |
第一步:系统配置
①配置/etc/hosts
::1         localhost
127.0.0.1   localhost
192.168.1.161   centos161
192.168.1.162   centos162
192.168.1.163   centos163
分发rsync -rvl /etc/hosts root@192.168.1.162:/etc/hosts
分发rsync -rvl /etc/hosts root@192.168.1.163:/etc/hosts
②配置NameNode节点ssh登陆【注意切换用户为hadoop的使用用户】
# 生成密钥
ssh-keygen -t rsa

# 全部都需要,包括本机
ssh-copy-id centos161
ssh-copy-id centos162
ssh-copy-id centos163
③配置ResourceManager节点ssh登陆【注意切换用户为hadoop的使用用户】
第二步:hadoop配置
①配置core-site.xml
<!-- 指定HDFS中NameNode的地址 -->
<property>
  <name>fs.defaultFS</name>
  <value>hdfs://centos161:9000</value>
</property>

<!-- 指定Hadoop运行时产生文件的存储目录 -->
<property>
  <name>hadoop.tmp.dir</name>
  <value>/opt/module/hadoop/data/tmp</value>
</property>

<!-- 有访问权限的代理用户 -->
<property>
  <name>hadoop.proxyuser.kun.hosts</name>
  <value>*</value>
</property>
<property>
  <name>hadoop.proxyuser.kun.groups</name>
  <value>*</value>
</property>

<!-- 默认用户 -->
<property>
  <name>hadoop.http.staticuser.user</name>
  <value>kun</value>
</property>
②配置hdfs-site.xml
<property>
  <name>dfs.replication</name>
  <value>3</value>
</property>

<!-- 指定Hadoop辅助名称节点主机配置 -->
<property>
  <name>dfs.namenode.secondary.http-address</name>
  <value>centos163:50090</value>
</property>

<!-- 块存储大小默认128M,HDFS块的大小设置主要取决于磁盘传输速率 -->
<property>
  <name>dfs.blocksize</name>
  <value>134217728</value>
</property>
③配置yarn-site.xml
<!-- Reducer获取数据的方式 -->
<property>
  <name>yarn.nodemanager.aux-services</name>
  <value>mapreduce_shuffle</value>
</property>

<!-- 指定YARN的ResourceManager的地址 -->
<property>
  <name>yarn.resourcemanager.hostname</name>
  <value>centos162</value>
</property>
④配置slaves
centos161
centos162
centos163
⑤分发配置文件
 rsync -rvl /opt/module/hadoop/etc/hadoop/* root@192.168.1.162:/opt/module/hadoop/etc/hadoop/
 rsync -rvl /opt/module/hadoop/etc/hadoop/* root@192.168.1.163:/opt/module/hadoop/etc/hadoop/
第三步 启动集群:
①NameNode节点格式化
hdfs namenode -format
②启动HDFS
sbin/start-dfs.sh
③用jps查看每个节点状态
④访问http://snnIp:50090/status.html查看secondaryNameNode
⑤在ResourceManger节点启动YARN
sbin/start-yarn.sh
第四步 集群测试
hadoop fs -mkdir -p /user/kun/input
hadoop fs -put etc/hadoop/*.xml /user/kun/input
hadoop jar share/hadoop/mapreduce/hadoop-mapreduce-examples-2.10.0.jar wordcount /user/kun/input /user/kun/output
集群时间同步
第一步 配置一台机器为时间服务器
yum install ntp
第二步 配置/etc/ntp.conf
# 授权192.168.1.0-192.168.1.255网段上的所有机器可以从这台机器上查询和同步时间
restrict 192.168.1.0 mask 255.255.255.0 nomodify notrap

# 集群在局域网中,不使用其他互联网上的时间,使用自己的时钟
#server 0.centos.pool.ntp.org iburst
#server 1.centos.pool.ntp.org iburst
#server 2.centos.pool.ntp.org iburst
#server 3.centos.pool.ntp.org iburst

# 当该节点丢失网络连接,依然可以采用本地时间作为时间服务器为集群中的其他节点提供时间同步
server 127.127.1.0
# 时间精准等级
fudge 127.127.1.0 stratum 10
第三步 配置/etc/sysconfig/ntpd
SYNC_HWCLOCK=yes
第四步 重新启动ntpd服务
systemctl restart ntpd
chkconfig ntpd on
第五步 配置其它机器同步时间服务器
crontab -e
# */10 * * * * /usr/sbin/ntpdate centos161
第六步 修改任意机器时间查看机器是否与时间服务器同步
date -s "2017-9-11 11:11:11"

# 等待同步
date
三、HDF的概述
HDFS (Hadoop Distributed File System)是个分布式的文件系统,用于存储文件,通过目录树来定位文件。
HDFS的使用场景:适合一次写入,多次读出的场景,且不支持文件的修改。适合做数据分析,不适合用来做网盘应用,实时性差。
HDFS的优点
- 高容错性
- 适合大数据处理
- 可构建在廉价机器上
HDFS的缺点
- 不适合低延时数据访问,比如毫秒级的存储数据
- 无法高效的对大量小文件进行存储
- 存储大量小文件的话,它会占用NarmeNode大量的内存来存储文件
- 小文件存储的寻址时间会超过读取时间,它违反了HDFS的设计目标
- 不支持并发写入、文件随机修改
- 不允许多个线程同时写
- 仅支持数据追加,不支持文件的随机修改
HDFS架构
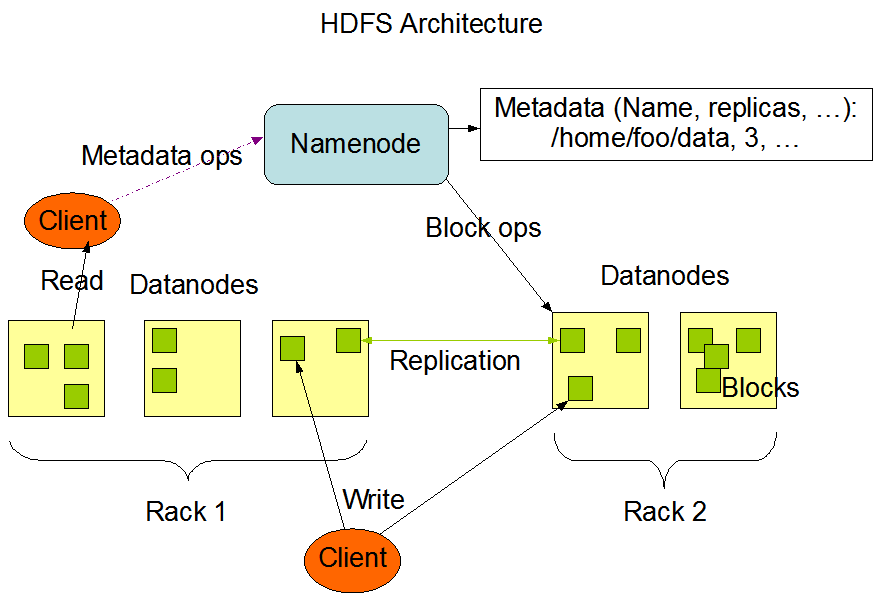
NameNode:①管理HDFS名称空间;②配置副本策略;③管理数据块映射信息;④处理客户端读写请求;
DataNode:①存储实际的数据块;②执行数据块的读/写请求;
Client:①文件切分,文件上传时切分为一块块Block;②NameNode交互获取文件位置信息;③DataNode交互读写文件;
SecondaryNameNode:①辅助NameNode,分担定期工作如FsImage、Edits;②紧急情况下辅助恢复NameNode;
四、HDFS的操作
Shell操作
①查看文件列表hadoop fs -ls /path,可选参数-R【递归展示相当于tree】
②创建目录hadoop fs -mkdir /path/dir,可选参数-p【创建多级目录】
③剪切本地文件到服务器hadoop fs -moveFromLocal file /path
④追加本地文件到服务器hadoop fs -appendToFile file /path
⑤查看文件 hadoop fs -cat /path/file
⑥复制本地文件到服务器hadoop fs -copyFromLocal file /path或hadoop fs -put file /path
⑦从服务器拷贝到本地hadoop fs -copyToLocal /path file或hadoop fs -get /path file
⑧服务器文件拷贝hadoop fs -cp /path /path
⑨服务器文件剪切hadoop fs -mv /path /path
⑩合并多个文件进行下载hadoop fs -getmerge /path/* file
⑪查看文件后几行hadoop fs -tail /path
⑫删除文件或文件夹hadoop fs -rm -f /path
⑬统计文件夹的大小信息hadoop fs -du -h /
⑭文件副本数量hadoop fs -setrep 10 /path
⑮修改文件权限chown chgrp chmod
HDFS的API操作
创建目录
@Test
public void mkdirTest() throws Exception {
  Configuration configuration = new Configuration();
  configuration.set("dfs.replication", "2");
  FileSystem fileSystem = FileSystem.get(new URI("hdfs://192.168.1.161:9000"), configuration, "kun");
  boolean success = fileSystem.mkdirs(new Path("/java/api/input"));
  log.info("执行结果{}", success);
  fileSystem.close();
}
上传操作
@Test
public void copyTest() throws Exception {
  Configuration configuration = new Configuration();
  FileSystem fileSystem = FileSystem.get(new URI("hdfs://192.168.1.161:9000"), configuration, "kun");
  fileSystem.copyToLocalFile(false, new Path("/input/sanguo"),  new Path("F:\\input"));
  fileSystem.close();
}

@Test
public void ioInputTest() throws Exception {
  Configuration configuration = new Configuration();
  FileSystem fileSystem = FileSystem.get(new URI("hdfs://192.168.1.161:9000"), configuration, "kun");
  InputStream inputStream = new FileInputStream(new File("F:\\input\\sanguo\\wuguo.txt"));
  OutputStream outputStream = fileSystem.create(new Path("/wuguo.txt"));
  IOUtils.copyBytes(inputStream, outputStream, configuration);
  fileSystem.close();
}
下载操作
@Test
public void copyTest() throws Exception {
  Configuration configuration = new Configuration();
  FileSystem fileSystem = FileSystem.get(new URI("hdfs://192.168.1.161:9000"), configuration, "kun");
  fileSystem.copyToLocalFile(false, new Path("/input/sanguo"),  new Path("F:\\input"));
  fileSystem.close();
}

@Test
public void ioDownTest() throws Exception {
  Configuration configuration = new Configuration();
  FileSystem fileSystem = FileSystem.get(new URI("hdfs://192.168.1.161:9000"), configuration, "kun");
  OutputStream outputStream = new FileOutputStream(new File("F:\\input\\sanguo\\wuguo.txt"));
  InputStream inputStream = fileSystem.open(new Path("/wuguo.txt"));
  IOUtils.copyBytes(inputStream, outputStream, configuration);
  fileSystem.close();
}
删除操作
@Test
public void rmTest() throws Exception {
  Configuration configuration = new Configuration();
  FileSystem fileSystem = FileSystem.get(new URI("hdfs://192.168.1.161:9000"), configuration, "kun");
  boolean success = fileSystem.delete(new Path("/input/sanguo"), false);
  log.info("执行结果{}", success);
  fileSystem.close();
}
重命名操作
@Test
public void renameTest() throws Exception {
  Configuration configuration = new Configuration();
  FileSystem fileSystem = FileSystem.get(new URI("hdfs://192.168.1.161:9000"), configuration, "kun");
  boolean success = fileSystem.rename(new Path("/input/sanguo"), new Path("/input/ThreeKing"));
  log.info("执行结果{}", success);
  fileSystem.close();
}
文件详情获取
@Test
public void fileDetailTest() throws Exception {
  Configuration configuration = new Configuration();
  FileSystem fileSystem = FileSystem.get(new URI("hdfs://192.168.1.161:9000"), configuration, "kun");
  /**
    * listFiles:只能列出文件,可控制是否递归
    * listLocatedStatus: 只能获取当前目录下的目录和文件
    * listStatusIterator: 和listLocatedStatus相似,但返回的是文件块状态信息少
    */
  RemoteIterator<LocatedFileStatus> listFiles = fileSystem.listLocatedStatus(new Path("/input/ThreeKing"));
  while (listFiles.hasNext()) {
    LocatedFileStatus fileStatus = listFiles.next();
    log.info("文件名:{}", fileStatus.getPath().getName());
    log.info("长度:{}", fileStatus.getLen());
    log.info("权限:{}", fileStatus.getPermission());
    log.info("是文件:{}", fileStatus.isFile());
    log.info("是目录:{}", fileStatus.isDirectory());
    // 块信息
    BlockLocation[] blockLocations = fileStatus.getBlockLocations();
    for (BlockLocation blockLocation : blockLocations) {
      String[] hosts = blockLocation.getHosts();
      for (String host : hosts) {
        log.info("存储节点:{}", host);
      }
    }
  }
  fileSystem.close();
}
五、HDFS的工作机制
HDFS写数据流程
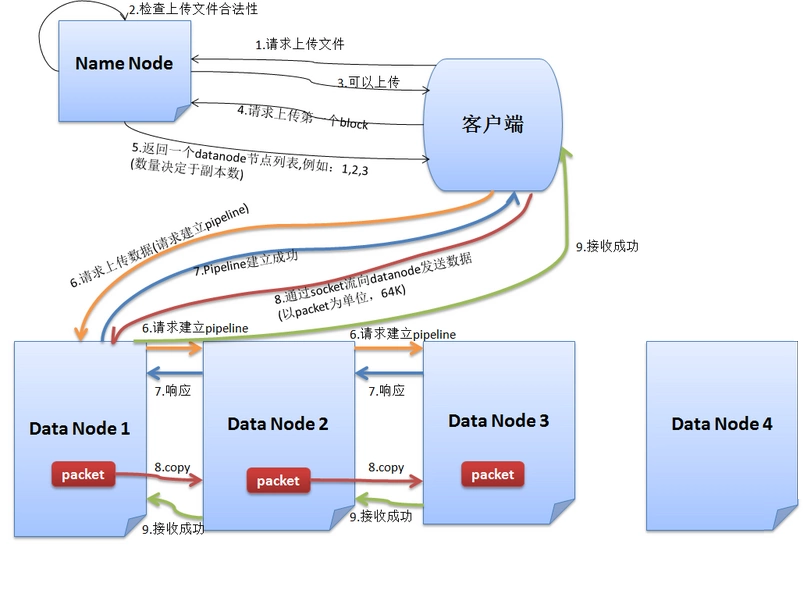
- 跟NameNode通信请求上传文件,NameNode检查目标文件是否已经存在,父目录是否已经存在
- NameNode返回是否可以上传
- Client先对文件进行切分,请求第一个block该传输到哪些DataNode服务器上
- NameNode返回3个DataNode服务器DataNode 1,DataNode 2,DataNode 3
- Client请求3台中的一台DataNode 1(网络拓扑上的就近原则)上传数据,DataNode 1收到请求会继续调用DataNode 2,然后DataNode 2调用DataNode 3,将整个pipeline建立完成,然后逐级返回客户端
- Client开始往DataNode 1上传第一个block(先从磁盘读取数据放到一个本地内存缓存),以pocket为单位。写入的时候DataNode会进行数据校验,它并不是通过一个packet进行一次校验而是以chunk为单位进行校验(512byte)。DataNode 1收到一个packet就会传给DataNode 2,DataNode 2传给DataNode 3,DataNode 1每传一个pocket会放入一个应答队列等待应答
- 一个block传输完成之后,Client再次请求NameNode上传第二个block的服务器.
- 传输完成Client通知NameNode
HDFS的读数据流程
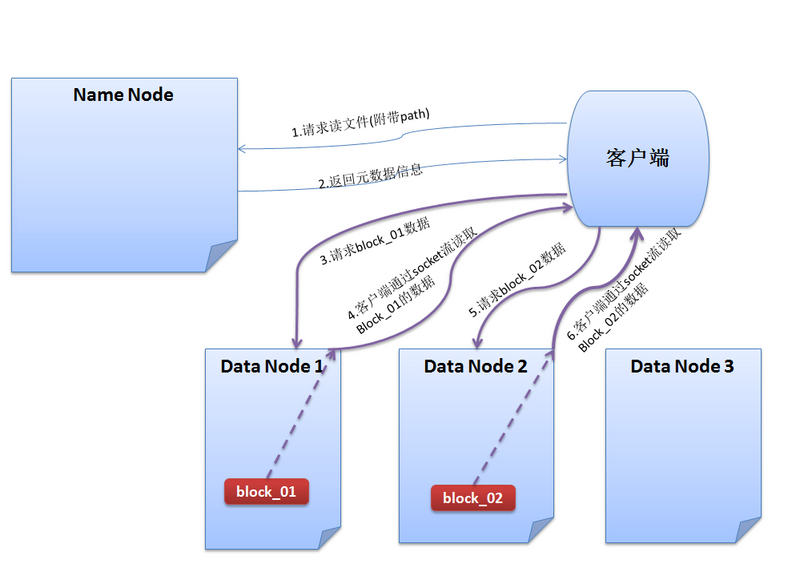
- 与NameNode通信查询元数据,找到文件块所在的DataNode服务器
- 挑选一台DataNode(网络拓扑上的就近原则)服务器,请求建立socket流
- DataNode开始发送数据,以packet(64kb)为单位来做校验
- 客户端以packet为单位接收,先在本地缓存,然后写入目标文件
- 读完一个block继续串行读取下个block
NameNode和SecondaryNameNode工作机制
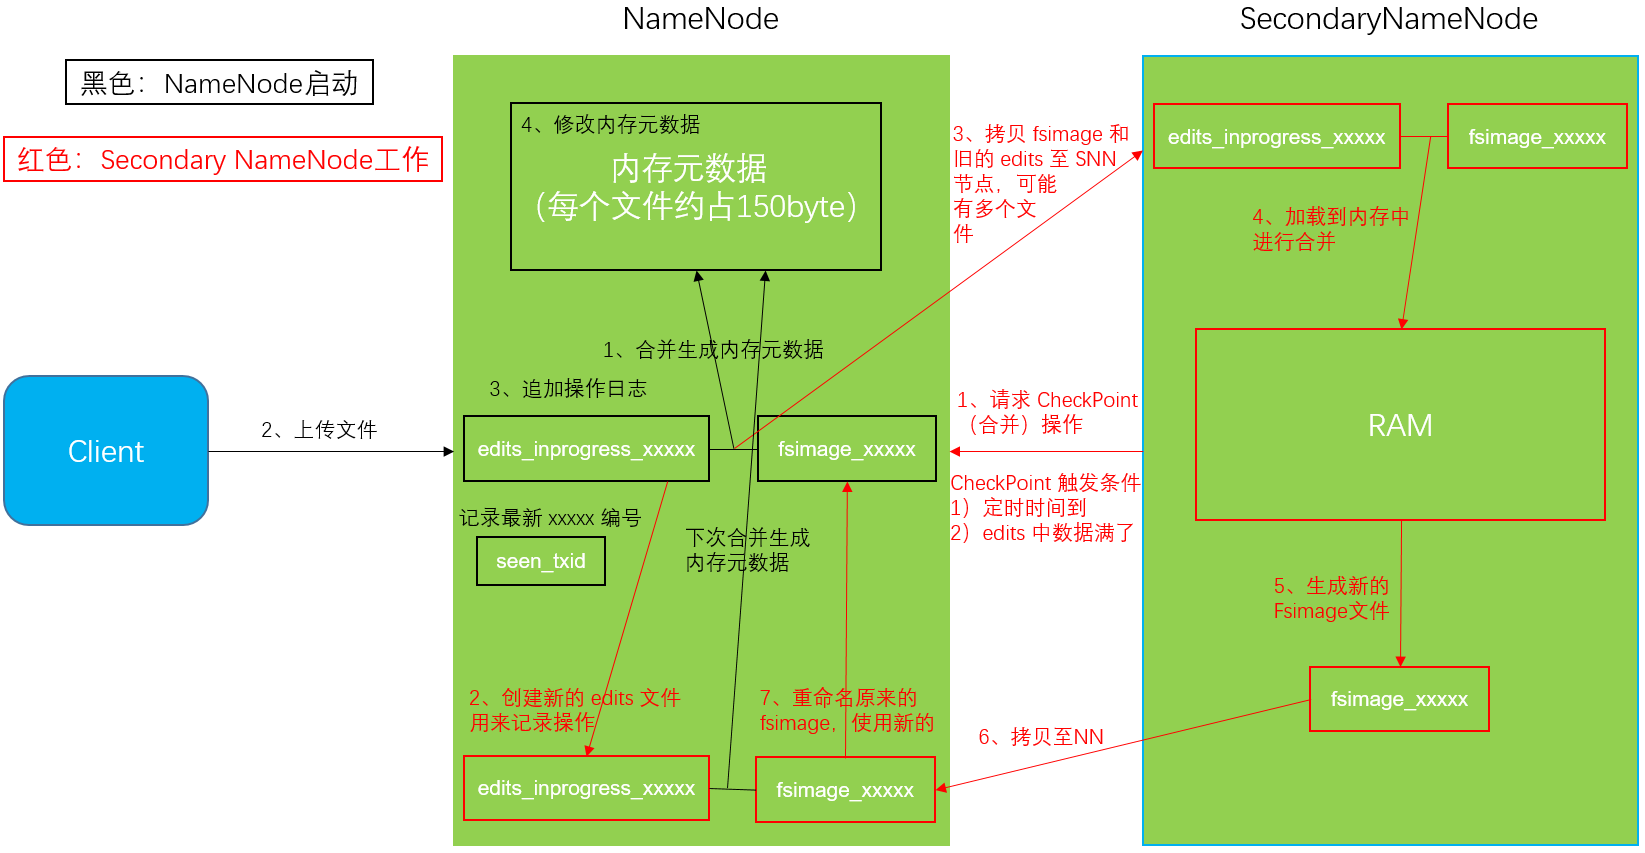
Fsimage:NameNode内存中元数据序列化后形成的文件;Edits:记录客户端更新元数据信息的每一步操作
第一阶段:NameNode启动
- 第一次启动格式化后的NameNode时,创建Fsimage和Edits文件。如果不是第一次启动,直接加载编辑日志和镜像文件到内存
- 客户端对元数据进行增删改的请求
- NameNode记录操作日志,更新滚动日志
- NameNode在内存中对数据进行增删改
第二阶段:Secondary NameNode工作
- Secondary NameNode询问NameNode是否需要CheckPoint
- Secondary NameNode请求执行CheckPoint
- NameNode滚动正在写的Edits日志
- 将滚动前的编辑日志和镜像文件拷贝到Secondary NameNode
- Secondary NameNode加载编辑日志和镜像文件到内存,并合并
- 生成新的镜像文件fsimage.chkpoint
- 拷贝fsimage.chkpoint到NameNode
- NameNode将fsimage.chkpoint重新命名成fsimage
CheckPoint的判断
①默认情况下,SecondaryNameNode每隔一小时执行一次
<property>
  <name>dfs.namenode.checkpoint.period</name>
  <value>3600</value>
</property>
②一分钟检查一次操作次数,3当操作次数达到1百万时,SecondaryNameNode执行一次
<!-- 操作次数的阈值 -->
<property>
  <name>dfs.namenode.checkpoint.txns</name>
  <value>1000000</value>
</property>

<!-- 检查是否到达操作阈值的时间 -->
<property>
  <name>dfs.namenode.checkpoint.check.period</name>
  <value>60</value>
</property >
NameNode故障处理
方式一:将SecondaryNameNode中数据拷贝到NameNode存储数据的目录
方式二:将检查点时间改小【之后需要改回去】,之后给SecondaryNameNode存储数据的目录拷贝到NameNode存储数据的平级目录,并删除in_use.lock文件。导入检查点数据bin/hdfs namenode -importCheckpoint,等待一会之后退出
集群安全模式
NameNode启动
NameNode启动时,首先将镜像文件(Fsimage)载入内存,并执行编辑日志(Edits) 中的各项操作。一旦在内存中成功建立文件系统元数据的映像,则创建一个新的Fsimage文件和一个空的编辑日志。此时,NameNode开始监听DataNode请求。这个过程期间NameNode一直运行在安全模式,即NameNode的文件系统对于客户端来说是只读的。
DataNode启动
系统中的数据块的位置并不是由NameNode维护的,而是以块列表的形式存储在DataNode中。在系统的正常操作期间,NameNode 会在内存中保留所有块位置的映射信息。在安全模式下,各个DataNode会向NameNode发送最新的块列表信息,NameNode了解到足够多的块位置信息之后,即可高效运行文件系统。
安全模式退出判断
如果满足”最小副本条件”,NameNode会在30秒钟之后就退出安全模式。所谓的最小副本条件指的是在整个文件系统中99.9%的块满足最小副本级别(默认值: dfs.replication.min=1)。在启动一个刚刚格式化的HDFS集群时,因为系统中还没有任何块,所以NameNode不会进入安全模式。
安全模式操作命令
hdfs dfsadmin -safemode get【查看安全模式状态】hdfs dfsadmin -safemode enter【进入安全模式状态】hdfs dfsadmin -safemode leave【离开安全模式状态】hdfs dfsadmin -safemode wait【等待安全模式结束】
NameNode多目录配置
NameNode的本地目录可以配置成多个,每个目录存放内容相同,增加了可靠性
第一步:配置hdfs-site.xml
<property>
  <name>dfs.namenode.name.dir</name>
  <value>file:///${hadoop.tmp.dir}/dfs/name1,file:///${hadoop.tmp.dir}/dfs/name2</value>
</property>
第二步:重新格式化NameNode
DataNode工作机制
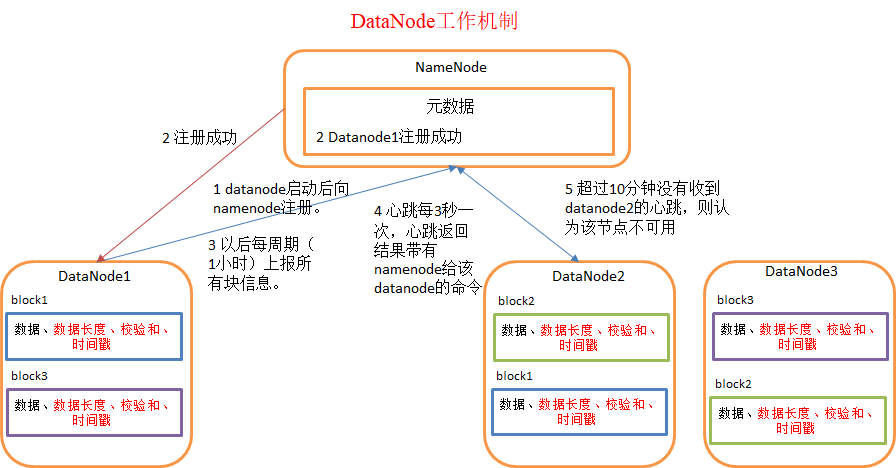
- 一个数据块在DataNode上以文件形式存储在磁盘上,包括两个文件,一个是数据本身,一个是元数据包括数据块的长度,块数据的校验和,以及时间戳
- DataNode启动后向NameNode注册,通过后,周期性(1小时)的向NameNode上报所有的块信息
- 每3秒进行一次心跳检测,心跳返回结果带有NameNode给该DataNode的命令【如复制块数据到另一台机器或删除某个数据块】如果超过10分钟没有收到某个DataNode的心跳,则认为该节点不可用。
掉线时限参数设置
当DataNode进程死亡或者网络故障导致无法与NameNode进行通讯时,NameNode不会立即将此DataNode移除,而是要经过一段时间(默认时长为10m30s)
计算公式为:2 * dfs.namenode.heartbeat.recheck-interval + 10 * dfs.heartbeat.interval
可在hdfs-site.xml配置
<!-- 单位毫秒 -->
<property>
  <name>dfs.namenode.heartbeat.recheck-interval</name>
  <value>300000</value>
</property>

<!-- 单位秒 -->
<property>
  <name>dfs.heartbeat.interval</name>
  <value>3</value>
</property>
添加节点
第一步:确保新加入的节点的logs和data文件为空
第二步:配置/etc/hosts,拷贝hadoop的etc目录下的文件
第三步:启动sbin/hadoop-daemon.sh start datanode和sbin/yarn-daemon.sh start nodemanager
如果出现数据不均衡的情况,应使用
sbin/start-balancer.sh均衡数据
白名单【应在集群创建时规划】
第一步:创建etc/hadoop/dfs.hosts文件
centos161
centos162
centos163
centos164
第二步:配置hdfs-site.xml
<property>
  <name>dfs.hosts</name>
  <value>/opt/module/hadoop/etc/hadoop/dfs.hosts</value>
</property>
第三步:分发hdfs-site.xml
第四步:刷新节点
hdfs dfsadmin -refreshNodes
yarn rmadmin -refreshNodes
注意:存在与白名单外的已有数据节点,数据不会变化
黑名单【应在退役节点时使用】
第一步:创建etc/hadoop/dfs.hosts.exclude文件
centos164
第二步:配置hdfs-site.xml
<property>
  <name>dfs.hosts.exclude</name>
  <value>/opt/module/hadoop/etc/hadoop/dfs.hosts.exclude</value>
</property>
第三步:分发hdfs-site.xml
hdfs dfsadmin -refreshNodes
yarn rmadmin -refreshNodes
第四步:刷新节点
注意:同一个主机不能同时存在再黑白名单中。存在与黑名单内的已有数据节点,数据会分配给其它节点
多目录配置
DataNode也可以配置成多个目录,每个目录存储的数据不一样【数据不是副本】
配置hdfs-site.xml
<property>
  <name>dfs.datanode.data.dir</name>
  <value>file:///${hadoop.tmp.dir}/dfs/data1,file:///${hadoop.tmp.dir}/dfs/data2</value>
</property>
六、HDFS其它
小文件存档
归档文件
hadoop archive -archiveName input.har -p /src *.xml /dest
-p:指定父目录,后面的源文件可以使用相对路径
查看归档文件
hadoop fs -ls -r har:///dest/input.har
解归档文件
hadoop fs -cp har:///dest/input.har/* /noArchive
快照管理
快照相当于是对目录做一个备份,并未对数据做备份,只是记录了文件的变化。
启用目录快照功能:hdfs dfsadmin -allowSnapshot /dir
禁用目录快照功能:hdfs dfsadmin -disallowSnapshot /dir
对目录创建快照:hdfs dfs -createSnapshot /dir SnapshotName
重命名快照:hdfs dfs -renameSnapshot SnapshotName NewSnapshotName
列出当前用户所有可快照目录:hdfs lsSnapshottableDir
比较两个快照目录的不同之处:hdfs snapshotDiff
七、MapReduce概述
MapReduce是一个基于Hadoop的数据分析应用的分布式运算程序的编程框架。MapReduce核心功能是将用户编写的业务逻辑代码和自带默认组件整合成一个完整的分布式运算程序,并发运行在一个Hadoop集群上。
MapReduce的优点:
①易于编程,只需简单的实现一些接口
②良好的扩展性,当计算资源不能满足时可以通过简单增加机器来提升
③高容错性,如果机器宕机故障会自动将上面的计算任务转移到另一节点运行
④PB级文件以上海量数据的离线处理
MapReduce的缺点:
①不能实时计算
②不擅长流式计算,即输入数据不是动态的
③不擅长有向图计算,多个程序之间存在依赖,后一个程序的输入是前一个程序的输出,这种情况下会造成大量IO
Map之后Reduce之前称之为Shuffle
八、MapReduce编程
WordCount入门案例
案例说明:计算单词出现的次数
自定义Mapper
@Slf4j
public class WordCountMapper extends Mapper<LongWritable, Text, Text, IntWritable> {

  private Text outKey = new Text();
  private IntWritable outValue = new IntWritable();

  // 任务开始时会被调用一次
  @Override
  protected void setup(Context context) throws IOException, InterruptedException {
    log.info("=================WordCountMapper setup=================");
  }

  @Override
  protected void map(LongWritable key, Text value, Context context) throws IOException, InterruptedException {
    String text = value.toString();
    String[] words = text.split(" ");
    for (String word : words) {
      outKey.set(word);
      outValue.set(1);
      context.write(outKey, outValue);
    }
  }

  // 任务结束会被调用一次
  @Override
  protected void cleanup(Context context) throws IOException, InterruptedException {
    log.info("=================WordCountMapper cleanup=================");
  }
}
自定义Reducer
@Slf4j
public class WordCountReducer extends Reducer<Text, IntWritable, Text, IntWritable> {

  private IntWritable outValue = new IntWritable();

  @Override
  protected void setup(Context context) throws IOException, InterruptedException {
    log.info("=================WordCountReduce setup=================");
  }

  @Override
  protected void reduce(Text key, Iterable<IntWritable> values, Context context) throws IOException, InterruptedException {
    int count = 0;
    for (IntWritable value : values) {
      count += value.get();
    }
    outValue.set(count);
    context.write(key, outValue);
  }

  @Override
  protected void cleanup(Context context) throws IOException, InterruptedException {
    log.info("=================WordCountReduce cleanup=================");
  }
}
自定义Driver
public class WordCountDriver {

  public static void main(String[] args) throws Exception {
    // 获取JOB
    Configuration configuration = new Configuration();
    configuration.set("fs.defaultFS", "hdfs://192.168.1.161:9000");

    Job job = Job.getInstance(configuration);
    // 设置jar位置
    job.setJarByClass(WordCountDriver.class);
    // 关联Mapper和Reducer
    job.setMapperClass(WordCountMapper.class);
    job.setReducerClass(WordCountReducer.class);
    // 设置Mapper阶段输出的KV类型
    job.setMapOutputKeyClass(Text.class);
    job.setMapOutputValueClass(IntWritable.class);
    // 设置最后输出的KV类型
    job.setOutputKeyClass(Text.class);
    job.setOutputValueClass(IntWritable.class);
    // 设置程序输出的输入路径和输出路径
    FileInputFormat.setInputPaths(job, new Path("hdfs://192.168.1.161:9000/input"));
    FileOutputFormat.setOutputPath(job, new Path("hdfs://192.168.1.161:9000/output"));
    // 提交JOB
    job.submit();
    job.waitForCompletion(true);
  }
}
自定义序列化
案例说明:统计手机的上下行流量
自定义序列化Bean
/**
 * 必须提供无参构造函数
 * 实现Writable接口,write和readFields字段顺序必须完全一致
 * 重新toString提供输出到文件的格式
 * 如果需要将自定义的bean放在key中传输还要实现Comparable接口
 * 必须有值,否则序列化报错
 */
@Data
@NoArgsConstructor
public class FlowerBean implements Writable {
  private String name;
  private long upFlow;
  private long downFlow;
  private long sumFlow;

  @Override
  public void write(DataOutput out) throws IOException {
    out.writeUTF(name);
    out.writeLong(upFlow);
    out.writeLong(downFlow);
    out.writeLong(sumFlow);
  }

  @Override
  public void readFields(DataInput in) throws IOException {
    this.name = in.readUTF();
    this.upFlow = in.readLong();
    this.downFlow = in.readLong();
    this.sumFlow = in.readLong();
  }

  @Override
  public String toString() {
    return name + '\t' + upFlow + '\t' + downFlow + '\t' + sumFlow;
  }
}
定义Mapper
public class FlowerMapper extends Mapper<LongWritable, Text, Text, FlowerBean> {

  @Override
  protected void map(LongWritable key, Text value, Context context) throws IOException, InterruptedException {
    String lineText = value.toString();
    String[] values = lineText.split("\t");
    FlowerBean flowerBean = new FlowerBean();
    flowerBean.setName(values[1]);
    flowerBean.setUpFlow(Long.parseLong(values[values.length-3]));
    flowerBean.setDownFlow(Long.parseLong(values[values.length-2]));
    context.write(new Text(values[1]), flowerBean);
  }
}
定义Reducer
public class FlowerReducer extends Reducer<Text, FlowerBean, Text, FlowerBean> {

  @Override
  protected void reduce(Text key, Iterable<FlowerBean> values, Context context) throws IOException, InterruptedException {

    FlowerBean flowerBean = new FlowerBean();
    long downFlow = 0;
    long upFlow = 0;
    for (FlowerBean value : values) {
      downFlow += value.getDownFlow();
      upFlow += value.getUpFlow();
    }
    long sumFlow = upFlow + downFlow;
    flowerBean.setUpFlow(upFlow);
    flowerBean.setDownFlow(downFlow);
    flowerBean.setSumFlow(sumFlow);
    flowerBean.setName(key.toString());
    context.write(key, flowerBean);
  }
}
定义Driver
public class FlowerDriver {

  public static void main(String[] args) throws Exception {
    // 获取JOB
    Configuration configuration = new Configuration();
    configuration.set("fs.defaultFS", "hdfs://192.168.1.161:9000");
    Job job = Job.getInstance(configuration);
    // 关联Mapper和Reducer
    job.setMapperClass(FlowerMapper.class);
    job.setReducerClass(FlowerReducer.class);
    // 设置Mapper阶段输出的KV类型
    job.setMapOutputKeyClass(Text.class);
    job.setMapOutputValueClass(FlowerBean.class);
    // 设置最后输出的KV类型
    job.setOutputKeyClass(Text.class);
    job.setOutputValueClass(FlowerBean.class);
    // 设置程序输出的输入路径和输出路径
    FileInputFormat.setInputPaths(job, new Path("/input/flower"));
    FileOutputFormat.setOutputPath(job, new Path("/output"));
    // 提交JOB
    job.submit();
    job.waitForCompletion(true);
  }
}
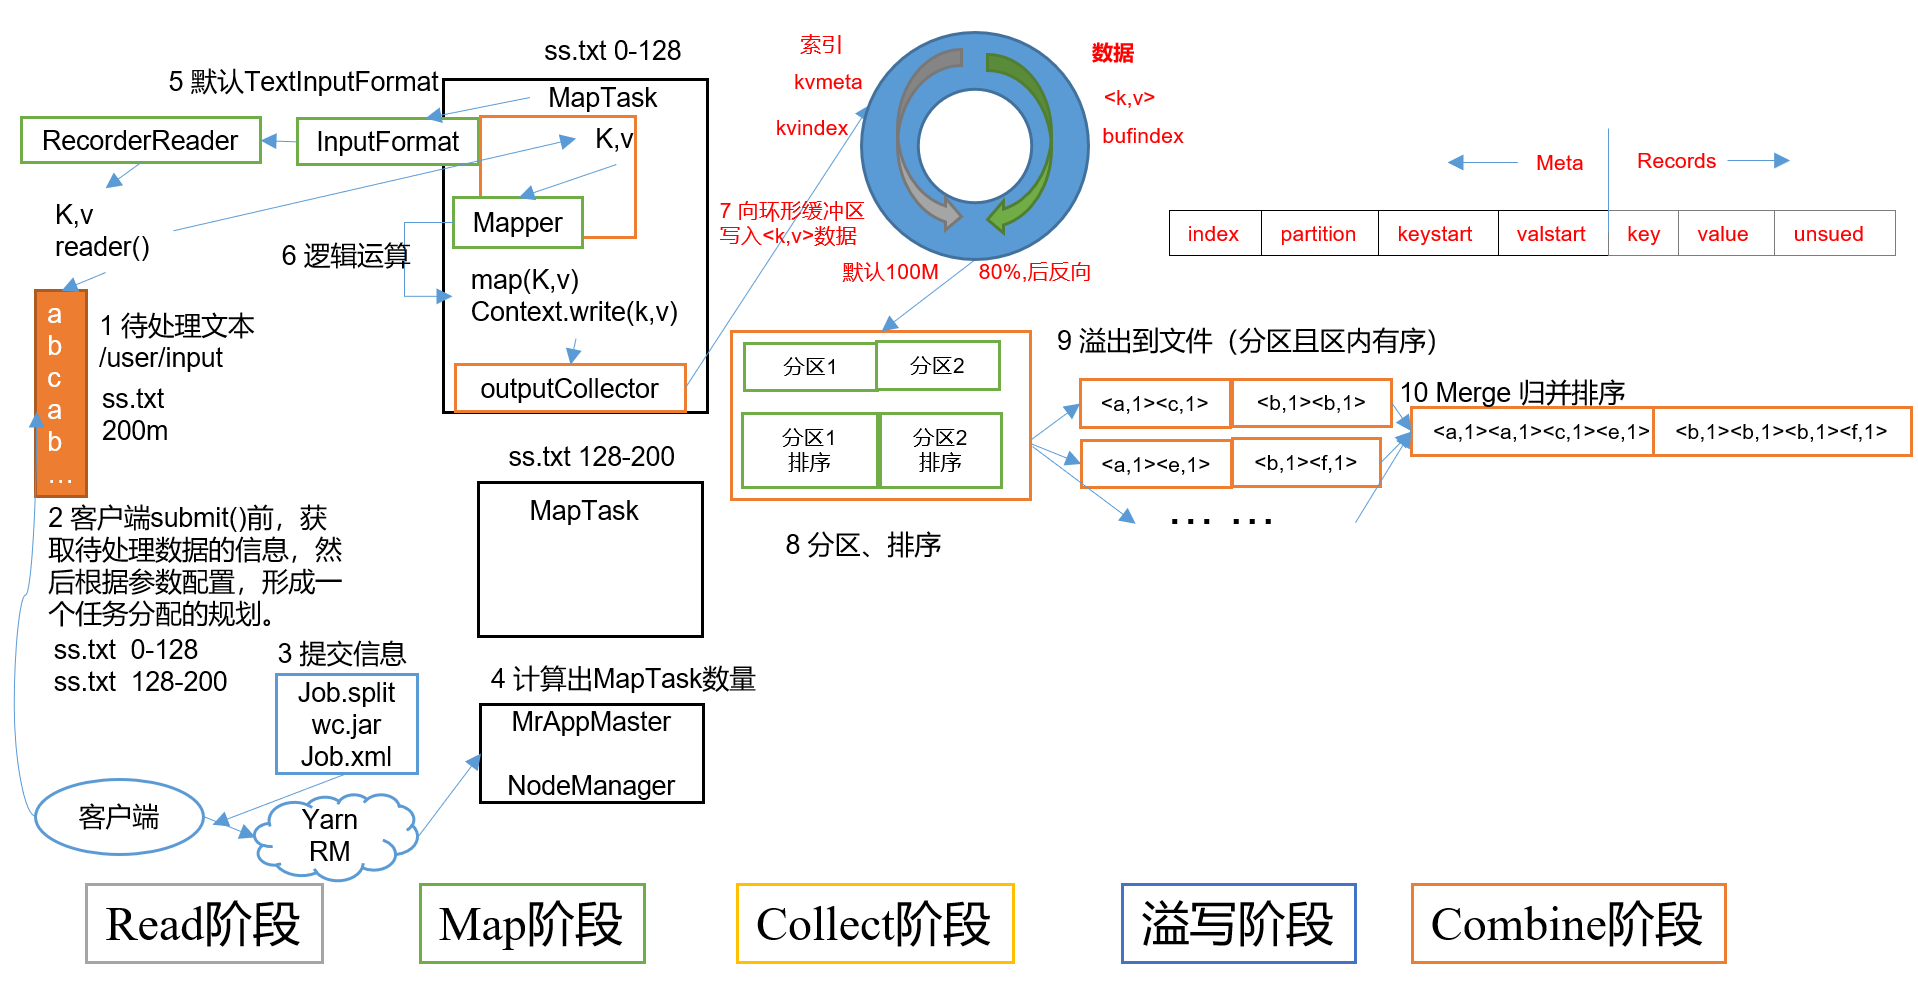
InputFormat数据输入

TextFileInputFormat(默认)
①简单的按照文件的内容长度进行切片
②切片大小,默认等于Block大小
③切片是不考虑数据集整体,而是逐个针对每个文件单独切片
④key为每行首单词再全文本的偏移量,value为行内容
切片案例:
file_1.txt 350M  ->  file_1.txt.split1 128M;file_1.txt.split2 128M;file_3.txt.split1 94M
file_2.txt 10M   ->  file_2.txt.split1 10M
file_3.txt 129M  ->  file_3.txt.split1 129M
注:物理存储是128M一块,切片是最后一片大小可以是存储的1.1倍
CombineTextInputFormat
框架默认的TextInputFormat切片机制是对任务按文件规划切片,不管文件多小,都会是一个单独的切片,都会交给一个MapTask,这样如果有大量小文件,就会产生大量的MapTask,处理效率极其低下。CombineTextInputFormat将多个小文件规划成一个大切片。
①提高小文件处理效率
②key为每行首单词再全文本的偏移量,value为行内容
切片案例:
①如果最大切片大小设置为4M,文件剩余大小大于4M但小于8M则将最后两端进行平均切分
file_1.txt 10M  ->  file_1.txt.split1 4M;file_1.txt.split2 3M;file_1.txt.split3 3M
file_2.txt 2M   ->  file_2.txt.split1 2M
file_3.txt 6M   ->  file_3.txt.split1 3M;file_3.txt.split2 3M
②进行组合,两个切片相加小于4M继续加,如果大于等于4M则停止且为一个切片
切片1:file_1.txt.split1 4M;
切片2:file_1.txt.split2 3M;file_3.txt.split1 3M;
切片3:file_2.txt.split1 2M;file_3.txt.split1 3M;
切片4:file_3.txt.split2 3M
代码设置:
job.setInputFormatClass(CombineTextInputFormat.class);
CombineTextInputFormat.setMaxInputSplitSize(job, 128 * 1024 * 1024);// 128m
KeyValueTextInputFormat
①以每行首单词(自定义切分规则)作为key,行除去key的内容作为value
②切片大小,默认等于Block大小
// 设置切割符,必须再得到job实例之前
configuration.set(KeyValueLineRecordReader.KEY_VALUE_SEPERATOR, " ");
Job job = Job.getInstance(configuration);
job.setInputFormatClass(KeyValueTextInputFormat.class);
NLineInputFormat
①按照行切分,切片数为行数/N有余数加一
②key为行号,value为行内容
NLineInputFormat.setNumLinesPerSplit(job, 3);
job.setInputFormatClass(NLineInputFormat.class);
自定义InputFormat
定义Format
public class CustomArchiveInputFormat extends FileInputFormat<Text, BytesWritable> {

  @Override
  public RecordReader<Text, BytesWritable> createRecordReader(InputSplit split, TaskAttemptContext context) throws IOException, InterruptedException {
    CustomArchiveRecordReader customArchiveRecordReader = new CustomArchiveRecordReader();
    customArchiveRecordReader.initialize(split, context);
    return customArchiveRecordReader;
  }

  /* 文件是否可以在逻辑上进行切分 */
  @Override
  protected boolean isSplitable(JobContext context, Path filename) {
    return false;
  }

  /* 调用父方法,返回的列表包含文件夹,再将父方法返回的数据再次过滤 */
  @Override
  protected List<FileStatus> listStatus(JobContext job) throws IOException {
    List<FileStatus> statusList = super.listStatus(job);
    return statusList.stream().filter(FileStatus::isFile).collect(Collectors.toList());
  }
}
定义RecordReader
@Slf4j
public class CustomArchiveRecordReader extends RecordReader<Text, BytesWritable> {

  private FileSplit split;
  private TaskAttemptContext context;
  private BytesWritable currentValue = new BytesWritable();
  private Text currentKey = new Text();
  // 每次mapper都会创建一个新的,所以初始化都为true
  private boolean isBegin = true;

  @Override
  public void initialize(InputSplit split, TaskAttemptContext context) throws IOException, InterruptedException {
    this.split = (FileSplit) split;
    this.context = context;
  }

  @Override
  public boolean nextKeyValue() throws IOException, InterruptedException {
    log.info("File【{}】开始处理", split.getPath().getName());
    if (isBegin) {
      byte[] contents = new byte[(int)split.getLength()];
      Path path = split.getPath();
      FileSystem fileSystem = path.getFileSystem(context.getConfiguration());
      FSDataInputStream inputStream = fileSystem.open(path);
      currentKey.set(path.getName());
      IOUtils.readFully(inputStream, contents, 0, contents.length);
      currentValue.set(contents, 0, contents.length);
      isBegin = false;
      return true;
    }
    return false;
  }

  @Override
  public Text getCurrentKey() throws IOException, InterruptedException {
    return currentKey;
  }

  @Override
  public BytesWritable getCurrentValue() throws IOException, InterruptedException {
    return currentValue;
  }

  @Override
  public float getProgress() throws IOException, InterruptedException {
    return 0;
  }

  @Override
  public void close() throws IOException {
    log.info("File【{}】已完成", split.getPath().getName());
  }
}
定义Mapper和Reducer
@Slf4j
public class CustomArchiveMapper extends Mapper<Text, BytesWritable, Text, BytesWritable> {

  @Override
  protected void map(Text key, BytesWritable value, Context context) throws IOException, InterruptedException {
    context.write(key, value);
  }
}

@Slf4j
public class CustomArchiveReducer extends Reducer<Text, BytesWritable, Text, BytesWritable> {

  @Override
  protected void reduce(Text key, Iterable<BytesWritable> values, Context context) throws IOException, InterruptedException {
    context.write(key, values.iterator().next());
  }
}
定义Driver
public class CustomArchiveDriver {

  public static void main(String[] args) throws Exception {
    // 获取JOB
    Configuration configuration = new Configuration();
    configuration.set("fs.defaultFS", "hdfs://192.168.1.161:9000");
    Job job = Job.getInstance(configuration);
    // 设置jar位置
    job.setJarByClass(CustomArchiveDriver.class);
    // 关联Mapper和Reducer
    job.setMapperClass(CustomArchiveMapper.class);
    job.setReducerClass(CustomArchiveReducer.class);
    job.setInputFormatClass(CustomArchiveInputFormat.class);
    // 设置Mapper阶段输出的KV类型
    job.setMapOutputKeyClass(Text.class);
    job.setMapOutputValueClass(BytesWritable.class);
    // 设置最后输出的KV类型
    job.setOutputKeyClass(Text.class);
    job.setOutputValueClass(BytesWritable.class);
    // 设置程序输出的输入路径和输出路径
    FileInputFormat.setInputPaths(job, new Path("hdfs://192.168.1.161:9000/input"));
    FileOutputFormat.setOutputPath(job, new Path("hdfs://192.168.1.161:9000/output"));
    // 提交JOB
    job.submit();
    job.waitForCompletion(true);
  }
}
分区
Maper通过Collector输出到环形缓冲区的使用默认分区是HashPartition分区,是根据key的hashCode对ReducerTask个数取模得到的,用户无法控制输出到哪个分区。可以通过自定义Partition进行控制。
/**
 * 一下代码没用取模的方式,所以如果taskNum设置小于5,返回值会大于numPartitions
 * 分区号必须从0开始,逐一累加
 */
public class CustomPartition extends Partitioner<Text, FlowerBean> {
  @Override
  public int getPartition(Text text, FlowerBean flowerBean, int numPartitions) {
    String phone = text.toString();
    if(phone.startsWith("139")) {
      return 0;
    }
    if(phone.startsWith("183")) {
      return 1;
    }
    if(phone.startsWith("135")) {
      return 2;
    }
    if(phone.startsWith("137")) {
      return 3;
    }
    return 4;
  }
}

public class FlowerDriver {
  public static void main(String[] args) throws Exception {
    // 。。。
    job.setPartitionerClass(CustomPartition.class);
    job.setNumReduceTasks(5);
    // 。。。
  }
}
如果[ ReduceTask的数量 > Partition的数量 ],则会产生几个空的输出文件
如果[ 1 < ReduceTask的数量 < Partition的数量 ],则部分数据因为找不到输出文件报错
如果[ ReduceTask的数量 = 1 ],则不管MapTask端输出,最终都输出到一个文件
排序
MapTask和ReduceTask均会对数据按照Key进行排序。该操作属于Hadoop的默认行为。任何程序数据均会被排序,而不管逻辑上是否需要。默认是使用快速排序按照字典顺序排序。
- MapTask过程中每次溢写磁盘需要进行快速排序,合并溢写文件要进行归并排序。
- ReduceTask进行分区汇总时,如果发生溢写操作也会进行快速排序,最后合并溢写文件
自定义排序
Bean对象要实现WritableComparable接口重写compareTo方法
/**
 * 现象:reducer并未将价格加和
 * 原理:进入顺序
 *      <0000001,33.8>
 *      <0000001,222.8>
 *      <0000002,122.4>
 *      ......
 *
 *    实际数据                      reducer结果
 * 0000001  222.8       ==>      0000001  33.8
 * 0000002  722.4                0000001  222.8
 * 0000001  33.8                 0000002  122.4
 * 0000003  232.8                0000002  522.8
 * 0000003  33.8                 0000002  722.4
 * 0000002  522.8                0000003  33.8
 * 0000002  122.4                0000003  232.8
 */
@Data
public class OrderBean implements WritableComparable<OrderBean> {
  private int orderId; // 订单id号
  private double price; // 价格

  @Override
  public int compareTo(OrderBean o) {
    int orderIdCompare = Integer.compare(this.getOrderId(), o.getOrderId());
    return orderIdCompare == 0 ? Double.compare(this.getPrice(), o.getPrice()) : orderIdCompare;
  }

  @Override
  public void write(DataOutput out) throws IOException {
    out.writeInt(orderId);
    out.writeDouble(price);
  }

  @Override
  public void readFields(DataInput in) throws IOException {
    orderId = in.readInt();
    price = in.readDouble();
  }
}

public class OrderReducer extends Reducer<OrderBean, NullWritable, OrderBean, NullWritable> {

  @Override
  protected void reduce(OrderBean key, Iterable<NullWritable> values, Context context) throws IOException, InterruptedException {
    OrderBean currentKey = new OrderBean();
    for (NullWritable value : values) {
      currentKey.setOrderId(key.getOrderId());
      currentKey.setPrice(currentKey.getPrice() + key.getPrice());
      currentKey.setDate(key.getDate());
    }
    context.write(currentKey, NullWritable.get());
  }
}
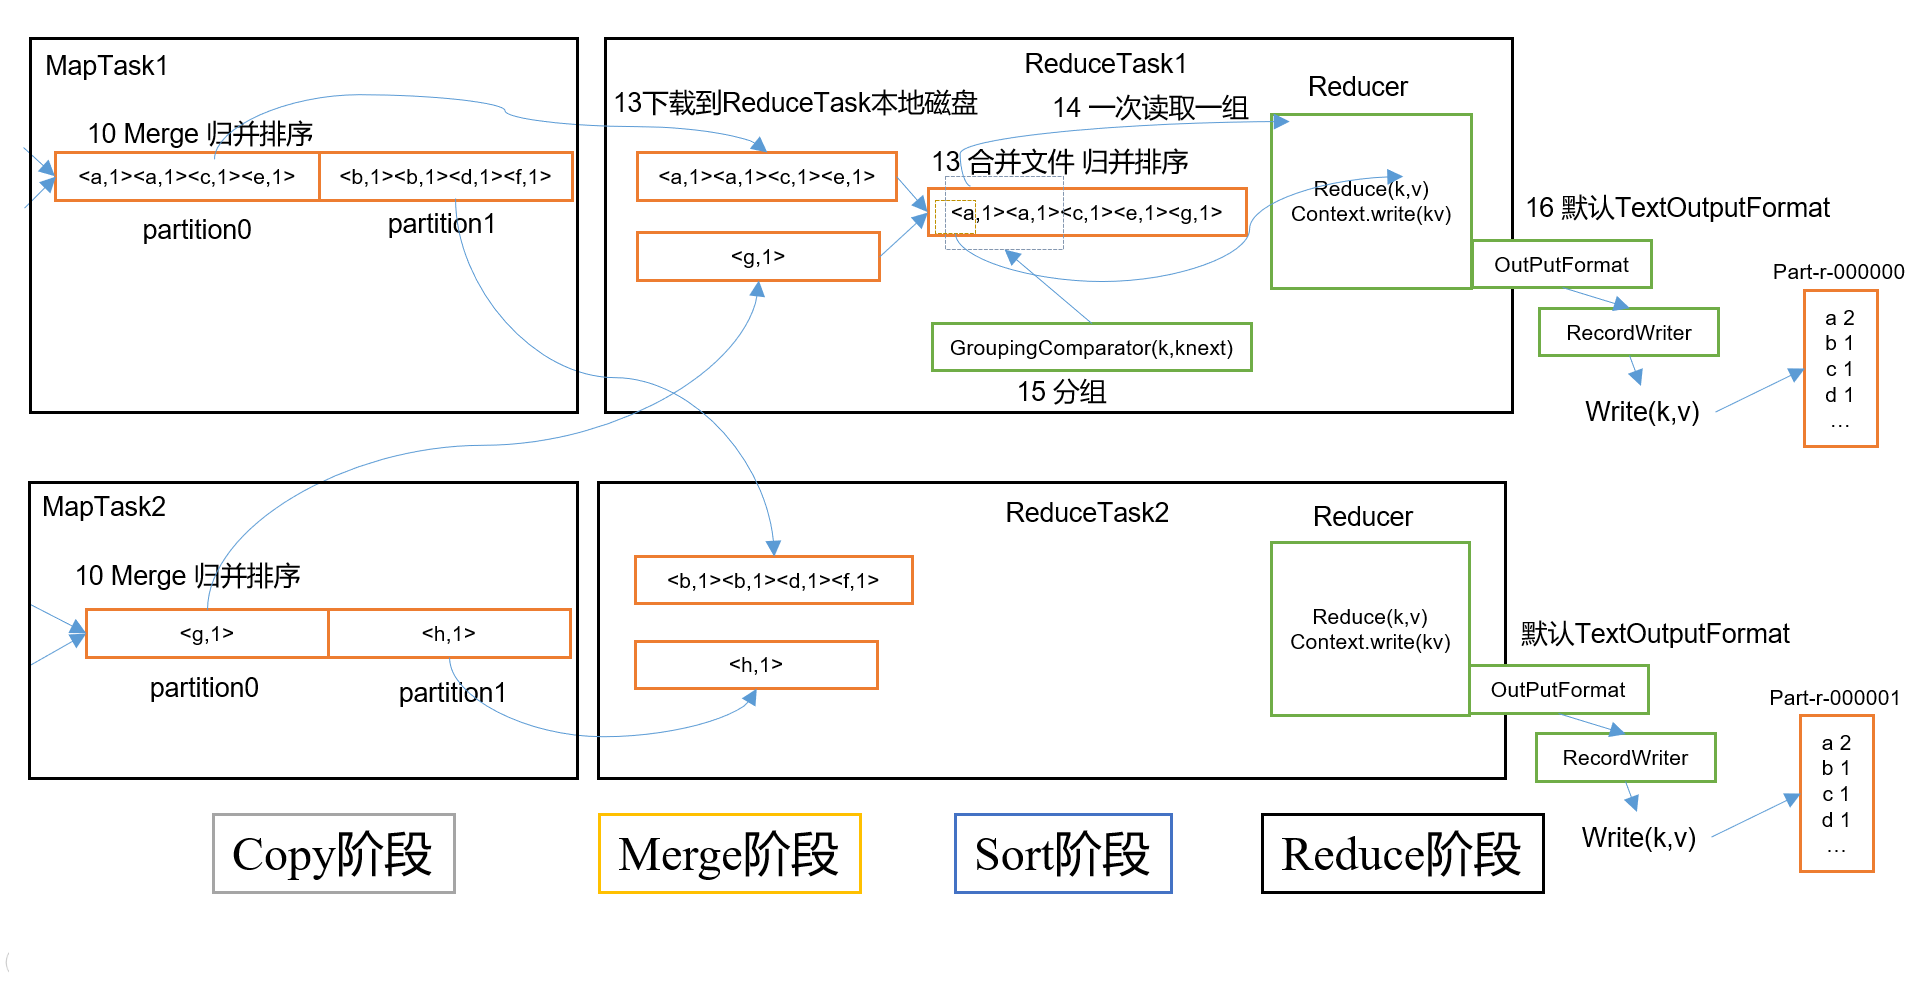
分组排序
指对Reduce阶段的数据根据某一个或几个字段进行分组, ReducerTask会按照Key进行分组,判断下一个key是否相同,将同组的Key传给reduce()执行
/**
 * 现象:reducer并将价格加和了
 * 原理:进入顺序
 *      <0000001,33.8,2020-09-14> <0000001,222,2020-09-14>
 *      <0000002,122.4,2020-09-10>
 *      <0000002,522.8,2020-09-14>
 *      <0000002,722.4,2020-09-12>
 *      <0000003,33.8,2020-09-11> <0000003,232.8,2020-09-11>
 *      ......
 *
 *    实际数据                                      reducer结果
 * 0000001 222    2020-09-14       ==>      0000001 255.8 2020-09-14
 * 0000002 722.4  2020-09-12                0000002 122.4 2020-09-10
 * 0000001 33.8   2020-09-14                0000002 522.8 2020-09-14
 * 0000003 232.8  2020-09-11                0000002 722.4 2020-09-12
 * 0000003 33.8   2020-09-11                0000003 266.6 2020-09-11
 * 0000002 522.8  2020-09-14
 * 0000002 122.4  2020-09-10
 */
@Data
public class OrderBean implements WritableComparable<OrderBean> {

  private int orderId;
  private double price;
  private String date;

  @Override
  public int compareTo(OrderBean o) {
    int orderIdCompare = Integer.compare(this.getOrderId(), o.getOrderId());
    return orderIdCompare == 0 ? Double.compare(this.getPrice(), o.getPrice()) : orderIdCompare;
  }

  @Override
  public void write(DataOutput out) throws IOException {
    out.writeInt(orderId);
    out.writeDouble(price);
    out.writeUTF(date);
  }

  @Override
  public void readFields(DataInput in) throws IOException {
    orderId = in.readInt();
    price = in.readDouble();
    date = in.readUTF();
  }
}

public class OrderGroupingComparator extends WritableComparator {

  public OrderGroupingComparator() {
    super(OrderBean.class,true);
  }

  @Override
  public int compare(WritableComparable a, WritableComparable b) {
    OrderBean aBean = (OrderBean) a;
    OrderBean bBean = (OrderBean) b;
    return aBean.getDate().compareTo(bBean.getDate());
  }
}

// 获得数据按照orderId分组price排序
public class OrderReducer extends Reducer<OrderBean, NullWritable, OrderBean, NullWritable> {

  @Override
  protected void reduce(OrderBean key, Iterable<NullWritable> values, Context context) throws IOException, InterruptedException {
    OrderBean currentKey = new OrderBean();
    for (NullWritable value : values) {
      currentKey.setOrderId(key.getOrderId());
      currentKey.setPrice(currentKey.getPrice() + key.getPrice());
    }
    context.write(currentKey, NullWritable.get());
  }
}
Combiner合并
Combiner在每个MapTask节点运行溢写排序和合并分区的过程中工作。Combiner的存在意义是对每个MapTask的结果进行局部汇总,以减少网络传输量。Combiner能够使用的前提是不影响最终结果【平均值之类的操作一定不能用Combiner】
Combiner的使用方为两种:①自定义Combiner类实现Reducer方法;②直接设置Combiner为Reducer的实现类方法
OutputFormat数据输出
默认的输出格式是TextOutputFormat,它把每条记录写为文本行。它的键和值可以是任格式,因为它的格式紧凑,很容易被压缩。
可根据需求自定义OutputFormat
public class LogOutputFormat extends FileOutputFormat<Text, NullWritable> {
  @Override
  public RecordWriter<Text, NullWritable> getRecordWriter(TaskAttemptContext job) throws IOException, InterruptedException {
    return new LogRecordWriter(job);
  }
}

/**
 * 将数据根据行首字母分类
 */
public class LogRecordWriter extends RecordWriter<Text, NullWritable> {

  private FSDataOutputStream outA_Q;
  private FSDataOutputStream outR_Z;

  public LogRecordWriter(TaskAttemptContext job) {
    try {
      Configuration configuration = job.getConfiguration();
      FileSystem fileSystem = FileSystem.get(configuration);
      String dir = configuration.get(FileOutputFormat.OUTDIR);
      outA_Q = fileSystem.create(new Path(dir + "/" + "a-q.text"));
      outR_Z = fileSystem.create(new Path(dir + "/" + "r-z.text"));
    } catch (IOException e) {
      e.printStackTrace();
    }
  }

  @Override
  public void write(Text key, NullWritable value) throws IOException, InterruptedException {
    String keyStr = key.toString();
    if(StringUtils.isNotBlank(keyStr)) {
      char firstChar = keyStr.toLowerCase().charAt(0);
      if ('a' <= firstChar && firstChar <= 'q') {
        outA_Q.writeUTF(keyStr + "\n");
      } else {
        outR_Z.writeBytes(keyStr + "\n");
      }
    }
  }

  @Override
  public void close(TaskAttemptContext context) throws IOException, InterruptedException {
    outA_Q.close();
    outR_Z.close();
  }
}
Join的应用
Join时Map端的主要工作:为来自不同表或文件的key/value对,打标签以区别不同来源的记录。然后用连接字段作为key,其余部分和新加的标志作为value,最后进行输出。
Join时Reduce端的主要工作:在Reduce端以连接字段作为key的分组已经完成,我们只需要在每一个分组当中将那些来源于不同文件的记录(在Map阶段已经打标志)分开,最后进行合并。
Reduce Join
在Reduce过程中进行Join操作
缺点:这种方式中,合并的操作是在Reduce阶段完成,Reduce端的处理压力太大,Map节点的运算负载则很低,资源利用率不高, 且在Reduce阶段极易产生数据倾斜。
@Data
public class TableBean implements Writable {
  private String orderId;
  private String productId;
  private String name;
  private int count;
  private String flag; // 表的标记

  @Override
  public void write(DataOutput out) throws IOException {
    out.writeUTF(orderId);
    out.writeUTF(productId);
    out.writeUTF(name);
    out.writeInt(count);
    out.writeUTF(flag);
  }

  @Override
  public void readFields(DataInput in) throws IOException {
    orderId = in.readUTF();
    productId = in.readUTF();
    name = in.readUTF();
    count = in.readInt();
    flag = in.readUTF();
  }

  @Override
  public String toString() {
    return orderId + '\t' +  name + '\t' + count + '\t';
  }
}

// 分类
public class TableMapper extends Mapper<LongWritable, Text, Text, TableBean> {
  private String fileName;
  private TableBean tableBean = new TableBean();
  private Text pId = new Text();

  @Override
  protected void setup(Context context) throws IOException, InterruptedException {
    FileSplit inputSplit = (FileSplit)context.getInputSplit();
    fileName = inputSplit.getPath().getName();
  }

  @Override
  protected void map(LongWritable key, Text value, Context context) throws IOException, InterruptedException {
    String[] data = value.toString().split("\t");
    if(fileName.startsWith("order")) {
      tableBean.setOrderId(data[0]);
      tableBean.setProductId(data[1]);
      pId.set(data[1]);
      tableBean.setCount(Integer.parseInt(data[2]));
      tableBean.setName("");
      tableBean.setFlag("order");
      context.write(pId, tableBean);
    }

    if(fileName.startsWith("product")) {
      tableBean.setOrderId("");
      tableBean.setCount(0);
      tableBean.setProductId(data[0]);
      tableBean.setName(data[1]);
      pId.set(data[0]);
      tableBean.setFlag("product");
      context.write(pId, tableBean);
    }
  }
}

public class TableReducer extends Reducer<Text, TableBean, TableBean, NullWritable> {

  @Override
  protected void reduce(Text key, Iterable<TableBean> values, Context context) throws IOException, InterruptedException {

    List<TableBean> orderBeans = new ArrayList<>();
    TableBean productBean = new TableBean();

    // 必须重新copy对象,不然iterator时使用自己填充,会将记录后移
    for (TableBean value : values) {
      if(value.getFlag().equals("order")) {
        TableBean bean = new TableBean();
        BeanUtil.copyProperties(value, bean);
        orderBeans.add(bean);
      } else {
        BeanUtil.copyProperties(value, productBean);
      }
    }

    for (TableBean orderBean : orderBeans) {
      TableBean record = new TableBean();
      BeanUtil.copyProperties(orderBean, record);
      record.setName(productBean.getName());
      context.write(record, NullWritable.get());
    }
  }
}
Map Join
Map Join适用于一张表十分小、一张表很大的场景。在Map端缓存多张表,提前处理业务逻辑,这样增加Map端业务,减少Reduce端数据的压力,尽可能的减少数据倾斜。
public class TableMapper extends Mapper<LongWritable, Text, Text, NullWritable> {

  private Map<String, String> productMap = new HashMap<>();
  private Text k = new Text();

  @Override
  protected void setup(Context context) throws IOException, InterruptedException {
    // 1 获取缓存的文件
    URI[] cacheFiles = context.getCacheFiles();
    String path = cacheFiles[0].getPath();
    Configuration configuration = context.getConfiguration();
    FileSystem fileSystem = FileSystem.get(configuration);
    FSDataInputStream fileStream = fileSystem.open(new Path(path));
    BufferedReader reader = new BufferedReader(new InputStreamReader(fileStream));
    String line;
    while(StringUtils.isNotEmpty(line = reader.readLine())){
      // 2 切割
      String[] fields = line.split("\t");
      // 3 缓存数据到集合
      productMap.put(fields[0], fields[1]);
    }
    // 4 关流
    reader.close();
  }

  @Override
  protected void map(LongWritable key, Text value, Context context) throws IOException, InterruptedException {
    // 1 获取一行
    String line = value.toString();
    // 2 截取
    String[] fields = line.split("\t");
    // 3 获取产品id
    String pId = fields[1];
    // 4 获取商品名称
    String pdName = productMap.get(pId);
    // 5 拼接
    k.set(line + "\t"+ pdName);
    // 6 写出
    context.write(k, NullWritable.get());
  }
}

public class DistributedCacheDriver {

    public static void main(String[] args) throws Exception {
        Configuration configuration = new Configuration();
        configuration.set("fs.defaultFS", "hdfs://192.168.1.161:9000");

        Job job = Job.getInstance(configuration);
        // 设置缓存文件
        job.addCacheFile(new URI("hdfs://192.168.1.161:9000/join/product.txt"));

        job.setMapOutputKeyClass(Text.class);
        job.setMapOutputValueClass(NullWritable.class);

        job.setMapperClass(TableMapper.class);

        job.setJarByClass(DistributedCacheDriver.class);

        FileInputFormat.setInputPaths(job, new Path("hdfs://192.168.1.161:9000/join"));
        FileOutputFormat.setOutputPath(job, new Path("hdfs://192.168.1.161:9000/output"));
        job.submit();
        job.waitForCompletion(true);
    }
}
计数器应用
Hadoop为每个作业维护若干内置计数器,以描述多项指标。例如,某些计数器记录已处理的字节数和记录数,使用户可监控已处理的输入数据量和已产生的输出数据量。
/* 可使用字符串区分 */
context.getCounter("status", "success").increment(1);
context.getCounter("status", "fail").increment(1);

/* 可使用枚举 */
context.getCounter(HttpStatus.SUCCESS).increment(1);
context.getCounter(HttpStatus.FAIL).increment(1);
九、数据压缩
压缩算法
鉴于磁盘I/O和网络带宽是Hadoop的宝贵资源,数据压缩对于节省资源、最小化磁盘I/O和网络传输非常有帮助。可以在任意MapReduce阶段启用压缩。 不过,尽管压缩与解压操作的CPU开销不高,其性能的提升和资源的节省并非没有代价。
Hadoop支持的压缩编码
| 压缩格式 | hadoop自带 | 算法 | 文件扩展名 | 是否可切分 | 换压缩格式后原程序是否需要修改 |
|---|---|---|---|---|---|
| DEFLATE | 是 | DEFLATE | .deflate | 否 | 和文本处理一样,不需要修改 |
| Gzip | 是 | DEFLATE | .gz | 否 | 和文本处理一样,不需要修改 |
| bzip2 | 是 | bzip2 | .bz2 | 是 | 和文本处理一样,不需要修改 |
| LZO | 否 | LZO | .lzo | 是 | 需要建索引,还需要指定输入格式 |
| Snappy | 否 | Snappy | .snappy | 否 | 和文本处理一样,不需要修改 |
- Gzip压缩
- 优点:压缩率比较高,而且压缩解压速度也比较快;Hadoop本身支持,在应用中处理Gzip格式的文件就和直接处理文本一样;大部分Linux系统都自带Gzip命令,使用方便。
- 缺点:不支持Split。
- 应用场景:当每个文件压缩之后在130M以内的(1个块大小内),都可以考虑用Gzip压缩格式。
- Bzip2压缩
- 优点:支持Split;具有很高的压缩率,比Gzip压缩率高; Hadoop本身自带,使用方便。
- 缺点:压缩解压速度慢。
- 应用场景:适合对速度要求不高,但需要较高的压缩率的时候,或者输出之后的数据比较大,处理之后的数据需要压缩存档减少磁盘空间并且以后数据用得比较少的情况,或者对单个很大的文本文件想压缩减少存储空间,同时又需要支持Split,而且兼容之前的应用程序的情况。
- Lzo压缩
- 优点:压缩解压速度也比较快,合理的压缩率;支持Split,可以在Linux系统下安装lzop命令,使用方便。
- 缺点:压缩率比Gzip要低一些,Hadoop本身不支持,需要安装;在应用中对Lzo格式的文件需要做一-些特殊处理(为了支持Split需要建索引,还需要指定InputFormat为Lzo格式)。
- 应用场景:一个很大的文本文件,压缩之后还大于200M以上的可以考虑,而且单个文件越大,Lzo优点越越明显。
- Snappy压缩
- 优点:高速压缩速度和合理的压缩率。
- 缺点:不支持Split,压缩率比Gzip要低,Hadoop本身不支持, 需要安装。
- 应用场景:当MapReduce作业的Map输出的数据比较大的时候,作为Map到Reduce的中间数据的压缩格式,或者作为一个MapReduce作业的输出和另外一个MapReduce作业的输入。
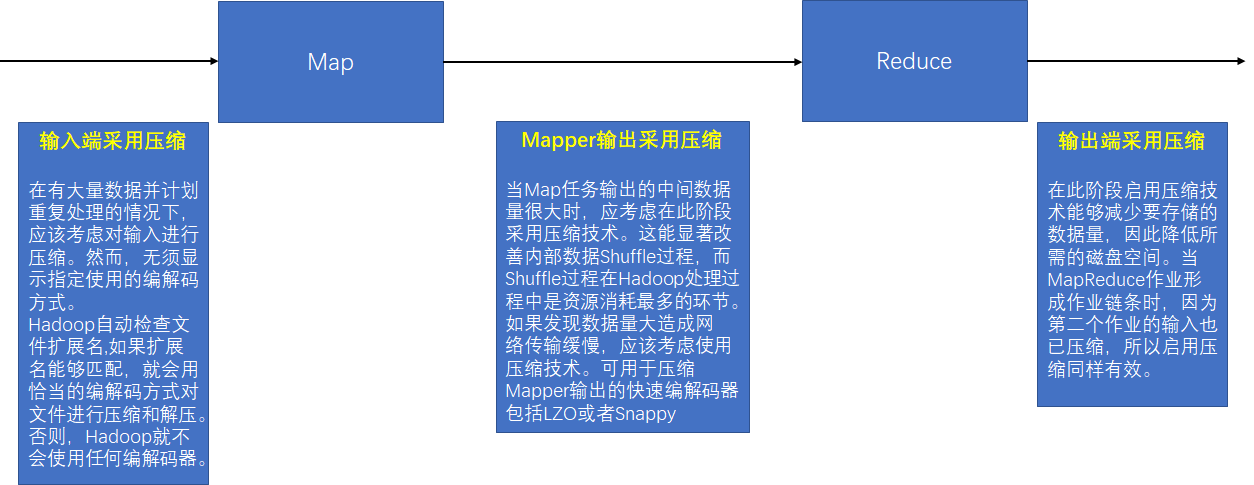
压缩位置选择
压缩参数配置
编码器
| 压缩格式 | 编码器 |
|---|---|
| DEFLATE | org.apache.hadoop.io.compress.DefaultCodec |
| gzip | org.apache.hadoop.io.compress.GzipCodec |
| bzip2 | org.apache.hadoop.io.compress.BZip2Codec |
| LZO | com.hadoop.compression.lzo.LzopCodec |
| Snappy | org.apache.hadoop.io.compress.SnappyCodec |
配置文件参数
core-site.xml配置
<!-- 输入压缩,Hadoop使用文件扩展名判断是否支持某种编解码器,默认以下值 -->
<property>
  <name>io.compression.codecs</name>
  <value>org.apache.hadoop.io.compress.DefaultCodec,org.apache.hadoop.io.compress.GzipCodec,org.apache.hadoop.io.compress.BZip2Codec</value>
</property>
mapred-site.xml配置
<!-- 这个参数设为true启用Mapper输出压缩 -->
<property>
  <name>mapreduce.map.output.compress</name>
  <value>false</value>
</property>

<!-- Mapper输出压缩格式,企业多使用LZO或Snappy编解码器在此阶段压缩数据 -->
<property>
  <name>mapreduce.map.output.compress.codec</name>
  <value>org.apache.hadoop.io.compress.DefaultCodec</value>
</property>

<!-- Reducer输出是否压缩 -->
<property>
  <name>mapreduce.output.fileoutputformat.compress</name>
  <value>false</value>
</property>

<!-- Reducer输出压缩格式 -->
<property>
  <name>mapreduce.output.fileoutputformat.compress.codec</name>
  <value>org.apache.hadoop.io.compress.DefaultCodec</value>
</property>

<!-- 压缩类型行压缩(RECORD)、块压缩(BLOCK)、无压缩(NONE),建议块压缩 -->
<property>
  <name>mapreduce.output.fileoutputformat.compress.type</name>
  <value>RECORD</value>
</property>
代码设置
// 开启map端输出压缩
configuration.setBoolean("mapreduce.map.output.compress", true);
// 设置map端输出压缩方式
configuration.setClass("mapreduce.map.output.compress.codec", BZip2Codec.class, CompressionCodec.class);

// 设置reduce端输出压缩开启
FileOutputFormat.setCompressOutput(job, true);
// 设置压缩的方式
FileOutputFormat.setOutputCompressorClass(job, BZip2Codec.class);
LZO安装
| 下载LZO | 下载lzop | 下载hadoop-lzo-master |
第一步:编译安装lzo与lzop【每台机器都需要】
# lzo
tar -xvzf   lzo-[version].tar.gz
./configure --enable-shared
make -j 10
make install
cp /usr/local/lib/*lzo* /usr/lib

# lzop
tar -xvzf lzop-[version].tar.gz
./configure
make -j 10
make install
第二步:安装、编译hadoop-lzo-master
unzip master.zip
# 编辑pom.xml修改hadoop的版本号与集群中hadoop版本一致
# <hadoop.current.version>2.10.0</hadoop.current.version>
# 安装配置好maven

# 导入安装需要的变量
export CFLAGS=-m64
export CXXFLAGS=-m64
export C_INCLUDE_PATH=/opt/module/hadoop/lzo/include
export LIBRARY_PATH=/opt/module/hadoop/lzo/lib

# maveb编译
mvn clean package -Dmaven.test.skip=true

# copy编译后的文件
cd target/native/Linux-amd64-64/
mkdir ~/hadoop-lzo-files
tar -cBf - -C lib . | tar -xBvf - -C ~/hadoop-lzo-files
第三步:拷贝编译后的文件【每台机器都需要】
cp ~/hadoop-lzo-files/libgplcompression*  $HADOOP_HOME/lib/native/
cp target/hadoop-lzo-0.4.21-SNAPSHOT.jar $HADOOP_HOME/share/hadoop/common/
第四步:配置hadoop配置文件【每台机器都需要】
配置core-site.xml
<property>
  <name>io.compression.codecs</name>
  <value>org.apache.hadoop.io.compress.GzipCodec,
    org.apache.hadoop.io.compress.DefaultCodec,
    com.hadoop.compression.lzo.LzoCodec,
    com.hadoop.compression.lzo.LzopCodec,
    org.apache.hadoop.io.compress.BZip2Codec
  </value>
</property>
<property>
  <name>io.compression.codec.lzo.class</name>
  <value>com.hadoop.compression.lzo.LzoCodec</value>
</property>
配置mapred-site.xml
<property>
  <name>mapred.compress.map.output</name>
  <value>true</value>
</property>
<property>
  <name>mapred.map.output.compression.codec</name>
  <value>com.hadoop.compression.lzo.LzoCodec</value>
</property>
Snappy安装
第一步:安装snappy
./configure
make
make install
第二步:和Hadoop一起编译
mvn package -Pdist,native -DskipTests -Dmaven.javadoc.skip=true -Dtar -Dsnappy.lib=/usr/local/lib -Dbundle.snappy
编译的hadoop下的lib/native已经存在
- libsnappy.la
- libsnappy.so.1
- libsnappy.so
- libsnappy.so.1.3.1
- libsnappy.a
第三步:拷贝所有snappy的lib到集群所有hadoop机器的lib/native下
第四步:查看是否成功
hadoop checknative
十、Yarn资源调度器
Yarn基本架构
YARN主要由ResourceManager、NodeManager、ApplicationMaster和Container等组件构成
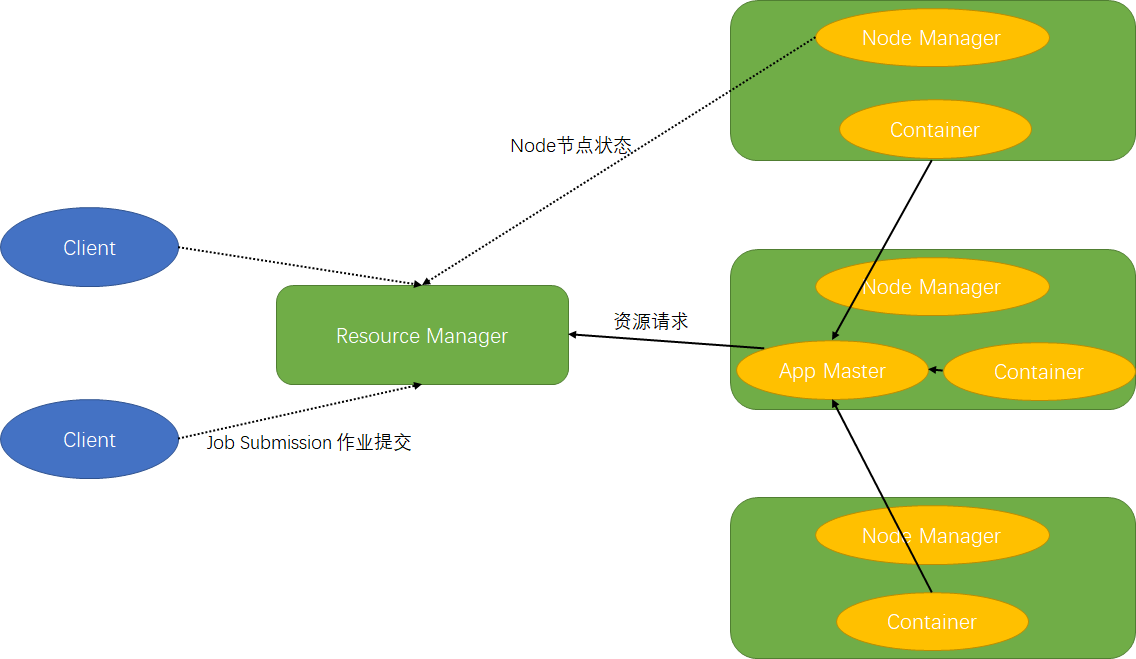
Resource Manager
①处理客户端请求;②监控NodeManager;③启动或监控App Master;④资源分配和调度
Node Manager
①管理单个节点上的资源;②处理来自ReourceManager的命令;③处理来自App Master的命令
App Master
①负责数据的切分;②为应用程序申请资源并分配内部任务;③任务的监控与容错
Container
封装节点上多维度资源,例如:CPU、内存、磁盘、网络等
Yarn工作机制
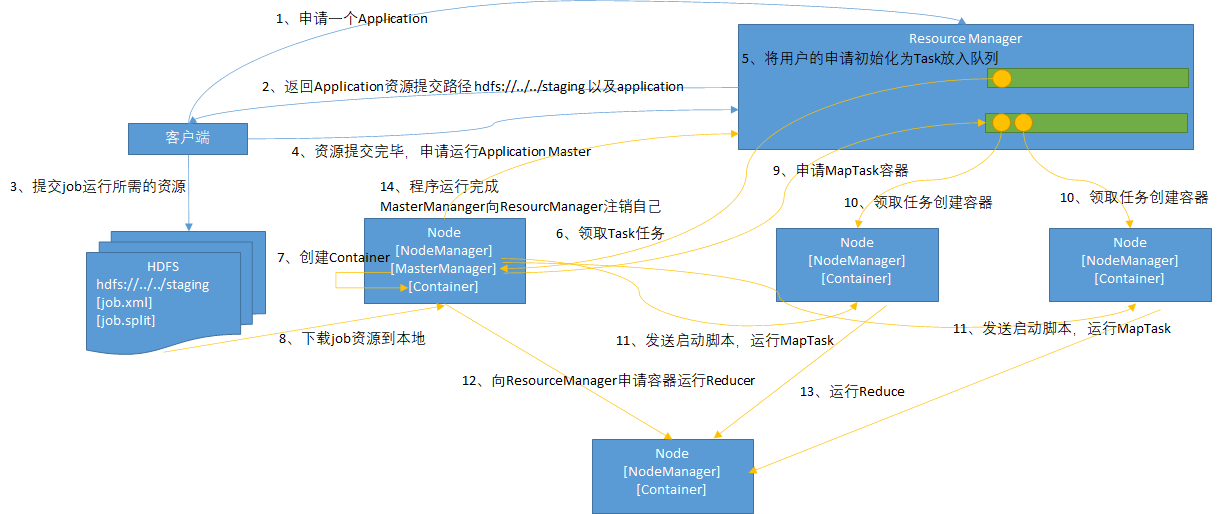
【1】作业提交
前置步骤:Client调用job.waitForCompletion方法,向整个集群提交MapReduce作业
第1步:Client向RM申请一个作业id
第2步:ResourceManager给Client返回该job资源的提交路径和作业id
第3步:Client提交jar包、切片信息和配置文件到指定的资源提交路径
第4步:Client提交完资源后,向RM申请运行AppMaster
【2】作业初始化
第5步:当RM收到Client的请求后,将该job添加到容量调度器中
第6步:某一个空闲的NM领取到该Job
第7步:该NodeMananger创建Container,并产生AppMaster
第8步:下载Client提交的资源到本地
【3】任务分配
第9步:AppMaster向ResourceManager申请运行多个MapTask任务资源
第10步:ResourceManager将运行MapTask任务分配给NodeManager,NodeManager分别领取任务并创建容器
【4】任务运行
第11步:ResourceManager向接收到任务的NodeManager发送程序启动脚本,这些NodeManager分别启动MapTask,MapTask对数据分区排序
第12步:AppMaster等待所有MapTask运行完毕后,向ResourceManager申请容器,运行ReduceTask
第13步:ReduceTask向MapTask获取相应分区的数据进行运算
第14步:程序运行完毕后,MR会向RM申请注销自己
进度和状态更新
YARN中的任务将其进度和状态包括counter返回给应用管理器, 客户端每秒【通过mapreduce.client.progressmonitor.pollinterval设置】向应用管理器请求进度更新, 展示给用户
作业完成
除了向应用管理器请求作业进度外,客户端每5秒都会通过调用waitForCompletion()来检查作业是否完成【时间间隔可以通过mapreduce.client.completion.pollinterval设置】。作业完成之后,应用管理器和Container会清理工作状态。作业的信息会被作业历史服务器存储以备之后用户核查
资源调度器
Hadoop作业调度器主要有三种:FIFO、Capacity Scheduler【默认】和Fair Scheduler,在``
<property>
  <name>yarn.resourcemanager.scheduler.class</name>
  <value>org.apache.hadoop.yarn.server.resourcemanager.scheduler.capacity.CapacityScheduler</value>
</property>
FIFO Scheduler
FIFO Scheduler把应用按提交的顺序排成一个队列,这是一个先进先出队列,在进行资源分配的时候,先给队列中最头上的应用进行分配资源,待最头上的应用需求满足后再给下一个分配,以此类推。
FIFO Scheduler是最简单也是最容易理解的调度器,也不需要任何配置,但它并不适用于共享集群。大的应用可能会占用所有集群资源,这就导致其它应用被阻塞,比如有个大任务在执行,占用了全部的资源,再提交一个小任务,则此小任务会一直被阻塞。
Capacity Scheduler
对于Capacity调度器,有一个专门的队列用来运行小任务,但是为小任务专门设置一个队列会预先占用一定的集群资源,这就导致大任务的执行时间会落后于使用FIFO调度器时的时间。
Fair Scheduler
在Fair调度器中,我们不需要预先占用一定的系统资源,Fair调度器会为所有运行的job动态的调整系统资源。
比如:当第一个大job提交时,只有这一个job在运行,此时它获得了所有集群资源;当第二个小任务提交后,Fair调度器会分配一半资源给这个小任务,让这两个任务公平的共享集群资源。
需要注意的是,在Fair调度器中,从第二个任务提交到获得资源会有一定的延迟,因为它需要等待第一个任务释放占用的Container。小任务执行完成之后也会释放自己占用的资源,大任务又获得了全部的系统资源。最终的效果就是Fair调度器即得到了高的资源利用率又能保证小任务及时完成。
任务的推测执行
因为作业完成时间取决于最慢的任务完成时间,所以当有某些节点因为自身问题拖慢任务结束时间,可使用推测执行进行优化。
推测执行机制
发现拖后腿的任务,比如某个任务运行速度远慢于任务平均速度。为拖后腿任务启动一个备份任务,同时运行。谁先运行完,则采用谁的结果。
执行推测任务的前提条件
- 执行推测任务的前提条件
- 当前Job已完成的Task必须不小于0.05(5%)
- 开启推测执行参数设置。mapred-site.xml文件中默认是打开的
<property>
  <name>mapreduce.map.speculative</name>
  <value>true</value>
</property>
不能启用推测执行机制情况
- 任务间存在严重的负载倾斜
- 特殊任务,比如任务向数据库中写数据
算法原理
推测运行时间 = (当前时刻 - 任务启动时刻) / 任务比例
推测完成时间 = 推测运行时间 + 任务启动时刻
备份任务推测完成时间 = 当前时刻 + 运行完成任务的平均时间
- MesourceManager总是选择
推测完成时间 - 备份任务推测完成时间差值最大的任务,为止启动备份任务 - 为了防止大量任务同时启动备份任务造成的资源浪费,MesourceManager为每个作业设置了同时启动的备份任务数目上限
十一、Hadoop优化
数据输入
-
合并小文件在执行MR任务前将小文件进行合并,大量的小文件会产生大量的Map任务,增大Map任务装载次数,而任务的装载比较耗时,从而导致MR运行较慢
-
采用CombineTextInpntFormat来作为输入, 解决输入端大量小文件场景
Map阶段
- 减少溢写(Spill) 次数:过调整
io.sort.mb及sort.spill.percent参数值,增大触发Spill的内存上限,减少Spill次数,从而减少磁盘lO - 减少合并(Merge) 次数:通过调整
io.sort.factor参数,增大Merge的文件数目,减少Merge的次数,从而缩短MR处理时间 - 在Map之后,不影响业务逻辑前提下,先进行Combine处理,减少I/O
Reduce阶段
- 合理设置Map和Reduce数:两个都不能设置太少,也不能设置太多。太少会导致Task等待,延长处理时间;太多会导致Map、Reduce任务间竞争资源,造成处理超时等错误
- 设置Map、Reduce共存:调整
slowstart.completedmaps参数,使Map运行到一定程度后,Reduce也开始运行,减少Reduce的等待时间。 -
规避使用Reduce:因为Reduce在用于连接数据集的时候将会产生大量的网络消耗。
- 合理设置Reduce端的Buffer:默认情况下,数据达到一个阈值的时候,Buffer中的数据就会写入磁盘,然后Reduce会从磁盘中获得所有的数据。也就是说,Buffer和Reduce是没有直接关联的,中间多次写磁盘~>读磁盘的过程,既然
有这个弊端,那么就可以通过参数来配置,使得Buffer中的一部分数据可以直接输送到Reduce,从而减少IO开销:
mapreduce reduce .input. buffer percent默认为0.0。当值大于0的时候,会保留指定比例的内存读Buffer中的数据直接拿给Reduce使用。这样一来, 设置Buffer 需要内存,读取数据需要内存,Reduce计算也要内存,所以要根据作业的运行情况进行调整。
I/O传输
采用数据压编的方式,减少网路I/O的时间。安装Snappy和LZO编码器
数据倾斜
抽样和范围分区:可以通过对原始数据进行抽样得到的结果集来预设分区边界值。 自定义分区:基于输出键的背景知识进行自定义分区。 采用Combine:使用Combine可以大量地减小数据倾斜。在可能的情况下,Combine的目的就是聚合并精简数据。 采用Map Join,尽量避免Reduce Join。
常用的调优参数
配置mapred-site.xml文件
| 配置参数 | 参数说明 |
|---|---|
| mapreduce.map.memory.mb | 一个MapTask可使用的资源上限(单位:MB),默认为1024。如果MapTask实际使用的资源量超过该值,则会被强制杀死。 |
| mapreduce.reduce.memory.mb | 一个ReduceTask可使用的资源上限(单位:MB),默认为1024。如果ReduceTask实际使用的资源量超过该值,则会被强制杀死。 |
| mapreduce.map.cpu.vcores | 每个MapTask可使用的最多cpu core数目,默认值: 1 |
| mapreduce.reduce.cpu.vcores | 每个ReduceTask可使用的最多cpu core数目,默认值: 1 |
| mapreduce.reduce.shuffle.parallelcopies | 每个Reduce去Map中取数据的并行数。默认值是5 |
| mapreduce.reduce.shuffle.merge.percent | Buffer中的数据达到多少比例开始写入磁盘。默认值0.66 |
| mapreduce.reduce.shuffle.input.buffer.percent | Buffer大小占Reduce可用内存的比例。默认值0.7 |
| mapreduce.reduce.input.buffer.percent | 指定多少比例的内存用来存放Buffer中的数据,默认值是0.0 |
| mapreduce.task.io.sort.mb | Shuffle的环形缓冲区大小,默认100m |
| mapreduce.map.sort.spill.percent | 环形缓冲区溢出的阈值,默认80% |
| mapreduce.map.maxattempts | 每个Map Task最大重试次数,一旦重试参数超过该值,则认为Map Task运行失败,默认值:4 |
| mapreduce.reduce.maxattempts | 每个Reduce Task最大重试次数,一旦重试参数超过该值,则认为Map Task运行失败,默认值:4 |
| mapreduce.task.timeout | Task超时时间,默认600000毫秒 |
配置yarn-site.xml文件
| 配置参数 | 参数说明 |
|---|---|
| yarn.scheduler.minimum-allocation-mb | 给应用程序Container分配的最小内存,默认值:1024 |
| yarn.scheduler.maximum-allocation-mb | 给应用程序Container分配的最大内存,默认值:8192 |
| yarn.scheduler.minimum-allocation-vcores | 每个Container申请的最小CPU核数,默认值:1 |
| yarn.scheduler.maximum-allocation-vcores | 每个Container申请的最大CPU核数,默认值:32 |
| yarn.nodemanager.resource.memory-mb | 给Containers分配的最大物理内存,默认值:8192 |
HDFS小文件优化方法
- Hadoop Archive:是一个高效地将小文件放入HDFS块中的文件存档工具,它能够将多个小文件打包成一个HAR文件, 这样就减少了NameName的内存使用。
- CombineFileInputFormat:用于将多个文件合并成一个单独的Split
- 开启JVM重用
mapred-site.xml配置mapreduce.job.jvm.num.tasks,默认为1
十二、Hadoop高可用
前提条件:已经搭建zookeeper集群,yum install psmisc
第一步:配置core-site.xml
<!-- zk集群 -->
<property>
  <name>ha.zookeeper.quorum</name>
  <value>centos161:2181,centos162:2181,centos163:2181</value>
</property>
<!-- 指定HDFS中NameNode的地址,配置为集群的 -->
<property>
  <name>fs.defaultFS</name>
  <value>hdfs://haCluster</value>
</property>

<!-- 指定Hadoop运行时产生文件的存储目录 -->
<property>
  <name>hadoop.tmp.dir</name>
  <value>/opt/module/HA/hadoop/data/tmp</value>
</property>
第二步:配置hdfs-site.xml
<!-- 集群名称 -->
<property>
  <name>dfs.nameservices</name>
  <value>haCluster</value>
</property>

<!-- 自动故障转移 -->
<property>
  <name>dfs.ha.automatic-failover.enabled</name>
  <value>true</value>
</property>

<!-- 配置nameNode -->
<property>
  <name>dfs.ha.namenodes.haCluster</name>
  <value>nn1,nn2</value>
</property>
<property>
  <name>dfs.namenode.rpc-address.haCluster.nn1</name>
  <value>centos161:8020</value>
</property>
<property>
  <name>dfs.namenode.rpc-address.haCluster.nn2</name>
  <value>centos162:8020</value>
</property>
<property>
  <name>dfs.namenode.http-address.haCluster.nn1</name>
  <value>centos161:50070</value>
</property>
<property>
  <name>dfs.namenode.http-address.haCluster.nn2</name>
  <value>centos162:50070</value>
</property>

<!-- 配置journalNode -->
<property>
  <name>dfs.namenode.shared.edits.dir</name>
  <value>qjournal://centos161:8485;centos162:8485;centos163:8485/haCluster</value>
</property>
<property>
  <name>dfs.client.failover.proxy.provider.mycluster</name>
  <value>org.apache.hadoop.hdfs.server.namenode.ha.ConfiguredFailoverProxyProvider</value>
</property>
<property>
  <name>dfs.journalnode.edits.dir</name>
  <value>/opt/module/HA/hadoop/data/tmp/dfs/jn</value>
</property>

<!-- ssh登陆配置 -->
<property>
  <name>dfs.ha.fencing.methods</name>
  <value>sshfence</value>
</property>
<property>
  <name>dfs.ha.fencing.ssh.private-key-files</name>
  <value>/home/kun/.ssh/id_rsa</value>
</property>

<property>
  <name>dfs.replication</name>
  <value>3</value>
</property>

<property>
  <name>dfs.namenode.name.dir</name>
  <value>file:///${hadoop.tmp.dir}/dfs/name</value>
</property>

<property>
  <name>dfs.datanode.data.dir</name>
  <value>file:///${hadoop.tmp.dir}/dfs/data</value>
</property>
第三步:配置yarn-site.xml
<property>
  <name>yarn.nodemanager.aux-services</name>
  <value>mapreduce_shuffle</value>
</property>

<!-- 启用resourcemanager ha -->
<property>
  <name>yarn.resourcemanager.ha.enabled</name>
  <value>true</value>
</property>

<!-- 声明两台resourcemanager的地址 -->
<property>
  <name>yarn.resourcemanager.cluster-id</name>
  <value>ha-yarn-cluster</value>
</property>

<property>
  <name>yarn.resourcemanager.ha.rm-ids</name>
  <value>rm1,rm2</value>
</property>

<property>
  <name>yarn.resourcemanager.hostname.rm1</name>
  <value>centos162</value>
</property>

<property>
  <name>yarn.resourcemanager.hostname.rm2</name>
  <value>centos163</value>
</property>

<!-- 指定zookeeper集群的地址 -->
<property>
  <name>yarn.resourcemanager.zk-address</name>
  <value>centos161:2181,centos162:2181,centos163:2181</value>
</property>

<!-- 启用自动恢复 -->
<property>
  <name>yarn.resourcemanager.recovery.enabled</name>
  <value>true</value>
</property>

<!-- 指定resourcemanager的状态信息存储在zookeeper集群 -->
<property>
  <name>yarn.resourcemanager.store.class</name>
  <value>org.apache.hadoop.yarn.server.resourcemanager.recovery.ZKRMStateStore</value>
</property>
集群群起
①启动所有JN节点启动journalNode服务[奇数个]
sbin/hadoop-daemon.sh start journalnode
②格式化
# NameNode 1 上格式化
bin/hdfs namenode -format
sbin/hadoop-daemon.sh start namenode

# NameNode 2 同步元数据
bin/hdfs namenode -bootstrapStandby
sbin/hadoop-daemon.sh start namenode

# 停止服务
sbin/stop-dfs.sh
③初始化HA在Zookeeper中状态
bin/hdfs zkfc -formatZK
④群起HDFS
sbin/start-dfs.sh

# 查看nameNode节点zkfc服务启动状态,低版本没启动使用下面命令启动
sbin/hadoop-daemin.sh start zkfc
⑤启动yarn
# 在ResourceManager节点启动
sbin/start-yarn.sh

# 查看ResourceManager节点启动状态,低版本没启动使用下面命令启动
sbin/yarn-daemon.sh start resourcemanager

# 查看状态
bin/yarn rmadmin -getServiceState rm1
附录
zk节点脚本
#!/bin/bash

host_name_arr=('centos161' 'centos162' 'centos163')
for host_name in ${host_name_arr[*]}
do
 echo '========================'$host_name'========================'
 if [ "$1" == "start" ] ; then
  ssh $host_name "/opt/module/zookeeper/bin/zkServer.sh start"
 fi
 if [ "$1" == "status" ] ; then
  ssh $host_name "/opt/module/zookeeper/bin/zkServer.sh status"
 fi
 echo -e '\n'
done
自定义Driver官方格式
public class FlowerDriver implements Tool {

  private Configuration configuration;

  public static void main(String[] args) throws Exception {
    int res = ToolRunner.run(new FlowerDriver(), args);
    System.exit(res);
  }

  @Override
  public int run(String[] args) throws Exception {
    // 获取JOB
    Job job = Job.getInstance(this.configuration);
    // 关联Mapper和Reducer
    job.setMapperClass(FlowerMapper.class);
    job.setReducerClass(FlowerReducer.class);
    // 设置Mapper阶段输出的KV类型
    job.setMapOutputKeyClass(Text.class);
    job.setMapOutputValueClass(FlowerBean.class);
    // 设置最后输出的KV类型
    job.setOutputKeyClass(Text.class);
    job.setOutputValueClass(FlowerBean.class);
    // 设置程序输出的输入路径和输出路径
    FileInputFormat.setInputPaths(job, new Path(args[0]));
    FileOutputFormat.setOutputPath(job, new Path(args[1]));
    // 提交JOB
    job.submit();
    return job.waitForCompletion(true) ? 0 : -1;
  }

  @Override
  public void setConf(Configuration conf) {
    this.configuration = conf;
  }

  @Override
  public Configuration getConf() {
    return configuration;
  }
}
执行方法:hadoop jar xxx.jar qualifiedClassName -Dmapred.map.tasks=nums -Dmapred.reduce.tasks=nums INPUT OUTPUT