Spring Boot基础篇
一、Spring Boot简单入门
Spring Boot简介
因为J2EE笨重的开发方式、繁琐的配置、低下的开发效率和复杂的部署流程、集成第三方插件难度大这些技术痛点的存在的存在,Spring开发了一套易用的框架Spring Boot。
Spring Boot目的是来简化Spring应用开发,使用约定大于配置的规则,去繁从简单,just run就能创建一个独立的,产品级别的应用,Spring勾画了一副企业级开发解决方案。

Spring Boot具有以下优点:
- 快速创建独立运行的Spring 项目以及与主流框架集成
- 使用嵌入式的Servlet容器,应用无需打成WAR包
- starters自动依赖与版本控制
- 大量的自动配置,简化开发,也可修改默认值
- 无需配置XML,无代码生成,开箱即用
- 准生产环境的运行时应用监控
- 与云计算的天然集成
设计架构历史变化
单体架构 :一个归档包(例如war格式或者Jar格式)包含了应用所有功能的应用程序,我们通常称之为单体应用。这种架构模式模块耦合度高、扩展能力受限,体积越来越大。
SOA架构:面向服务的架构。这里的服务可以理解为service层业务服务。它们将整体构成一个彼此协作的套件。一般来说,每个组件会从始至终执行一块完整的业务逻辑,通常包括完成整体大action所需的各种具体任务与功能。
微服务架构:在微服务架构中,业务逻辑被拆分成一系列小而松散耦合的分布式组件,共同构成了较大的应用。每个组件都被称为微服务,而每个微服务都在整体架构中执行着单独的任务,或负责单独的功能。每个微服务可能会被一个或多个其他微服务调用,以执行较大应用需要完成的具体任务
| 功能 | SOA | 微服务 |
|---|---|---|
| 组件大小 | 大块业务逻辑 | 单独任务或者小块业务逻辑 |
| 耦合 | 通常松耦合 | 总是松耦合 |
| 管理 | 着重中央管理 | 着重分散管理 |
| 目标 | 确保应用能够交互操作 | 执行新功能、快速拓展 |
Spring Boot 初探
第一步:创建Maven工程,选在jar方式。在pom中添加
<!-- 指定父工程为spring-boot-starter-parent -->
<parent>
  <groupId>org.springframework.boot</groupId>
  <artifactId>spring-boot-starter-parent</artifactId>
  <version>2.1.1.RELEASE</version>
</parent>

<dependencies>
  <!-- 引入web模块 -->
  <dependency>
    <groupId>org.springframework.boot</groupId>
    <artifactId>spring-boot-starter-web</artifactId>
  </dependency>
</dependencies>
第二步:创建主应用程序类
/**
 * @SpringBootApplication标识这是一个主程序类,说明这是个Spring Boot应用
 */
@SpringBootApplication
public class HelloWorldMainApplication {

  //Spring 应用启动起来
  public static void main(String[] args) {
    SpringApplication.run(HelloWorldMainApplication.class, args);
  }
}
第三步:创建Controller,注意要在主程序类的子包下
@Controller
public class HelloWorld {

  //直接Run就可以通过游览器访问地址
  @RequestMapping("/hello")
  @ResponseBody
  public String hello() {
    return "hello world";
  }
}
第四步:打包部署,执行maven package即可生成jar包
<!-- Spring Boot打包插件 -->
<plugin>
  <groupId>org.springframework.boot</groupId>
  <artifactId>spring-boot-maven-plugin</artifactId>
</plugin>
探究
-
POM文件
spring-boot-starter-parent的重要信息:- 父项目是
spring-boot-dependencies - 管理了Jdk版本
- 引入了各种打包、编译相关插件
spring-boot-dependencies的重要信息- 进行了版本仲裁
spring-boot-starter-web的重要信息- 映入了嵌入式tomcat、springMVC相关组件
- 父项目是
-
SpringBootApplication注解梳理/* * SpringBootApplication注解层级关系 * @SpringBootApplication * | * +- @SpringBootConfiguration * | | * | +- @Configuration【标志自己是一个配置类用于加载配置】 * | * +- @EnableAutoConfiguration * | | * | +- @AutoConfigurationPackage * | | | * | | +-@Import(AutoConfigurationPackages.Registrar.class)【保存主配置包名,用于后续扫描】 * | | * | +- @Import(AutoConfigurationImportSelector.class)【】 * | * +- @ComponentScan【设定包扫描过滤器,加载相应类】 */ @SpringBootConfiguration @EnableAutoConfiguration @ComponentScan(excludeFilters = { @Filter(type = FilterType.CUSTOM, classes = TypeExcludeFilter.class), @Filter(type = FilterType.CUSTOM, classes = AutoConfigurationExcludeFilter.class) }) public @interface SpringBootApplication { @AliasFor(annotation = EnableAutoConfiguration.class) Class<?>[] exclude() default {}; @AliasFor(annotation = EnableAutoConfiguration.class) String[] excludeName() default {}; @AliasFor(annotation = ComponentScan.class, attribute = "basePackages") String[] scanBasePackages() default {}; @AliasFor(annotation = ComponentScan.class, attribute = "basePackageClasses") Class<?>[] scanBasePackageClasses() default {}; } -
@Import(AutoConfigurationPackages.Registrar.class)的作用//AutoConfigurationPackages是ImportBeanDefinitionRegistrar的实现类 static class Registrar implements ImportBeanDefinitionRegistrar, DeterminableImports { @Override public void registerBeanDefinitions(AnnotationMetadata metadata, BeanDefinitionRegistry registry) { register(registry, new PackageImport(metadata).getPackageName()); } @Override public Set<Object> determineImports(AnnotationMetadata metadata) { return Collections.singleton(new PackageImport(metadata)); } } public static void register(BeanDefinitionRegistry registry, String... packageNames) { if (registry.containsBeanDefinition(BEAN)) { BeanDefinition beanDefinition = registry.getBeanDefinition(BEAN); ConstructorArgumentValues constructorArguments = beanDefinition.getConstructorArgumentValues(); constructorArguments.addIndexedArgumentValue( 0,addBasePackages(constructorArguments, packageNames)); } else { //注册了BasePackages,构造函数参数为@SpringBootApplication所在包的包名,为ComponentScan服务 GenericBeanDefinition beanDefinition = new GenericBeanDefinition(); beanDefinition.setBeanClass(BasePackages.class); beanDefinition.getConstructorArgumentValues() .addIndexedArgumentValue(0, packageNames); beanDefinition.setRole(BeanDefinition.ROLE_INFRASTRUCTURE); registry.registerBeanDefinition(BEAN, beanDefinition); } } -
@Import(AutoConfigurationImportSelector.class)的作用//加载了META-INF/spring.factories【properties】下类映射注入到容器 private static Map<String, List<String>> loadSpringFactories(@Nullable ClassLoader classLoader) { MultiValueMap<String, String> result = cache.get(classLoader); if (result != null) { return result; } try { //spring-boot-autoconfigure/META-INF/spring.factories //spring-boot/META-INF/spring.factories Enumeration<URL> urls = (classLoader != null ? classLoader.getResources(FACTORIES_RESOURCE_LOCATION) : ClassLoader.getSystemResources(FACTORIES_RESOURCE_LOCATION)); result = new LinkedMultiValueMap<>(); while (urls.hasMoreElements()) { URL url = urls.nextElement(); UrlResource resource = new UrlResource(url); Properties properties = PropertiesLoaderUtils.loadProperties(resource); for (Map.Entry<?, ?> entry : properties.entrySet()) { String factoryClassName = ((String) entry.getKey()).trim(); for (String factoryName : StringUtils.commaDelimitedListToStringArray((String) entry.getValue())) { result.add(factoryClassName, factoryName.trim()); } } } cache.put(classLoader, result); return result; } catch (IOException ex) { throw new IllegalArgumentException("Unable to load factories from location [" + FACTORIES_RESOURCE_LOCATION + "]", ex); } }
二、Spring Boot工程结构
project
 |
 +- src/main/java      【java代码存放位置】
 |
 +- src/main/resource  【资源文件】
 |   |
 |   +- static         【静态资源文件存放位置】
 |   |
 |   +- templates      【用于web开发的前端模板】
 |   |
 |   +- application.yml【配置文件】
 |
 +- src/test/java      【测试代码存放位置】
三、配置文件详解
YAML基本语法
- k:(空格)v 表示一对键值【空格必须有】
- 以空格缩进控制层级关系
- 属性值大小写敏感
- 值为双引号字符串特殊字符不会进行转义、值为单引号字符串特殊字符会进行转义
- 分为行外写法和行内写法
#对象行外写法
xiaoming:
  age: 19
  sex: f
  note: 'I\tlove\tLili'
#对象行内写法
xiaoming: {age: 19,sex: f,note: 'I\tlove\tLili'}

#对象行外写法
friends:
  - zhangsan
  - Lisi
  - WangWu
#对象行内写法
friends: [zhangsan,Lisi,WangWu]
YAML配置文件值获取
使用@ConfigurationProperties指定前缀代表从yaml文件中读取对应属性,IDE环境会自动提示加入POM依赖
<dependency>
  <groupId>org.springframework.boot</groupId>
  <artifactId>spring-boot-configuration-processor</artifactId>
  <optional>true</optional>
</dependency>
指定前缀要与yaml文件的前缀要匹配。如果属性是驼峰命令法【例如userName】,yaml也可以使用-分割【user-name】
@Component
@ConfigurationProperties(prefix="person")
public class Person {
  private Integer id;
  private Integer age;
  private String  name;
  private Boolean boss;
  private Date	birth;
  private Map<String,Object> maps;
  private List<Object> list;
  private Dog		dog;
  //=============Getter/Setter方法=============
}

public class Dog {
  private String name;
  private String age;
  //=============Getter/Setter方法=============
}
person:
  id: 1
  name: 张三
  age: 18
  boss: false
  birth: 2019/01/01
  maps: {k1: v1,k2: v2}
  list:
  - list1
  - list2
  - list3
  dog:
    age: 10
    name: tom
@ConfigurationProperties和@Value对比
| @ConfigurationProperties | @Value | |
|---|---|---|
| 功能 | 批量注入配置文件中的属性 | 一项一项指定 |
| 松散绑定(松散语法) | 支持 | 不支持 |
| SpEL | 不支持 | 支持 |
| JSR303校验 | 支持 | 不支持 |
| 复杂类型封装 | 支持 | 不支持 |
适用范围:
- 只是在某个业务逻辑中需要获取一下配置文件中的某项值,使用@Value
- 专门编写了一个javaBean来和配置文件进行映射,就直接使用@ConfigurationProperties
配置文件属性校验
@Component
@ConfigurationProperties(prefix="person")//支持JSR303
@Validated//使用JSR303校验
public class Person {
  private Integer id;
  private Integer age;
  @NotEmpty
  private String  name;
  private Boolean boss;
  private Date    birth;
  private Map<String,Object> maps;
  private List<Object> list;
  private Dog	    dog;

  //=============Getter/Setter方法=============
}
@PropertySource和@ImportResource导入配置文件
-
@PropertySource:加载指定的配置文件,避免所有文件全配置在SpringBoot全局配置文件中产生混淆
//指定加载user.properties @PropertySource("classpath:user.properties") @Component @ConfigurationProperties(prefix="user") public class User { private String userName; private Integer age; //=============Getter/Setter方法============= } -
@ImportResource:导入Spring的XML配置文件,让配置文件里面的内容生效【不建议使用】
配置文件占位符
person:
  id: 1
  name: 张三
  # 生成随机数
  # ${random.uuid}、${random.int}、${random.long}、${random.10}、${random.[20,50]}
  age: ${random.uuid}
  boss: false
  birth: 2019/01/01
  maps: {k1: v1,k2: v2}
  list:
  - list1
  - list2
  - list3
  dog:
    age: 10
    name: tom-${person.name:not-host} #使用占位符获取配置的值,如果没有使用:后值作为默认值
四、Profile
profile文件编写规则
-
多Profile文件
主配置文件编写时可以是 application-{profile}.yml/properties,默认使用application.yml/properties
-
yml多文档块
# 指定激活的profile
spring:
  profiles:
    active:
      - dev
---
server:
  port: 8081
  # profile环境名称
spring:
  profiles: dev

---
server:
  port: 8082
  # profile环境名称
spring:
  profiles: prod
激活指定profile
-
在配置文件中指定激活的profile【spring.profiles.active=dev】
-
命令行参数【–spring.profiles.active=dev】
-
虚拟机参数【-Dspring.profiles.active=dev】
五、Spring Boot配置文件加载位置
spring boot 启动会扫描以下位置的application.properties或者application.yml文件作为Spring boot的配置文件
- file:./config/
- file:./
- classpath:/config/
- classpath:/
按照优先级从高到低的顺序加载,高优先级配置内容会覆盖低优先级配置内容。SpringBoot会从这四个位置加载主配置文件,互补配置。也可以通过配置spring.config.location指定额外的配置文件来改变以上配置内容,一般在运维中使用
六、自动配置原理
- SpringBoot启动的时候加载主配置类,开启了自动配置功能
@EnableAutoConfiguration -
类路径下 META-INF/spring.factories 里面配置的所有EnableAutoConfiguration的值加入到了容器中
- spring.factories中每个xxxAutoConfiguration都是容器中的组件,都加入到容器中,用做自动配置
- 每个配置类会根据不同的判断条件决定是否生效,一但这个配置类生效,这个配置类就会给容器中添加各种组件。这些组件的属性是从对应的properties类中获取的,这些类里面的每一个属性又和配置文件绑定
- @Conditional派生注解用于判断配置类是否生效
| @Conditional扩展注解 | 判断是否满足当前指定条件 |
|---|---|
| @ConditionalOnJava | 系统的java版本是否符合要求 |
| @ConditionalOnBean | 容器中存在指定Bean |
| @ConditionalOnMissingBean | 容器中不存在指定Bean |
| @ConditionalOnExpression | 满足SpEL表达式指定 |
| @ConditionalOnClass | 系统中有指定的类 |
| @ConditionalOnMissingClass | 系统中没有指定的类 |
| @ConditionalOnSingleCandidate | 容器中只有一个指定的Bean,或者这个Bean是首选Bean |
| @ConditionalOnProperty | 系统中指定的属性是否有指定的值 |
| @ConditionalOnResource | 类路径下是否存在指定资源文件 |
| @ConditionalOnWebApplication | 当前是web环境 |
| @ConditionalOnNotWebApplication | 当前不是web环境 |
| @ConditionalOnJndi | JNDI存在指定项 |
注:可以通过启用【debug=true】属性来让控制台打印自动配置报告
七、Spring Boot与日志
市场上主流日志框架分类
| 日志门面 | 日志实现 |
|---|---|
| JCL(Jakarta Commons Logging) SLF4j(Simple Logging Facade for Java) jboss-logging |
Log4j JUL(java.util.logging) Log4j2 Logback |
SpringBoot选用SLF4j作为日志门面,Logback作为日志实现
SLF4j的使用
以后开发的时候,日志记录方法的调用,不应该来直接调用日志的实现类,而是调用日志抽象层里面的方法,给系统里面导入slf4j的jar和 logback的实现jar
import org.slf4j.Logger;
import org.slf4j.LoggerFactory;

public class HelloWorld {
  public static void main(String[] args) {
    Logger logger = LoggerFactory.getLogger(HelloWorld.class);
    logger.info("Hello World");
  }
}
SLF4j与日志框架实现绑定图
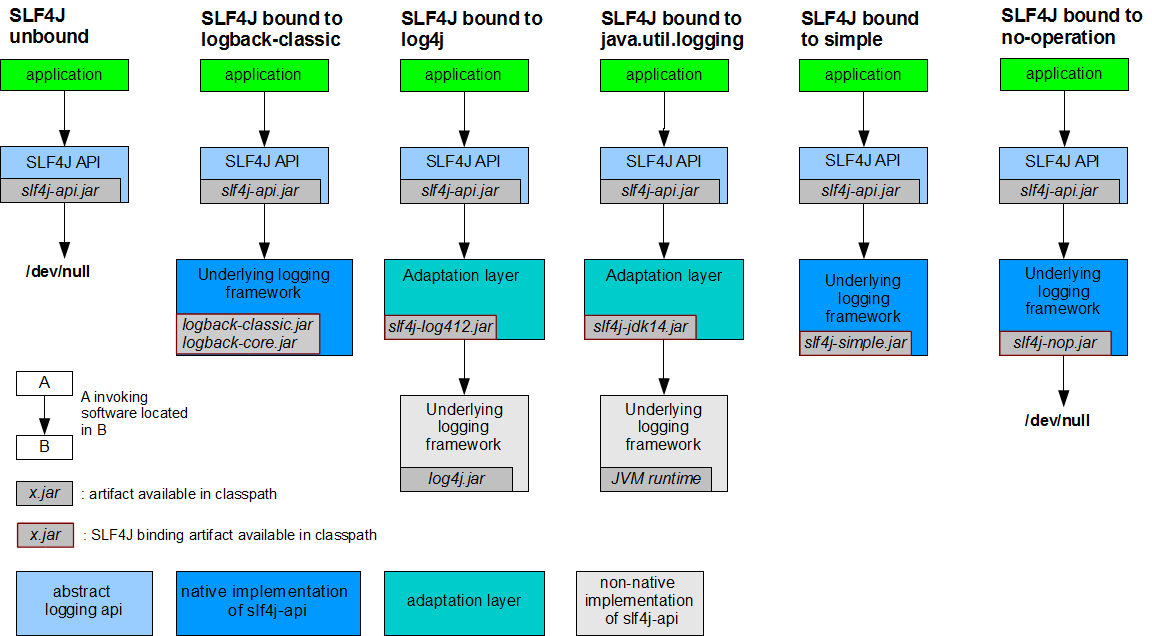
每个日志的实现框架都有自己的配置文件。使用slf4j以后,配置文件还是做成日志实现框架的配置文件
SLF4J统一日志实现框架
SpringBoot能自动适配所有的日志,而且底层使用slf4j+logback的方式记录日志,引入其他框架的时候,只需要把这个框架依赖的日志框架排除掉即
日志使用
-
SpringBoot修改日志的默认配置
#com.kun下的包日志级别是trace
logging.level.com.kun=trace
#logging.path=./	不指定路径在当前项目下生成springboot.log日志,不能指定名字
#logging.file=G:/springboot.log 可以指定完整的路径

# 在当前磁盘的根路径下创建spring文件夹和里面的log文件夹;使用 spring.log 作为默认文件
logging.path=/spring/log

# 在控制台输出的日志的格式
logging.pattern.console=%d{yyyy‐MM‐dd} [%thread] %‐5level %logger{50} ‐ %msg%n
# 指定文件中日志输出的格式
logging.pattern.file=%d{yyyy‐MM‐dd} [%thread] %‐5level %logger{50} %msg%n
logging.file logging.path Example Description (none) (none) 只在控制台输出 指定文件名 (none) my.log 输出日志到my.log文件 (none) 指定目录 /var/log 输出到指定目录的 spring.log 文件中 -
指定配置
如果给类路径下放上每个日志框架自己的配置文件,SpringBoot就不使用自身的默认配置
Logging System Customization Logback logback-spring.xmllogback-spring.groovy
logback.xmlorlogback.groovyLog4j2 log4j2-spring.xmlorlog4j2.xmlJDK (Java Util Logging) logging.properties -
logback.xml:直接就被日志框架识别了
- logback-spring.xml:日志框架不直接加载日志的配置项,由SpringBoot解析日志配置,可以使用SpringBoot的高级Profile功能
  <!-- 可以指定某段配置只在某个环境下生效 -->
  <springProfile name="dev">
    <!-- 配置 -->
  </springProfile>
例如
  <appender name="stdout" class="ch.qos.logback.core.ConsoleAppender">
    <!--
    日志输出格式:
        %d			表示日期时间
        %thread		表示线程名
        %‐5level	    级别从左显示5个字符宽度
        %logger{50}   表示logger名字最长50个字符,否则按照句点分割
        %msg		    日志消息
        %n			换行符
    -->
    <layout class="ch.qos.logback.classic.PatternLayout">
      <springProfile name="dev">
        <pattern>%d{yyyy‐MM‐dd HH:mm:ss.SSS} ‐‐‐‐> [%thread] ‐‐‐> %‐5level %logger{50} ‐ %msg%n
        </pattern>
      </springProfile>
      <springProfile name="!dev">
        <pattern>%d{yyyy‐MM‐dd HH:mm:ss.SSS} ==== [%thread] ==== %‐5level
          %logger{50} ‐ %msg%n
        </pattern>
      </springProfile>
    </layout>
  </appender>
八、Spring Boot与Web开发
静态资源的处理
@Configuration
@ConditionalOnWebApplication(type = Type.SERVLET)
@ConditionalOnClass({ Servlet.class, DispatcherServlet.class, WebMvcConfigurer.class })
@ConditionalOnMissingBean(WebMvcConfigurationSupport.class)
@AutoConfigureOrder(Ordered.HIGHEST_PRECEDENCE + 10)
@AutoConfigureAfter({ DispatcherServletAutoConfiguration.class,
                     TaskExecutionAutoConfiguration.class, ValidationAutoConfiguration.class })
public class WebMvcAutoConfiguration {

  //......

  @Configuration
  @Import(EnableWebMvcConfiguration.class)
  @EnableConfigurationProperties({ WebMvcProperties.class, ResourceProperties.class })
  @Order(0)
  public static class WebMvcAutoConfigurationAdapter
    implements WebMvcConfigurer, ResourceLoaderAware {

    @Override
    public void addResourceHandlers(ResourceHandlerRegistry registry) {
      if (!this.resourceProperties.isAddMappings()) {
        logger.debug("Default resource handling disabled");
        return;
      }
      Duration cachePeriod = this.resourceProperties.getCache().getPeriod();
      CacheControl cacheControl = this.resourceProperties.getCache()
        .getCachecontrol().toHttpCacheControl();

      // 所有/webjars/**,都去classpath:/META-INF/resources/webjars/找资源
      // webjars:以jar包的方式引入静态资源【参考http://www.webjars.org】
      if (!registry.hasMappingForPattern("/webjars/**")) {
        customizeResourceHandlerRegistration(
          registry.addResourceHandler("/webjars/**")
          .addResourceLocations("classpath:/META-INF/resources/webjars/")
          .setCachePeriod(getSeconds(cachePeriod))
          .setCacheControl(cacheControl));
      }

      /**
        * staticPathPattern = "/**"
        * staticLocations = "classpath:/META-INF/resources/",
        *                   "classpath:/resources/",
        *                   "classpath:/static/",
        *                   "classpath:/public/"
        */
      String staticPathPattern = this.mvcProperties.getStaticPathPattern();
      if (!registry.hasMappingForPattern(staticPathPattern)) {
        customizeResourceHandlerRegistration(
          registry.addResourceHandler(staticPathPattern)
          .addResourceLocations(getResourceLocations(this.resourceProperties.getStaticLocations()))
          .setCachePeriod(getSeconds(cachePeriod))
          .setCacheControl(cacheControl));
      }
    }

    //欢迎页请求映射处理
    @Bean
    public WelcomePageHandlerMapping welcomePageHandlerMapping(
      ApplicationContext applicationContext) {
      return new WelcomePageHandlerMapping(
        new TemplateAvailabilityProviders(applicationContext),
        applicationContext, getWelcomePage(),
        this.mvcProperties.getStaticPathPattern());
    }

    //欢迎图标
    @Bean
    public ResourceHttpRequestHandler faviconRequestHandler() {
      ResourceHttpRequestHandler requestHandler = new ResourceHttpRequestHandler();
      requestHandler.setLocations(resolveFaviconLocations());
      return requestHandler;
    }
  }
}
总结:
-
所有
/webjars/**,都去classpath:/META-INF/resources/webjars/找资源 -
/**访问当前项目的任何资源,都去(静态资源的文件夹)找映射"classpath:/META‐INF/resources/", "classpath:/resources/", "classpath:/static/", "classpath:/public/" -
欢迎页,静态资源文件夹下的所有index.html页面被
/**映射 -
所有的 **/favicon.ico 都是在静态资源文件下找
动态页面处理
使用thymeleaf模板引擎
<!-- 引入thymeleaf的starter -->
<dependency>
  <groupId>org.springframework.boot</groupId>
  <artifactId>spring-boot-starter-thymeleaf</artifactId>
</dependency>

<!--
 如果thymeleaf是2版本切换thymeleaf3版本方法
 <properties>
    <thymeleaf.version>3.0.9.RELEASE</thymeleaf.version>
    <!‐‐ 布局功能的支持程序 thymeleaf3主程序 layout2以上版本 ‐‐>
    <thymeleaf‐layout‐dialect.version>2.2.2</thymeleaf‐layout‐dialect.version>
 </properties>
-->
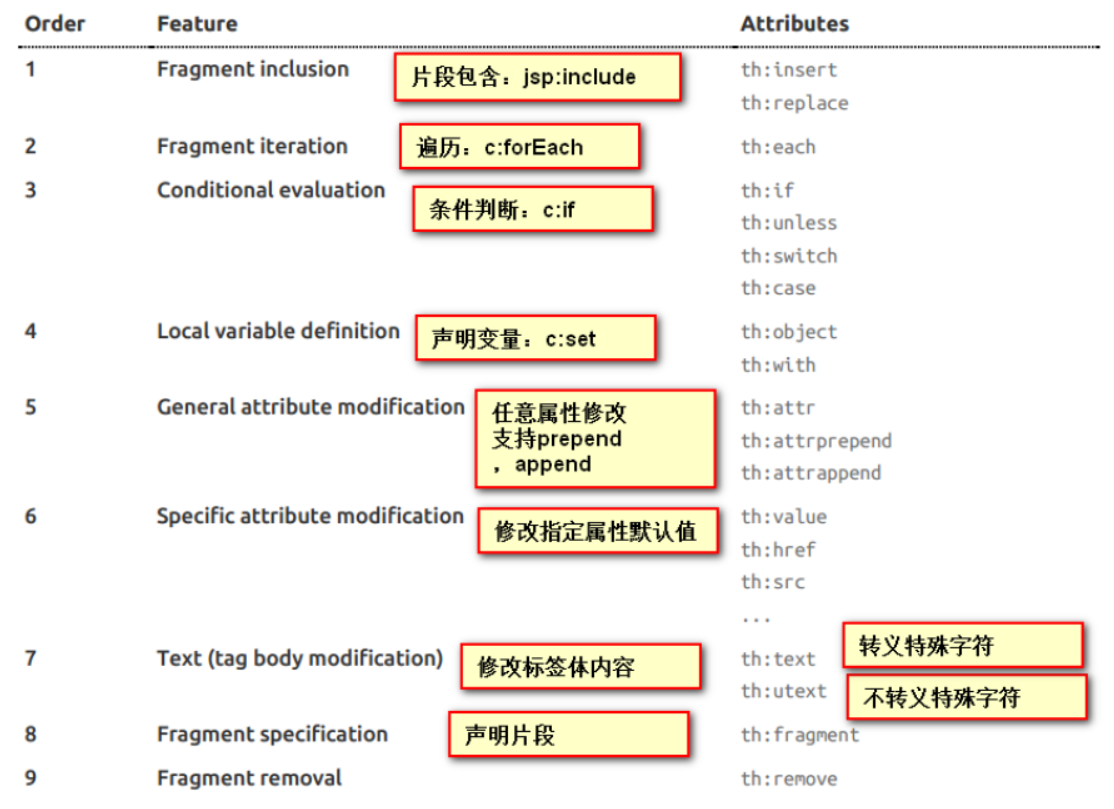
thymeleaf基本语法
导入名称空间:<html lang="en" xmlns:th="http://www.thymeleaf.org">
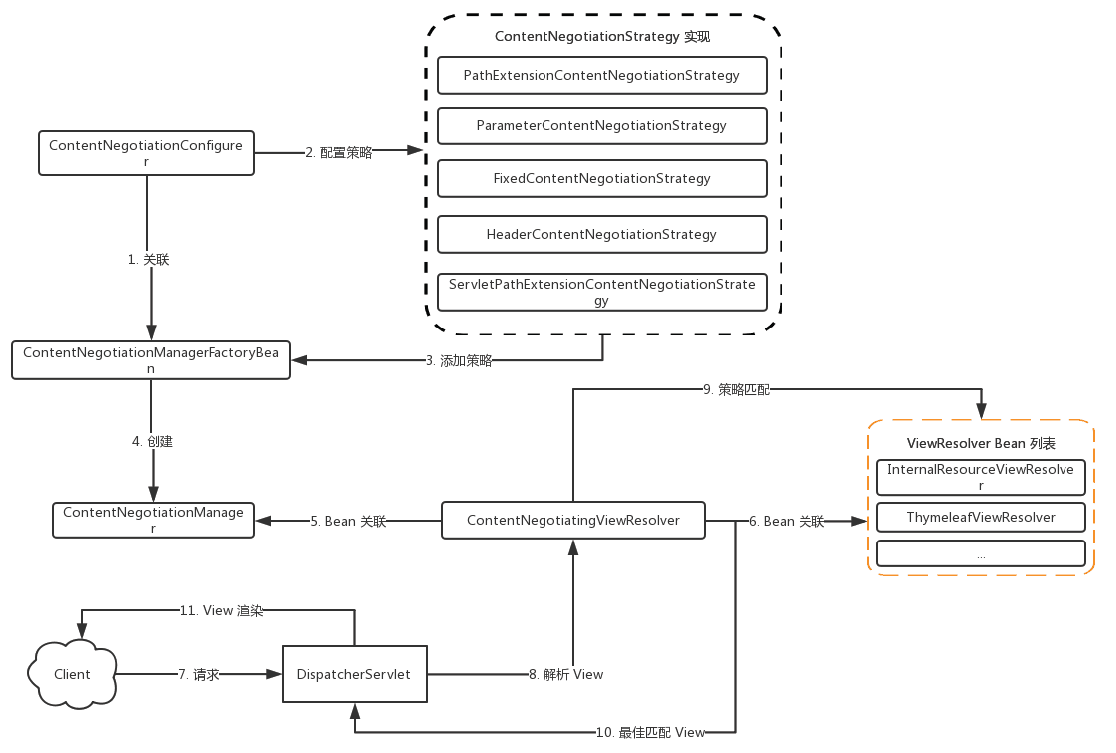
内容协商
Web客户端通过不同的请求策略,实现服务端响应对应视图内容输出
视图解析器ContentNegotiatingViewResolver:
①关联ViewResolver Bean列表
②关联ContentNegotiationManager
③解析最佳匹配View
常用的ContentNegotiatingViewResolver:
- InternalResourceViewResolver
- BeanNameViewResolver
- ThymeleafViewResolver
内容协商管理器ContentNegotiationManager:
①由ContentNegotitationConfigurer配置
②由ContnetNegotiationManagerFactoryBean创建
③关联ContentNegotiationStrategy集合
内容协商策略ContentNegotitationStragtegy
常见的ContentNegotitationStragtegy:
- 固定MediaType:FixedContentNegotitationStragtegy
- ”Accept“请求头:HeaderContentNegotitationStragtegy
- 请求参数:ParameterContentNegotitationStragtegy
- 路径扩展名:PathExtensionContentNegotitationStragtegy
SpringMVC自动配置
Spring Boot 自动配了SpringMVC,以下是SpringBoot对SpringMVC的默认配置:(WebMvcAutoConfiguration)
-
包含了ContentNegotiatingViewResolver和BeanNameViewResolver
-
自动配置了ViewResolver【视图解析器:根据方法的返回值得到视图对象(View),视图对象决定如何渲染(转发/重定向)】
-
ContentNegotiatingViewResolver【用于组合所有的视图解析器】
-
-
支持服务器静态资源,包括WebJars
-
静态首页访问
-
favicon.ico图标
-
自动注册了
Converter,GenericConverter,Formatter- Converter:转换器【传入参数转换为对象】
- Formatter:格式化器【日期等格式格式化使用】
-
支持HttpMessageConverters
- HttpMessageConverter:SpringMVC用来转换Http请求和响应的
- HttpMessageConverters :从容器中获取所有的HttpMessageConverter
-
自动注册MessageCodesResolver【定义错误代码生成规则】
-
自动使用ConfigurableWebBindingInitializer【参数数据绑定使用】
扩展SpringMVC
编写一个配置类(@Configuration),实现WebMvcConfigurer类,且不能标注@EnableWebMvc
@Configuration
public class AppWebMvcConfigurer implements WebMvcConfigurer{

  @Override
  public void addFormatters(FormatterRegistry registry) {
  }

  @Override
  public void addInterceptors(InterceptorRegistry registry) {
  }
}
原理:
WebMvcAutoConfiguration是SpringMVC的自动配置类WebMvcAutoConfiguration使用WebMvcAutoConfigurationAdapter作为默认配置WebMvcAutoConfigurationAdapter使用了注解@Import(EnableWebMvcConfiguration.class)EnableWebMvcConfiguration是DelegatingWebMvcConfiguration子类
@Configuration
public class DelegatingWebMvcConfiguration extends WebMvcConfigurationSupport {

  private final WebMvcConfigurerComposite configurers = new WebMvcConfigurerComposite();

  //从容器中获取所有WebMvcConfigurer,将配置全部保存起来用于扩展
  @Autowired(required = false)
  public void setConfigurers(List<WebMvcConfigurer> configurers) {
    if (!CollectionUtils.isEmpty(configurers)) {
      this.configurers.addWebMvcConfigurers(configurers);
    }
  }
}
效果:SpringMVC的自动配置和我们的扩展配置都会起作用
全面接管SpringMVC
只需要在配置类中添加@EnableWebMvc
@EnableWebMvc
@Configuration
public class AppWebMvcConfigurer implements WebMvcConfigurer{

  @Override
  public void addFormatters(FormatterRegistry registry) {
  }

  @Override
  public void addInterceptors(InterceptorRegistry registry) {
  }
}
原理:
-
@EnableWebMvc使用了@Import(DelegatingWebMvcConfiguration.class) -
public class DelegatingWebMvcConfiguration extends WebMvcConfigurationSupport -
WebMvcAutoConfiguration使用了@ConditionalOnMissingBean(WebMvcConfigurationSupport.class) WebMvcConfigurationSupport被@EnableWebMvc已经导入故不再生效
总结:在SpringBoot中会有非常多的xxxConfigurer帮助我们进行扩展配置
在SpringBoot中会有很多的xxxCustomizer帮助我们进行定制配置
国际化
-
编写国际化配置文件
message.properties【默认语言文件】
message_en_US.properties【英语美国语言配置】
message_zh_CN.properties【中文中国语言配置】
注:编写国际化i18n文件可以再eclipse中安装ResourceBundle插件
-
配置SpringBoot国际化文件读取路径
#以下配置会读取【i18n/message】开头的properties文件 spring: messages: basename: i18n.message -
在thymeleaf中使用国际化文件
[[#{login.tip}]]                             <!-- 行外写法 -->
<label th:text="#{login.username}"></label>  <!-- 行内写法 -->
错误处理机制
SpringBoot默认效果,游览器返回默认错误页面,其他工具返回JSON数据,SpringBoot通过请求头的Accept动态确定返回的信息类型
原理:ErrorMvcAutoConfiguration【错误处理的自动配置类】给容器默认添加了如下组件
- DefaultErrorAttributes
//存放页面展示需要使用错误的属性
@Override
public Map<String, Object> getErrorAttributes(WebRequest webRequest,
                                              boolean includeStackTrace) {
  Map<String, Object> errorAttributes = new LinkedHashMap<>();
  errorAttributes.put("timestamp", new Date());
  addStatus(errorAttributes, webRequest);
  addErrorDetails(errorAttributes, webRequest, includeStackTrace);
  addPath(errorAttributes, webRequest);
  return errorAttributes;
}
- BasicErrorController
@Controller
@RequestMapping("${server.error.path:${error.path:/error}}")
public class BasicErrorController extends AbstractErrorController {

  //......

  //返回HTML需要的错误界面
  @RequestMapping(produces = MediaType.TEXT_HTML_VALUE)
  public ModelAndView errorHtml(HttpServletRequest request,
                                HttpServletResponse response) {
    HttpStatus status = getStatus(request);
    Map<String, Object> model = Collections.unmodifiableMap(
      getErrorAttributes(request, isIncludeStackTrace(request, MediaType.TEXT_HTML)));
    response.setStatus(status.value());
    ModelAndView modelAndView = resolveErrorView(request, response, status, model);
    return (modelAndView != null) ? modelAndView : new ModelAndView("error", model);
  }

  //返回JSON错误数据
  @RequestMapping
  public ResponseEntity<Map<String, Object>> error(HttpServletRequest request) {
    Map<String, Object> body = getErrorAttributes(request,
                                                  isIncludeStackTrace(request, MediaType.ALL));
    HttpStatus status = getStatus(request);
    return new ResponseEntity<>(body, status);
  }

  //......
}
- ErrorPageCustomizer
@Value("${error.path:/error}")
private String path = "/error"; //系统出现错误以后来到error请求进行处理相当于web.xml注册的错误页面规则
- DefaultErrorViewResolver
public class DefaultErrorViewResolver implements ErrorViewResolver, Ordered {

  private static final Map<Series, String> SERIES_VIEWS;

  static {
    Map<Series, String> views = new EnumMap<>(Series.class);
    views.put(Series.CLIENT_ERROR, "4xx");
    views.put(Series.SERVER_ERROR, "5xx");
    SERIES_VIEWS = Collections.unmodifiableMap(views);
  }

  @Override
  public ModelAndView resolveErrorView(HttpServletRequest request,
                                       HttpStatus status,Map<String, Object> model) {
    ModelAndView modelAndView = resolve(String.valueOf(status.value()), model);
    if (modelAndView == null && SERIES_VIEWS.containsKey(status.series())) {
      modelAndView = resolve(SERIES_VIEWS.get(status.series()), model);
    }
    return modelAndView;
  }

  //寻找对应的错误视图
  private ModelAndView resolve(String viewName, Map<String, Object> model) {
    //viewName是错误代码
    String errorViewName = "error/" + viewName;

    //模板引擎可以解析这个页面地址就用模板引擎解析
    TemplateAvailabilityProvider provider = this.templateAvailabilityProviders
      .getProvider(errorViewName, this.applicationContext);
    if (provider != null) {
      return new ModelAndView(errorViewName, model);
    }
    //模板引擎不可用,就在静态资源文件夹下找errorViewName对应的页面   error/404.html
    return resolveResource(errorViewName, model);
  }

  private ModelAndView resolveResource(String viewName, Map<String, Object> model) {
    for (String location : this.resourceProperties.getStaticLocations()) {
      try {
        Resource resource = this.applicationContext.getResource(location);
        resource = resource.createRelative(viewName + ".html");
        if (resource.exists()) {
          return new ModelAndView(new HtmlResourceView(resource), model);
        }
      }
      catch (Exception ex) {
      }
    }
    return null;
  }
}
错误处理步骤:系统出现4xx或者5xx之类的错误,ErrorPageCustomizer就会生效(定制错误的响应规则)会来到/error请求,会被BasicErrorController处理
定制错误页面
-
有模板引擎的情况下,将错误页面命名为【错误状态码.html】放在模板引擎文件夹里面的 error文件夹下,发生此状态码的错误就会来到对应的页面。可以使用4xx和5xx作为错误页面的文件名来匹配这种类型的所有错误,精确优先(优先寻找精确的状态码.html)
页面能获取的信息:
- timestamp:时间戳
- status:状态码
- error:错误提示
- exception:异常对象
- message:异常消息
- errors:JSR303数据校验的错误信息
-
没有模板引擎(模板引擎找不到这个错误页面),静态资源文件夹下找
-
以上都没有错误页面,就是默认来到SpringBoot默认的错误提示页面
定制错误的json数据
-
自定义异常处理或者返回定制json数据【失去自适应效果,需要自适应效果需要自己手动编写】
@ControllerAdvice public class MyExceptionHandler { @ResponseBody @ExceptionHandler(UserNotExistException.class) public Map<String,Object> handleException(Exception e){ Map<String,Object> map = new HashMap<>(); map.put("code","user.notexist"); map.put("message",e.getMessage()); return map; } } //没有自适应效果... -
转发到/error进行自适应响应效果处理
@ExceptionHandler(UserNotExistException.class)
public String handleException(Exception e, HttpServletRequest request){
  Map<String,Object> map = new HashMap<>();
  //传入我们自己的错误状态码  4xx 5xx,否则就不会进入定制错误页面的解析流程
  request.setAttribute("javax.servlet.error.status_code",500);
  map.put("code","user.notexist");
  map.put("message",e.getMessage());
  //转发到/error
  return "forward:/error";
}
定制数据携带出去
出现错误以后,会来到/error请求,会被BasicErrorController处理,响应出去可以获取的数据是由父类的getErrorAttributes得到的实现方式有两种:
- 完全来编写一个ErrorController的实现类【或者是编写AbstractErrorController的子类】,此方法较为麻烦
- 页面的数据或是json返回能用的数据都是通过ErrorAttributes.getErrorAttributes得到,所以自定义ErrorAttributes就能完成功能,此方法比较简单。通常在自定义的ExceptionHandler中把错误信息先存入。
//给容器中加入我们自己定义的ErrorAttributes
@Component
public class MyErrorAttributes extends DefaultErrorAttributes {

  @Override
  public Map<String, Object> getErrorAttributes(RequestAttributes requestAttributes,
                                                boolean includeStackTrace) {
    Map<String, Object> map = super.getErrorAttributes(requestAttributes, includeStackTrace);
    String errorCode = requestAttributes.getAttribute("code");
    map.put("errorCode",errorCode);
    return map;
  }
}
配置跨域访问
Cross-Origin Resource Sharing(CORS)配置方式
①注解驱动 :@CorssOrigin【也可以和@Controller或@RequestMapping同级更加精确】
public @interface CrossOrigin {
  @AliasFor("origins")
  String[] value() default {};

  //允许可访问的域列表,*代表所有
  @AliasFor("value")
  String[] origins() default {};

  //运行的请求头
  String[] allowedHeaders() default {};

  //配置获取响应的头信息, 在其中可以设置其他的头信息,不进行配置时, 默认可以获取到
  //Cache-Control、Content-Language、Content-Type、Expires、Last-Modified、Pragma字段
  String[] exposedHeaders() default {};

  //允许可访问的域发送请求的方法
  RequestMethod[] methods() default {};

  //浏览器是否应该同时发送凭证(如cookie)。默认false,开启设置为true
  String allowCredentials() default "";

  //准备响应前的缓存持续的最大时间(以秒为单位)
  long maxAge() default -1L;
}
//----------------------------------------------------------------------------------
@SpringBootApplication
@CrossOrigin(origins = {"*"}, maxAge = 3600, methods = {RequestMethod.GET},allowCredentials = "true")
public class WebApplication {

  public static void main(String[] args) {
    SpringApplication.run(WebApplication.class, args);
  }

}
②代码驱动:WebMvcConfigurer#addCorsMappings
@Configuration
public class AppWebMvcConfigurer implements WebMvcConfigurer {

  @Override
  public void addCorsMappings(CorsRegistry registry) {
    registry.addMapping("/**")
      .allowedOrigins("*")
      .allowCredentials(true)
      .allowedMethods("GET", "POST", "DELETE", "PUT","PATCH")
      .maxAge(3600);
  }
}
九、Spring WebFlux
Reactive概念
Reactor【反应堆模式】是事件驱动的,有一个或多个并发输入源,有一个Service Handler,有多个Request Handlers。Service Handler会同步的将输入的请求(Event)多路复用的分发给相应的Request Handler。
Reactive是异步非阻塞的,可以提高程序性能。
CallBack和Future缺陷
CallBack和Future均无法控制异步执行顺序,例如:加载资源和用户登陆同时进行而获取用户关注信息,需要等待用户登陆动作之后进行,CallBack和Future在此情景下不容易控制。Future可使用CompletableFuture解决问题。
Reactive编程定义
Reactive具有的原则
- 响应性的
- 适应性强的
- 弹性的
- 消息驱动的
效果:同步或异步非阻塞执行,数据传播被通知
Reactive的实现框架
- java9 Flow API
- RxJava
- Reactor
WebFlux基本介绍

Spring WebFlux是一套全新的Reactive Web栈技术,是SpringFramework5.0添加的新功能。实现完全非阻塞,支持Reactive Streams背压等特性,并且运行环境不限于Servlet容器。WebFlux实现了在资源有限的情况下,尽可能多的接收并处理请求【提升负载】而不是更快的响应。
webflux主要在如下两方面体现出独有的优势:
-
在servlet3.1其实已经提供了非阻塞的API,WebFlux提供了一种比其更完美的解决方案。使用非阻塞的方式可以利用较小的线程或硬件资源来处理并发进而提高其可伸缩性
-
函数式编程端点
Servlet模型&WebFlux
Servlet
servlet由servlet container进行生命周期管理。container运行时接受请求,并为每个请求分配一个线程(一般从线程池中获取空闲线程)然后调用service()。
弊端:servlet是一个简单的网络编程模型,当请求进入servlet container时,servlet container就会为其绑定一个线程,一旦并发上升,线程数量就会上涨,而线程资源代价是昂贵的(上线文切换,内存消耗大)严重影响请求的处理时间。在一些简单的业务场景下,不希望为每个request分配一个线程,只需要1个或几个线程就能应对极大并发的请求,这种业务场景下servlet模型没有优势。
Spring WebMvc是基于servlet的一个路由模型,即实现了所有请求处理的一个servlet【DispatcherServlet】,并由该servlet进行路由。所以spring webmvc无法摆脱servlet模型的弊端。
WebFlux
Webflux模式替换了旧的Servlet线程模型。用少量的线程处理request和response的IO操作,这些线程称为Loop线程,而业务交给响应式编程框架处理,用户可以将业务中阻塞的操作提交到响应式框架的work线程中执行,而不阻塞的操作依然可以在Loop线程中进行处理,大大提高了Loop线程的利用率。
SpringMVC与SpringWebFlux
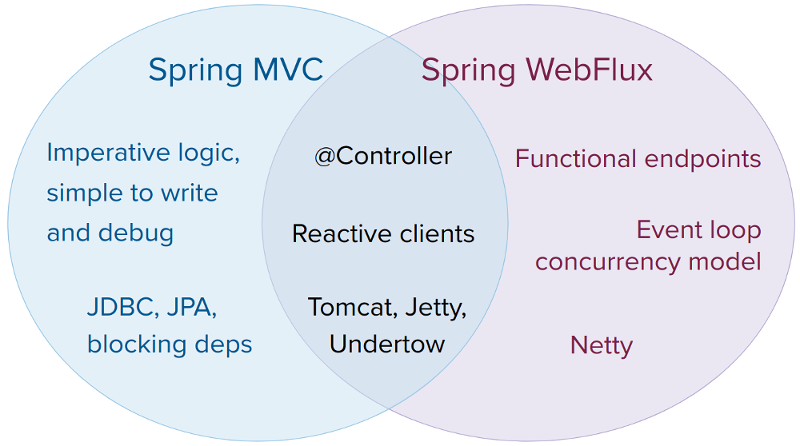
它们都可以用注解式编程模型,都可以运行在tomcat,jetty,undertow等servlet容器当中。但是SpringMVC采用命令式编程方式,代码一句一句的执行,这样更有利于理解与调试,而WebFlux则是基于异步响应式编程,对于调试和理解增大了难度。两种框架官方给出的建议是:
- 如果原先使用用SpringMVC好好的话,则没必要迁移。因为命令式编程是编写、理解和调试代码的最简单方法。因为老项目的类库与代码都是基于阻塞式的。
- 如果打算使用非阻塞式web框架,WebFlux确实是一个可考虑的技术路线,而且它支持类似于SpringMvc的Annotation的方式实现编程模式,也可以在微服务架构中让WebMvc与WebFlux共用Controller,切换使用的成本相当小
- 在SpringMVC项目里如果需要调用远程服务的话,你不妨考虑一下使用WebClient,而且方法的返回值可以考虑使用Reactive Type类型的,当每个调用的延迟时间越长,或者调用之间的相互依赖程度越高,其好处就越大
WebHandler
WebFlux已经脱离了Servlet API,由WebHandler实现类处理会话机制、请求过滤、静态资源等等。其实在HttpHandler的基本实现类通过适配器模式及装饰模式也间接的实现了WebHandler接口。
WebHandlerDecorator:WebHandler的装饰器,利用装饰模式实现相关功能的扩展
HttpWebHandlerAdapter: 进行Http请求处理,同时也是HttpHandler的实现类
FilteringWebHandler:通过WebFilter进行过滤处理的类,类似于Servlet中的Filter
ExceptionHandlingWebHandler: 针对于异常的处理类
ResourceWebHandler:用于静态资源请求的处理类
DispatcherHandler:请求的总控制器,类似于WebMVC中的DispatcherServlet
实现WebFlux示例
-
基于Annotated Controller方式实现和SpringMVC方式完全相同
-
函数式编程方式
/**
 * 类似于Controller,处理用户请求的真实逻辑
 */
public class StudentHandler {


  //这里采用Mono模式类似于点对点,也可使用Flux类似于发布、订阅
  public static Mono<ServerResponse> selectStudent(ServerRequest request) {
    Student studentBody = new Student();
    request.bodyToMono(Student.class).subscribe(
      student -> BeanUtils.copyProperties(student, studentBody));
    return ok().contentType(APPLICATION_JSON_UTF8).body(fromObject(studentBody));
  }

  public static Mono<ServerResponse> insertStudent(ServerRequest request){
    return ok().contentType(TEXT_PLAIN).body(fromObject("success"));

  }
  private static class Student {
    private Integer id;
    private String name;

    public Integer getId() {
      return id;
    }

    public void setId(Integer id) {
      this.id = id;
    }

    public String getName() {
      return name;
    }

    public void setName(String name) {
      this.name = name;
    }
  }
}

//===================================================================================

//配置类
@Configuration
@EnableWebFlux
public class WebConfig implements WebFluxConfigurer {

  @Bean
  public RouterFunction<?> routerFunctionA() {
    RouterFunction<ServerResponse> route = route()
      .GET("/student/{id}", accept(APPLICATION_JSON), StudentHandler::selectStudent)
      .POST("/student", StudentHandler::insertStudent)
      .build();
    return route;
  }
}
十、配置嵌入式Servlet容器
SpringBoot默认使用Tomcat作为嵌入式的Servlet容器
修改和嵌入式容器相关的配置参数方式
修改和server有关的配置(ServerProperties)
#修改通用配置
server:port: 8081
server:context-path: /crud

#修改tomcat特定配置,如修改其他容器,更改容器名
server:tomcat:uri-encoding: UTF-8
注册Servlet三大组件【Servlet、Filter、Listener】
SpringBoot默认是以jar包的方式启动嵌入式的Servlet容器来启动SpringBoot的web应用,没有web.xml文件,注册三大组件用以下方式
ServletRegistrationBean
@Bean
public ServletRegistrationBean<HelloServlet> helloServletBean() {
  return new ServletRegistrationBean<HelloServlet>(new HelloServlet(), "/hello");
}
FilterRegistrationBean
@Bean
public FilterRegistrationBean<HelloFilter> helloFilterBean() {
  FilterRegistrationBean<HelloFilter> helloFilterBean = new FilterRegistrationBean<HelloFilter>(new HelloFilter());
  helloFilterBean.addUrlPatterns("/hello");
  return helloFilterBean;
}
ServletListenerRegistrationBean
@Bean
public ServletListenerRegistrationBean<HelloListener> helloListenerBean() {
  return new ServletListenerRegistrationBean<HelloListener>(new HelloListener());
}
替换为其他嵌入式Servlet容器
Tomcat(默认使用)
<dependency>
  <!-- 引入web模块默认就是使用嵌入式的Tomcat作为Servlet容器 -->
  <groupId>org.springframework.boot</groupId>
  <artifactId>spring‐boot‐starter‐web</artifactId>
</dependency>
Jetty
<!-- 引入web模块  -->
<dependency>
  <groupId>org.springframework.boot</groupId>
  <artifactId>spring‐boot‐starter‐web</artifactId>
  <exclusions>
    <exclusion>
      <artifactId>spring‐boot‐starter‐tomcat</artifactId>
      <groupId>org.springframework.boot</groupId>
    </exclusion>
  </exclusions>
</dependency>

<!-- 引入jetty -->
<dependency>
  <artifactId>spring‐boot‐starter‐jetty</artifactId>
  <groupId>org.springframework.boot</groupId>
</dependency>
Undertow
<!-- 引入web模块  -->
<dependency>
  <groupId>org.springframework.boot</groupId>
  <artifactId>spring‐boot‐starter‐web</artifactId>
  <exclusions>
    <exclusion>
      <artifactId>spring‐boot‐starter‐tomcat</artifactId>
      <groupId>org.springframework.boot</groupId>
    </exclusion>
  </exclusions>
</dependency>

<!-- 引入undertow -->
<dependency>
  <artifactId>spring‐boot‐starter‐undertow<</artifactId>
    <groupId>org.springframework.boot</groupId>
    </dependency>
嵌入式Servlet容器自动配置原理
@Configuration
@ConditionalOnWebApplication
@EnableConfigurationProperties(ServerProperties.class)
public class EmbeddedWebServerFactoryCustomizerAutoConfiguration {

  //配置Tomcat的WebServer
  @Configuration
  @ConditionalOnClass({ Tomcat.class, UpgradeProtocol.class })
  public static class TomcatWebServerFactoryCustomizerConfiguration {
    @Bean
    public TomcatWebServerFactoryCustomizer tomcatWebServerFactoryCustomizer(
      Environment environment, ServerProperties serverProperties) {
      return new TomcatWebServerFactoryCustomizer(environment, serverProperties);
    }
  }

  //配置Jetty的WebServer
  @Configuration
  @ConditionalOnClass({ Server.class, Loader.class, WebAppContext.class })
  public static class JettyWebServerFactoryCustomizerConfiguration {
    @Bean
    public JettyWebServerFactoryCustomizer jettyWebServerFactoryCustomizer(
      Environment environment, ServerProperties serverProperties) {
      return new JettyWebServerFactoryCustomizer(environment, serverProperties);
    }
  }

  //配置Undertow的WebServer
  @Configuration
  @ConditionalOnClass({ Undertow.class, SslClientAuthMode.class })
  public static class UndertowWebServerFactoryCustomizerConfiguration {
    @Bean
    public UndertowWebServerFactoryCustomizer undertowWebServerFactoryCustomizer(
      Environment environment, ServerProperties serverProperties) {
      return new UndertowWebServerFactoryCustomizer(environment, serverProperties);
    }
  }

  //配置Netty的WebServer
  @Configuration
  @ConditionalOnClass(HttpServer.class)
  public static class NettyWebServerFactoryCustomizerConfiguration {
    @Bean
    public NettyWebServerFactoryCustomizer nettyWebServerFactoryCustomizer(
      Environment environment, ServerProperties serverProperties) {
      return new NettyWebServerFactoryCustomizer(environment, serverProperties);
    }
  }
}
步骤:
- SpringBoot启动时判断环境是,并根据环境不同创建不同的上下文
- SERVLET(AnnotationConfigServletWebServerApplicationContext)
- REACTIVE(AnnotationConfigReactiveWebServerApplicationContext)
- DEFAULT(AnnotationConfigApplicationContext)
- SpringBoot根据导入的依赖情况,给容器中添加相应的
xxxServerFactoryCustomizer - 使用WebServerFactoryCustomizerBeanPostProcessor调用定制器的定制方法
十一、使用外置的Servlet容器
嵌入式Servlet容器简单、便携,但是不支持JSP
外置的Servlet容器,外面安装Tomcat应用war包的方式打包
使用外置的Servlet容器步骤
- 必须创建一个war项目
- 将嵌入式的Tomcat指定为provided
<dependency>
  <groupId>org.springframework.boot</groupId>
  <artifactId>spring-boot-starter-tomcat</artifactId>
  <scope>provided</scope>
</dependency>
- 必须编写一个SpringBootServletInitializer的子类,并调用configure方法
public class ServletInitializer extends SpringBootServletInitializer {
  @Override
  protected SpringApplicationBuilder configure(SpringApplicationBuilder application) {
    return application.sources(SpringBootAppWarApplication.class);
  }
}
十二、启动配置原理
启动原理
-
创建SpringApplication对象
public SpringApplication(ResourceLoader resourceLoader, Class<?>... primarySources) { this.resourceLoader = resourceLoader; //传入run方法的配置类【配置类有多个】 this.primarySources = new LinkedHashSet<>(Arrays.asList(primarySources)); //根据加载的类判断当前环境【REACTIVE、SERVLET、NONE】 this.webApplicationType = WebApplicationType.deduceFromClasspath(); //加载META-INF/spring.factories的org.springframework.context.ApplicationContextInitializer setInitializers((Collection) getSpringFactoriesInstances( ApplicationContextInitializer.class)); //初始化器 //加载META-INF/spring.factories的org.springframework.context.ApplicationListener setListeners((Collection) getSpringFactoriesInstances(ApplicationListener.class)); //监听器 //确定主配置类【当前main方法的类】 this.mainApplicationClass = deduceMainApplicationClass(); } -
运行run方法启动程序
public ConfigurableApplicationContext run(String... args) {
  StopWatch stopWatch = new StopWatch();
  stopWatch.start();
  ConfigurableApplicationContext context = null;
  Collection<SpringBootExceptionReporter> exceptionReporters = new ArrayList<>();
  configureHeadlessProperty();
  //获取SpringApplicationRunListeners,在创建SpringApplication已加载
  SpringApplicationRunListeners listeners = getRunListeners(args);
  //回调所有的获取SpringApplicationRunListener.starting()方法
  listeners.starting();
  try {
    //封装命令行参数
    ApplicationArguments applicationArguments = new DefaultApplicationArguments(
      args);
    //准备环境,并在最后回调SpringApplicationRunListener.environmentPrepared();表示环境准备完成
    ConfigurableEnvironment environment = prepareEnvironment(listeners,applicationArguments);
    configureIgnoreBeanInfo(environment);
    Banner printedBanner = printBanner(environment);

    //创建ApplicationContext【决定创建web的ioc还是普通的ioc】
    context = createApplicationContext();
    //异常报告使用
    exceptionReporters = getSpringFactoriesInstances(
      SpringBootExceptionReporter.class,
      new Class[] { ConfigurableApplicationContext.class }, context);
    //准备上下文环境【将environment保存到ioc中,并且applyInitializers()】
    //applyInitializers():回调之前保存的所有的ApplicationContextInitializer的initialize方法
    //回调所有的SpringApplicationRunListener的contextPrepared()
    prepareContext(context, environment, listeners, applicationArguments,
                   printedBanner);
    //刷新容器;ioc容器初始化(如果是web应用还会创建嵌入式的Tomcat)
    refreshContext(context);
    //留作子类扩展
    afterRefresh(context, applicationArguments);
    stopWatch.stop();
    if (this.logStartupInfo) {
      new StartupInfoLogger(this.mainApplicationClass)
        .logStarted(getApplicationLog(), stopWatch);
    }
    //调用SpringApplicationRunListener的started方法
    listeners.started(context);
    //从ioc容器中获取所有的ApplicationRunner和CommandLineRunner进行回调
    //ApplicationRunner先回调,CommandLineRunner再回调
    callRunners(context, applicationArguments);
  }
  catch (Throwable ex) {
    handleRunFailure(context, ex, exceptionReporters, listeners);
    throw new IllegalStateException(ex);
  }

  try {
    //调用SpringApplicationRunListener的running方法
    listeners.running(context);
  }
  catch (Throwable ex) {
    handleRunFailure(context, ex, exceptionReporters, null);
    throw new IllegalStateException(ex);
  }
  return context;
}
事件监听机制
ApplicationContextInitializer的子类需要配置在META-INF/spring.factories的org.springframework.context.ApplicationContextInitializer属性中SpringApplicationRunListener的实现类直接放入IOC容器中会被加载
十三、自定义starter
编写自定义starter
-
使用以下注解将编写自动配置类
@Configuration //指定这个类是一个配置类 @ConditionalOnXXX //在指定条件成立的情况下自动配置类生效 @AutoConfigureAfter //指定自动配置类的顺序 @Bean //给容器中添加组件 @ConfigurationProperties//结合相关xxxProperties类来绑定相关的配置 @EnableConfigurationProperties //让xxxProperties生效加入到容器中 -
将自动配置类配置在META‐INF/spring.factories文件中以
org.springframework.boot.autoconfigure.EnableAutoConfiguration作为key -
约定
- 启动器只用来做依赖导入,是一个空工程
- 非spring自身的启动器以
自定义启动器名-spring-boot-starter命名 - 专起一个maven工程来写一个自动配置模块
- 启动器依赖自动配,别人只需要引入启动器(starter)