nginx服务
一、Nginx概述
简介
Nginx是一个开源且高效、可靠的HTTP中间件、代理服务。
nginx优势:
- IO多路复用的epoll
- 轻量级【功能模块少、代码模块化】
- CPU亲和【将一个进程”绑定” 到一个或一组CPU上,避免Cacahe Miss】
- 处理文件采用SendFile方式【mmap系统调用】
nginx版本选择
- Mainline Version 开发版
- Stable Version 稳定版
- Legacy Version 历史版本
YUM安装Nginx
第一步:安装前准备
#安装nginx必要库
yum -y install gcc-c++ gcc autoconf pcre-devel make automake
#安装可选命令工具
yum -y install wget httpd-tools
#官方要求执行
sudo yum install yum-utils
第二步:修改/etc/yum.repos.d/nginx.repo
[nginx-stable]
name=nginx stable repo
baseurl=http://nginx.org/packages/centos/$releasever/$basearch/
gpgcheck=1
enabled=1
gpgkey=https://nginx.org/keys/nginx_signing.key

[nginx-mainline]
name=nginx mainline repo
baseurl=http://nginx.org/packages/mainline/centos/$releasever/$basearch/
gpgcheck=1
enabled=0
gpgkey=https://nginx.org/keys/nginx_signing.key
第三步:执行安装
sudo yum install nginx
安装文件
rpm -ql nginx查看安装目录及文件
/etc/logrotate.d/nginx          #Nginx日志轮转,用于日志切割

/etc/nginx/nginx.conf           #nginx主要配置文件
/etc/nginx/conf.d/default.conf  #安装之后默认加载的文件
/etc/nginx/fastcgi_params       #cgi配置
/etc/nginx/scgi_params          #cgi配置
/etc/nginx/uwsgi_params         #cgi配置
/etc/nginx/koi-utf              #编码转换的映射文件
/etc/nginx/koi-win              #编码转换的映射文件
/etc/nginx/win-utf              #编码转换的映射文件
/etc/nginx/mime.types           #设置Http协议Content-Type与扩展名对应关系
/etc/nginx/modules              #nginx模块目录指向/usr/lib64/nginx/modules

/usr/lib64/nginx/modules        #nginx模块目录

/etc/sysconfig/nginx                         #用于守护进程
/etc/sysconfig/nginx-debug                   #用于守护进程
/usr/lib/systemd/system/nginx-debug.service  #用于守护进程
/usr/lib/systemd/system/nginx.service        #用于守护进程

/usr/sbin/nginx                 #nginx命令
/usr/sbin/nginx-debug           #nginx-debug命令

/usr/share/doc/nginx-1.16.0            #nginx手册
/usr/share/doc/nginx-1.16.0/COPYRIGHT  #nginx手册
/usr/share/man/man8/nginx.8.gz         #nginx帮助文件

/usr/share/nginx/html/50x.html     #nginx默认50x界面
/usr/share/nginx/html/index.html   #nginx默认index界面

/var/cache/nginx  #nginx缓冲目录
/var/log/nginx    #nginx日志目录
Nginx源码安装
提前准备:
- 下载并解压源码
- 安装必要库
yum -y install gcc-c++ gcc autoconf pcre-devel make automake zlib-devel openssl openssl-devel
第一步:设置编译参数
./configure \
--prefix=/etc/nginx \
--sbin-path=/usr/sbin/nginx \
--modules-path=/usr/lib64/nginx/modules \
--conf-path=/etc/nginx/nginx.conf \
--error-log-path=/var/log/nginx/error.log \
--http-log-path=/var/log/nginx/access.log \
--pid-path=/var/run/nginx.pid \
--lock-path=/var/run/nginx.lock \
--http-client-body-temp-path=/var/cache/nginx/client_temp \
--http-proxy-temp-path=/var/cache/nginx/proxy_temp \
--http-fastcgi-temp-path=/var/cache/nginx/fastcgi_temp \
--http-uwsgi-temp-path=/var/cache/nginx/uwsgi_temp \
--http-scgi-temp-path=/var/cache/nginx/scgi_temp \
--user=nginx \
--group=nginx \
--with-compat \
--with-file-aio \
--with-threads \
--with-http_addition_module \
--with-http_auth_request_module \
--with-http_dav_module \
--with-http_flv_module \
--with-http_gunzip_module \
--with-http_gzip_static_module \
--with-http_mp4_module \
--with-http_random_index_module \
--with-http_realip_module \
--with-http_secure_link_module \
--with-http_slice_module \
--with-http_ssl_module \
--with-http_stub_status_module \
--with-http_sub_module \
--with-http_v2_module \
--with-mail \
--with-mail_ssl_module \
--with-stream \
--with-stream_realip_module \
--with-stream_ssl_module \
--with-stream_ssl_preread_module \
--with-cc-opt='-O2 -g -pipe -Wall -Wp,-D_FORTIFY_SOURCE=2 -fexceptions -fstack-protector-strong --param=ssp-buffer-size=4 -grecord-gcc-switches -m64 -mtune=generic -fPIC' \
--with-ld-opt='-Wl,-z,relro -Wl,-z,now -pie'
第二步:编译&安装
make
make install
安装编译参数
使用nginx -V查看版本信息和安装编译参数
#安装目录或文件路径
--prefix=/etc/nginx
--sbin-path=/usr/sbin/nginx
--modules-path=/usr/lib64/nginx/modules
--conf-path=/etc/nginx/nginx.conf
--error-log-path=/var/log/nginx/error.log
--http-log-path=/var/log/nginx/access.log
--pid-path=/var/run/nginx.pid
--lock-path=/var/run/nginx.lock

#执行对应模块时,nginx所保留的临时文件
--http-client-body-temp-path=/var/cache/nginx/client_temp
--http-proxy-temp-path=/var/cache/nginx/proxy_temp
--http-fastcgi-temp-path=/var/cache/nginx/fastcgi_temp
--http-uwsgi-temp-path=/var/cache/nginx/uwsgi_temp
--http-scgi-temp-path=/var/cache/nginx/scgi_temp

#nginx进程启动的用户和用户组
--user=nginx
--group=nginx

--with-compat
--with-file-aio                   #使用aio传输文件,效率不一定比sendfile高
--with-threads
--with-http_addition_module
--with-http_auth_request_module
--with-http_dav_module
--with-http_flv_module
--with-http_gunzip_module         #支持gunzip的压缩方式。用于客户端不支持gzip压缩功能下
--with-http_gzip_static_module    #预读gzip功能
--with-http_mp4_module
--with-http_random_index_module   #目录中随机选取主页模块
--with-http_realip_module
--with-http_secure_link_module    #安全下载链接模块
--with-http_slice_module          #大文件拆分使用
--with-http_ssl_module            #https的证书相关
--with-http_stub_status_module    #查看nginx客户端状态模块
--with-http_sub_module            #HTTP内容替换模块
--with-http_v2_module
--with-mail
--with-mail_ssl_module
--with-stream                     #编译ngx_stream_core_module
--with-stream_realip_module
--with-stream_ssl_module
--with-stream_ssl_preread_module

#定义要传递到C编译器命令行的其他选项
--with-cc-opt='-O2 -g -pipe -Wall -Wp,-D_FORTIFY_SOURCE=2 -fexceptions -fstack-protector-strong --param=ssp-buffer-size=4 -grecord-gcc-switches -m64 -mtune=generic -fPIC'
#定义要传递到C链接器命令行的其他选项
--with-ld-opt='-Wl,-z,relro -Wl,-z,now -pie'
二、Nginx基本命令
-
检查nginx配置文件语法是否正确
nginx -t -c nginx.conf #t代表检查 c指定文件路径 -
重新加载配置文件
nginx -s reload -c nginx.conf #s代表信号relaod参数表示重加载 c指定文件路径 -
查看安装模块
nginx -V #查看编译时自己设置的参数包含模块信息 -
快速停止
nginx -s stop -
优雅停机(现有任务运行完成,其它请求拒绝)
nginx -s quit
三、简单配置
配置文件位置
/etc/nginx/nginx.conf为主要配置文件,在此配置文件中默认配置了 include /etc/nginx/conf.d/*.conf即会加载conf.d下的配置文件
nginx.conf配置
user  nginx;                                #设置nginx服务的系统启动用户
worker_processes  1;                        #工作进程数,建议设置位CPU核心数

error_log  /var/log/nginx/error.log warn;   #nginx错误日志
pid        /var/run/nginx.pid;              #pid文件位置

events {
    worker_connections  1024;               #每个进程允许的最大连接数,生成环境必须调整
}

http {
    include       /etc/nginx/mime.types;    #Content_Type配置
    default_type  application/octet-stream;

    #日志格式定义
    log_format  main  '$remote_addr - $remote_user [$time_local] "$request" '
                      '$status $body_bytes_sent "$http_referer" '
                      '"$http_user_agent" "$http_x_forwarded_for"';

    #访问日志定义使用main格式打印
    access_log  /var/log/nginx/access.log  main;

    sendfile        on;       #是否开启sendfile
    #tcp_nopush     on;       #是否不立即传输而是等待包大小或者时间到达条件,以提高效率

    keepalive_timeout  65;    #客户端和服务的keepalive超市时间

    #gzip  on;                          #压缩传输

    include /etc/nginx/conf.d/*.conf;   #引入辅助配置文件
}
Nginx配置结构
http {
  #......
  server {
    listen 80;
    server_name localhost;

    location / {
        root   /usr/share/nginx/html;
        index  index.html index.htm;
    }

    error_page   500 502 503 504  /50x.html;
    location = /50x.html {
        root   /usr/share/nginx/html;
    }
  }
  server {
    #......
  }
}
Nginx日志格式
Nginx可用日志变量
-
HTTP请求变量:$arg_PARAMETER、$http_HEADER、$sent_http_HEADER
-
内置变量:
名称 描述 $bytes_sent 发送到客户端的字节数 $connection 连接序列号 $connection_requests 通过连接发出的当前请求数 $msec 以秒为单位的时间 $pipe p代表pipelined方式请求,.代表其它方式$request_length 请求长度(包括请求行,请求头和请求正文) $request_time 以毫秒为单位请求处理时间 $status 回应状态 $time_iso8601 ISO 8601格式的当地时间 $time_local 本地时间格式 -
自定义变量
Nginx默认日志格式
log_format  main  '$remote_addr $status - $remote_user [$time_local] "$request" '
                      '$status $body_bytes_sent "$http_referer" '
                      '"$http_user_agent" "$http_x_forwarded_for"';
四、官方模块
http_stub_status_module
作用:监控nginx客户端状态
Syntax:	 stub_status;
Default: —
Context: server, location
配置示例
location /stub_status {
    stub_status;
}
#-------------------------------访问/stub_status返回数据--------------------------------
#Active connections: 2 					当前连接数
#server accepts handled requests
# 13 13 16                            握手次数 连接次数 请求次数
#Reading: 0 Writing: 1 Waiting: 1     读个数   写个数   等待个数
http_random_index_module
作用:访问随机主页
Syntax:	 random_index on | off;
Default: random_index off;
Context: location
配置示例
#只能配置在“/”下
location / {
    root         /opt/nginx/app/randmon_page;
    random_index on;
}
http_sub_module
作用:HTTP内容替换
【替换指定字符串】
Syntax:	 sub_filter string replacement;
Default: —
Context: http, server, location

【是否阻止response header中写入Last-Modified,防止缓存,默认是off,即防止缓存】
Syntax:	 sub_filter_last_modified on | off;
Default: sub_filter_last_modified off;
Context: http, server, location

【是否只替换一次字符串】
Syntax:	 sub_filter_once on | off;
Default: sub_filter_once on;
Context: http, server, location

Syntax:	 sub_filter_types mime-type ...;
Default: sub_filter_types text/html;
Context: http, server, location
配置示例
location / {
    sub_filter      'kun' 'KUN';
    sub_filter_once off;
    root            /opt/nginx/app/sub_module;
    index           submodule.html;
}
http_limit_conn_module
作用:限制连接频率
【开辟保存连接信息的空间 key:存储信息,name空间名称,size空间大小】
Syntax:	 limit_conn_zone key zone=name:size;
Default: —
Context: http

【限制同时连接的并发数量 zone:空间名称,number:限制个数】
Syntax:	 limit_conn zone number;
Default: —
Context: http, server, location
配置示例
limit_conn_zone $binary_remote_addr zone=coon_addr:10m;   #开辟10M空间
server {
    #......
    location / {
        limit_conn   addr 1;                              #每次一个ip只允许1次连接
        root        /usr/share/nginx/html;
        index       index.html index.htm;
    }
}
http_limit_req_module
作用:限制请求频率
【开辟保存请求信息的空间 key:存储信息,name空间名称,size空间大小,rate请求速率】
Syntax:  limit_req_zone key zone=name:size rate=rate [sync];
Default: —
Context: http

【限制同时请求的并发数量 zone:空间名称,burst允许超过个数,nodelay是否延迟执行burst 】
Syntax:	limit_req zone=name [burst=number] [nodelay | delay=number];
Default:	—
Context:	http, server, location
配置示例
#开辟10M空间,每IP每秒只允许请求一次
limit_req_zone  $binary_remote_addr zone=req_addr:10m rate=1r/s;
server {
    #......
    location / {
        limit_req   zone=req_addr burst=3 nodelay;	#允许突发连接数为3,不延迟
        root        /usr/share/nginx/html;
        index       index.html index.htm;
    }
}
#------------------------------------使用ab工具压测#-----------------------------------
#ab -n 20 -c 20 http://localhost/
#结果成功4个请求,失败16个请求
http_access_module
作用:控制访问的ip,如果多层代理此种方式有问题【基于remote_addr识别】
【允许访问名单】
Syntax:  allow address | CIDR | unix: | all;
Default: —
Context: http, server, location, limit_except

【拒绝访问名单】
Syntax:  deny address | CIDR | unix: | all;
Default: —
Context: http, server, location, limit_except
配置示例
location ~ ^/admin.html {
    root    /opt/nginx/app/access_module;
    index   admin.html;
    allow   192.168.1.0/24;         #允许次网段访问
    deny    all;                    #不允许其它人访问,注意带all参数的放最后
}
http_auth_basic_module
作用:用户登陆认证
【需开启次模块进行认证,string代表页面上的登陆提示信息】
Syntax:  auth_basic string | off;
Default: auth_basic off;
Context: http, server, location, limit_excep

【存储用户名、密码信息的模块】
Syntax:  auth_basic_user_file file;
Default: —
Context: http, server, location, limit_except
配置示例
location ~ ^/auth.html {
    root        	/opt/nginx/app/auth_module;
    auth_basic  	"manager site";
    auth_basic_user_file /etc/nginx/auth_conf;
}
#-------------------------------------------------------------------------------------
#使用【htpasswd -c /etc/nginx/auth_conf username 】制作存放密码文件
http_secure_link_module

作用:制定并允许检查请求的真实性以及保护资源免遭未授权的访问也可限制链接生效时长
Syntax:  secure_link expression;
Default: —
Context: http, server, location

Syntax:  secure_link_md5 expression;
Default: —
Context: http, server, location
配置示例
#echo -n '$expire$uri kun'| openssl md5 -binary | openssl base64 | tr +/ -_ | tr -d =
#即可等待md5值
location ~ ^/download {
    #定义md5和expire变量位置
    secure_link  $arg_md5,$arg_expire;
    #kun未混淆串
    secure_link_md5 "$secure_link_expires$uri kun";

    #如果md5不正确
    if ($secure_link = "") {
        return 403;
    }
    #如果expire已经失效
    if ($secure_link = "0") {
        return 410;
    }

    root /opt/nginx/app/secure_link;
}
http_geoip2_module
作用:基于IP地址匹配MaxMind GeoIP二进制文件,读取IP所在地域信息。
场景:区别国内国外作Http访问规则,区别国内城市作HTTP访问规则
安装:
#路径地址为解压的ngx_http_geoip2_module模块的路径
./configure 【原参数】 --add-dynamic-module=/path/to/ngx_http_geoip2_module
nginx.conf配置:
load_module modules/ngx_http_geoip2_module.so;

#......

http {
    #......
    geoip2 /etc/maxmind-country.mmdb {
      auto_reload 5m;
      $geoip2_metadata_country_build metadata build_epoch;
      #$variable_with_ip为用于辨别IP地址的变量,可设置为$remote_addr或自定义变量
      $geoip2_data_country_code default=US source=$variable_with_ip country iso_code;
      $geoip2_data_country_name country names en;
    }

    geoip2 /etc/maxmind-city.mmdb {
      $geoip2_data_city_name default=London city names en;
    }
}
五、Nginx服务
Nginx作为静态web服务
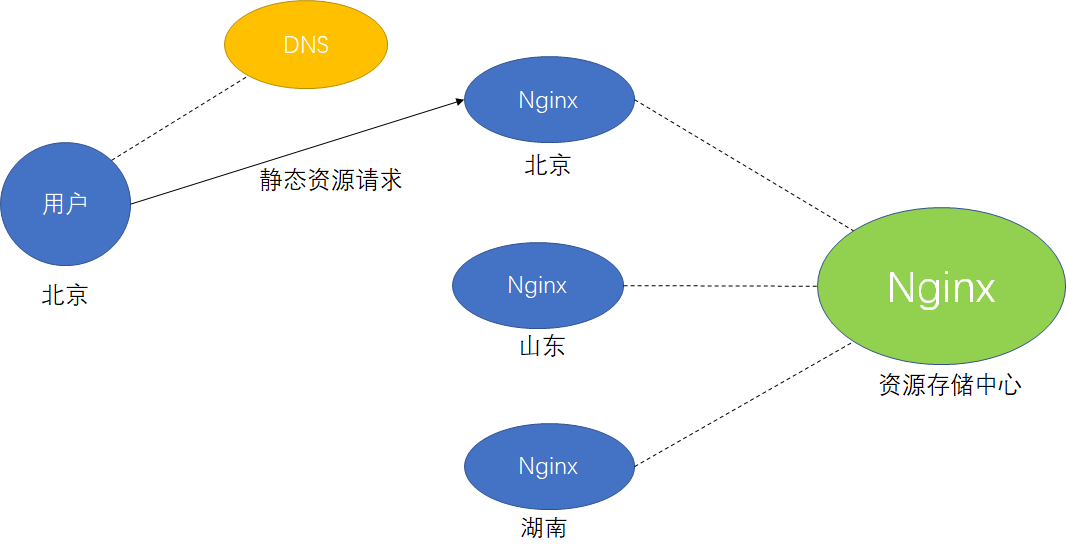
CDN服务简介

用户请求域名,通过DNS服务器解析之后,导向了最近的服务器以取得最快的访问服务。nginx作为静态资源缓存载体十分高效
配置Nginx文件读取相关
【采取epoll方式发送文件】
Syntax:  sendfile on | off;
Default: sendfile off;
Context: http, server, location, if in location

【不立即发送数据包,将多个包整体进行整合一次发送,提高传输效率,sendfile开启时才能使用】
Syntax:	 tcp_nopush on | off;
Default: tcp_nopush off;
Context: http, server, location

【与tcp_nopush相反,立即发送数据包,keepalive开启时才能使用】
Syntax:  tcp_nodelay on | off;
Default: tcp_nodelay on;
Context: http, server, location

--------------------------------ngx_http_gzip_module---------------------------------
【允许传输gzip文件,在客户端解压,减少带宽压力】
Syntax:  gzip on | off;
Default: gzip off;
Context: http, server, location, if in location

【压缩级别(1-9)依次上升】
Syntax:  gzip_comp_level level;
Default: gzip_comp_level 1;
Context: http, server, location

【gzip的http协议版本】
Syntax:  gzip_http_version 1.0 | 1.1;
Default: gzip_http_version 1.1;
Context: http, server, location

-------------------------------http_gzip_static_module-------------------------------
【预读gzip功能】
Syntax:  gzip_static on | off | always;
Default: gzip_static off;
Context: http, server, location
配置示例
location ~ .*\.(jpg|gif|png)$ {
    gzip    on;				      #开启压缩
    gzip_http_version 1.1;  #版本1.1
    gzip_comp_level 2;      #压缩等级2
    gzip_types text/plain application/javascript application/x-javascript text/css application/xml text/javascript application/x-httpd-php image/jpeg image/gif image/png;
    root    /opt/nginx/app/gzip/img;
}

location ~ .*\.(txt|xml)$ {
    gzip    on;             #开启压缩
    gzip_http_version 1.1;  #版本1.1
    gzip_comp_level 2;      #压缩等级2
    gzip_types text/plain application/javascript application/x-javascript text/css application/xml text/javascript application/x-httpd-php image/jpeg image/gif image/png;
    root    /opt/nginx/app/gzip/doc;
}

location ~ ^/download {
    gzip_static on;     #开启gzip预读取,必须要存在gzip压缩文件
    tcp_nopush on;      #开启tcp_nopush,累计包一起发送
    root    /opt/nginx/app/gzip;
}
配置Nginx浏览器缓存相关

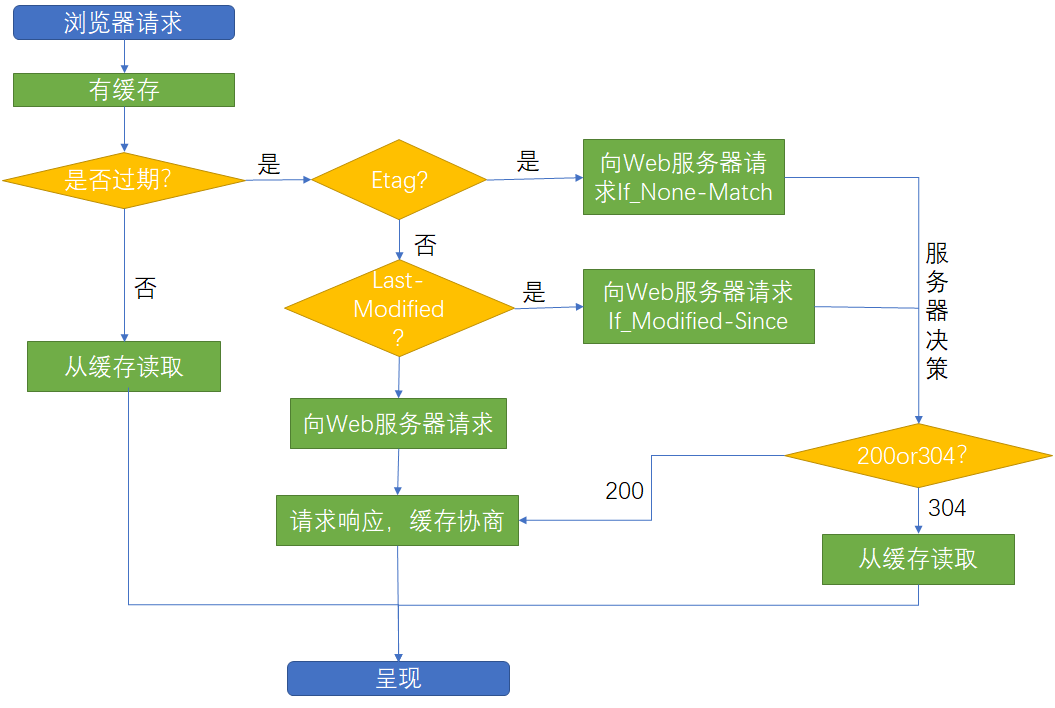
- 检验是否过期的方法:expires【http1.0】、Cache-control(max-age)【http1.1】
相关语法
----------------------------------http_headers_module---------------------------------
【设置缓存过期时间】
Syntax:  expires [modified] time;
Default: expires off;
Context: http, server, location, if in location
配置示例
#响应头返回max-age=86400,但浏览器可能会发送max-age=0并不使用,目的是每次交互拿到最新数据
location ~ .*\.html$ {
    expires 24h;
    root /opt/nginx/app/expires;
}
跨域访问
为避免CSRF攻击,浏览器默认禁止跨域访问。但因为业务设计或者其它原因我们有时需要打开跨域访问
---------------------------------http_headers_module----------------------------------
【添加Access-Control-Allow-Origin与Access-Control-Allow-Methods请求头】
Syntax:	 add_header name value [always];
Default: —
Context: http, server, location, if in location
配置示例
server {
    listen       81;
    server_name  www.kun.com;

    location ~ .*\.html$ {
        root    /opt/nginx/app/oringin;
        #被发起ajax请求的页面开启允许跨域访问,*代表允许所有ip跨域访问
        add_header  Access-Control-Allow-Origin  http://192.168.1.155;
        add_header  Access-Control-Allow-Methods GET,POST,PUT,DELETE,OPTIONS;
    }
}
基于http_refer防盗链
----------------------------------http_referer_module---------------------------------
【有效的referers信息,none代表空,block代表允许不带协议信息的】
Syntax:	 valid_referers none | blocked | server_names | string ...;
Default: —
Context: server, location
配置示例
location ~ .*\.(jpg|gif|png)$ {
    #允许的referers信息,none代表空,block代表允许不带协议信息的
    valid_referers none blocked 192.168.1.155;
    #当invalid_referer信息无效时$invalid_referer为1
    if ($invalid_referer) {
        return 403;
    }
    root    /opt/nginx/app/gzip/img;
}
#------------------------------------------------------------------------------------
#curl -I http://192.168.1.155/wei.png  返回200
#curl -I http://192.168.1.155/wei.png -e "http://www.baidu.com"	返回403
Nginx作为代理服务

正向代理&反向代理
正向代理:客户端明确要到达的目的服务器,单无法自己去访问,借助正向代理访问目的服务器,如翻墙、通过一台能上网的主机代理上网
正向代理:客户端知道要访问的服务器但是并不了解最终提供服务的服务器,如访问/admin和/merchant实际被代理到两条不同服务器
正向代理区别和反向代理的区别在于代理的对象不一样
- 正向代理代理的对象是客户端
- 反向代理代理的对象是服务器
配置代理
-----------------------------------http_proxy_module---------------------------------
【设置代理的目的地址】
Syntax:  proxy_pass URL;
Default: —
Context: location, if in location, limit_except

【缓存相关、是否尽可能多的缓存响应信息然后一次性发送给客户端】
Syntax:  proxy_buffering on | off;
Default: proxy_buffering on;
Context: http, server, location

Syntax:  proxy_buffer_size size;
Default: proxy_buffer_size 4k|8k;
Context: http, server, location

Syntax:	 proxy_buffers number size;
Default: proxy_buffers 8 4k|8k;
Context: http, server, location

Syntax:  proxy_busy_buffers_size size;
Default: proxy_busy_buffers_size 8k|16k;
Context: http, server, location

【重定向相关、对重定向的信息是否重写】
Syntax:	 proxy_redirect default;
         proxy_redirect off;
         proxy_redirect redirect replacement;
Default: proxy_redirect default;
Context: http, server, location

【请求相关、更改请求信息】
Syntax:	 proxy_set_header field value;
Default: proxy_set_header Host $proxy_host;
         proxy_set_header Connection close;
Context: http, server, location

Syntax:  proxy_hide_header field;
Default: —
Context: http, server, location

Syntax:  proxy_set_body value;
Default: —
Context: http, server, location

【超时相关】
Syntax:	 proxy_connect_timeout time;
Default: proxy_connect_timeout 60s;
Context: http, server, location

Syntax:	 proxy_read_timeout time;
Default: proxy_read_timeout 60s;
Context: http, server, location

Syntax:	 proxy_send_timeout time;
Default: proxy_send_timeout 60s;
Context: http, server, location
配置示例
#---------------------------------------反向代理--------------------------------------
server {
    listen       81;
    server_name  www.kun.com;

    location ~ / {
        root    /opt/nginx/app/proxy;
    }
}

#设置反向代理
location ~ ^/proxy.html$ {
    proxy_pass http://192.168.1.155:81;
}
#--------------------------------------http正向代理------------------------------------
server {
    #配置DNS解析IP地址,以及超时时间(5秒)
    resolver 8.8.8.8;    # 必需
    resolver_timeout 5s;

    #......

    location / {
        #配置正向代理参数
        proxy_pass http://$host$request_uri;

        #设置请求头信息
        proxy_set_header Host $http_host;
        proxy_set_header X-Real-IP $remote_addr
        #重定向设置
        proxy_redirect default;
        #设置超时时间
        proxy_connect_timeout 30;
        proxy_send_timeout 60s;
        proxy_read_timeout 60s;
        #配置缓存大小
        proxy_buffering on;
        proxy_buffer_size 32k;
        proxy_buffers 8 128k;
        proxy_busy_buffers_size 256k;
        #关闭磁盘缓存读写减少I/O
        proxy_max_temp_file_size 256k;
    }
}
#-------------------------------------https正向代理------------------------------------
server{
    resolver 8.8.8.8;
    access_log /var/log/nginx/access_proxy-443.log main;
    listen 443;
    location / {
    	root html;
    	index index.html index.htm;
    	proxy_pass https://$host$request_uri;
    	proxy_buffers 8 128k;
    	proxy_max_temp_file_size 0k;
    	proxy_connect_timeout 30;
    	proxy_send_timeout 60;
    	proxy_read_timeout 60;
    	proxy_next_upstream error timeout invalid_header http_502;
    }
    error_page 500 502 503 504 /50x.html;
    location = /50x.html {
    	root html;
    }
}
#curl --proxy proxy.cn:443 http://www.alipay.com测试代理是否可用
Nginx作为负载均衡服务

--------------------------------stream_upstream_module--------------------------------
Syntax:  upstream name { ... }
Default: —
Context: stream

【url_hash策略】
Syntax:	 hash key [consistent];
Default: —
Context: upstream
后端服务器在负载均衡调度中的状态
| 状态 | 解释 |
|---|---|
| down | 当前server暂时不参与负载均衡 |
| backup | 预留的备份服务器,当提供服务的server宕机顶上,恢复时隐退 |
| max_fails | 允许请求失败的次数 |
| fail_timeout | 经过max_fails失败后,服务暂停的时间 |
| max_conns | 限制最大的接收的连接数 |
调度算法
| 算法 | 简介 |
|---|---|
| 轮询 | 默认算法,按时间顺序逐一分配到不同的后端服务器 |
| weight | 加权轮询weight值越大,分配访问几率越高 |
| ip_hash | 每个请求按访问ip的hash结果分配 |
| least_conn | 连接数最少的机器被连接 |
| hash 关键数值 | hash自定义的key |
配置示例
upstream app {
    #ip_hash;             #策略配置
    #hash  $request_uri;  #使用uri作为hash的key
    server 192.168.1.158:8001 backup;
    server 192.168.1.158:8002 down;
    server 192.168.1.158:8003 max_fails=3 fail_timeout=30s weight=3;
}
server {
    #......
    location / {
        proxy_pass http://app;
    }
}
Nginx作为缓存服务
----------------------------------http_proxy_module----------------------------------
【缓存文件定义】
Syntax:  proxy_cache_path path [levels=levels] [use_temp_path=on|off] keys_zone=name:size [inactive=time] [max_size=size] [manager_files=number] [manager_sleep=time] [manager_threshold=time] [loader_files=number] [loader_sleep=time] [loader_threshold=time] [purger=on|off] [purger_files=number] [purger_sleep=time] [purger_threshold=time];
Default: —
Context: http

【是否开启缓存】
Syntax:	proxy_cache zone | off;
Default:
proxy_cache off;
Context:	http, server, location

【缓存过期周期】
Syntax:  proxy_cache_valid [code ...] time;
Default: —
Context: http, server, location

【缓存的维度】
Syntax:  proxy_cache_key string;
Default: proxy_cache_key $scheme$proxy_host$request_uri;
Context: http, server, location
清除指定缓存的方式
- rm -rf 缓存目录
- 第三方扩展模块ngx_cache_purge
部分页面不缓存方式
Syntax:  proxy_no_cache string ...;
Default: —
Context: http, server, location
配置示例
upstream app {
    server 192.168.1.158:8001;
    server 192.168.1.158:8002;
    server 192.168.1.158:8003;
}
#缓存文件配置
#参数位置1:路径【目录必须存在】
#参数位置2:目录结构,推荐1:2
#参数位置3:zone名称:zone空间大小【1m大约能存8千key信息】
#参数位置4:缓存文件最大占用空间
#参数位置5:某个缓存在inactive指定的时间内如果不访问,将会从缓存中删除
#参数位置6:是否使用临时路径存储,建议关闭
proxy_cache_path /var/cache/nginx/app levels=1:2 keys_zone=proxy_cache_zone:10m max_size=10g inactive=60m use_temp_path=off;
server {
    #......
    location / {
        proxy_cache proxy_cache_zone;
        proxy_cache_valid 200 304 12h;                   #200、304响应保存12小时
        proxy_cache_valid any 10m;                       #任何响应保存10分钟
        proxy_cache_key $host$uri$is_args$args;          #缓存的key
        add_header Nginx-Cache "$upstream_cache_status"; #返回前端响应头
        #当发生错误时重新请求
        proxy_next_upstream error timeout invalid_header http_500 http_502 http_503 http_504;
        proxy_pass http://app;
    }
}
大文件分片请求
-----------------------------------http_slice_module----------------------------------
【将请求的大文件进行拆分,分别向几台后端服务器发送读取请求】
Syntax:  slice size;
Default: slice 0;
Context: http, server, location
优势:每个子请求收到的数据都会形成一个独立的文件,一个请求断了,其它请求不受影响
缺点:slice设置不合理时可能会导致文件描述符耗尽等情况
六、动静分离
将动态资源和静态资源分离,提高程序效率,减少服务器压力而且当后台服务无法正常提供时静态服务依旧可用。策略是使用动态代理的方式转发请求到后台服务器。
upstream api {
    server 192.168.1.117:8080;
}
server {
	#......
    location / {
        root /opt/nginx/app/dynamic;
    }
    location ~ ^/api {
        proxy_pass http://api;
    }
}
七、rewrite规则
应用场景:
- URL访问跳转,支持开发设计(页面跳转、兼容性支持、展示效果等)
- SEO优化,便于排名靠前
- 维护(后台维护、流量转发)
- 安全
配置语法
---------------------------------http_rewrite_module---------------------------------
Syntax:  rewrite regex replacement [flag];
Default: —
Context: server, location, if
flag选项说明
| 值 | 解释 |
|---|---|
| last | 停止后续rewrite指令集,利用修改后的uri在nginx中重新匹配 |
| break | 停止后续rewrite指令集,表示完成rewrite寻找结果文件 |
| redirect | 返回302临时重定向,地址栏会显示跳转后的地址,用户下次还访问此链接 |
| permanent | 返回301永久重定向,地址栏会显示跳转后的地址,浏览器会缓存,用户下次直接访问即使nginx关闭也会重定向链接 |
配置示例
#------------------------------------break&last--------------------------------------
#请求 http://hostname/last  会定位到/test返回200响应码,浏览器地址不变
#请求 http://hostname/break 回去寻找root下/test文件,找不到返回404响应码,浏览器地址不变
location ~ ^/break {
    rewrite ^/break /test break;
}

location ~ ^/last {
    rewrite ^/last /test last;
}

location /test {
    default_type application/json;
    return 200 '{"status":"success"}';
}
#---------------------------------redirect&permanent---------------------------------
#请求 http://hostname/redirect 会被临时重定向到www.baidu.com
#请求 http://hostname/permanent 会被永久重定向到www.baidu.com,下次不会再请求次nginx
location ~ /redirect {
    rewrite /redirect http://www.baidu.com redirect;
}

location ~ /permanent {
    rewrite /permanent http://www.baidu.com permanent;
}
rewirte加入控制流程
Syntax:	 if (condition) { ... }
Default: —
Context: server, location
| 符号 | 含义 |
|---|---|
| =,!= | 做是否完全匹配 |
| ~,!~ | 区分大小写是否匹配字符串 |
| ~*,!~* | 不区分大小写是否匹配字符串 |
| -f,!-f | 文件存在,文件是否存在 |
| -d,!-d | 目录存在,目录是否存在 |
| -e ,!-e | 文件、目录、符号链接是否存在 |
| -x ,!-x | 文件是否可执行 |
配置示例
#http://hostname/course-11-22-33.html会寻找/opt/nginx/app/course/11/22/course_33.html
#如果页面存在则返回,如果不存在则返回404
#
#如果访问路径有误则进入if判断
#如果是chrome则重定向到163
#如果文件不存在则重定向到baidu
location ~ ^/course {
    rewrite /course-(\d+)-(\d+)-(\d+).html /course/$1/$2/course_$3.html break;
    if ($http_user_agent ~* chrome) {
        rewrite ^/(.*)$ http://www.163.com redirect;
    }
    if (!-f $request_filename) {
        rewrite ^/(.*)$ http://www.baidu.com?wd=$1 redirect;
    }
    root /opt/nginx/app;
}
rewirte的优先级:http>server>location
例:将请求全部定向到维护页 rewrite ^(.*)$ /pages/maintain.html break;
八、Https
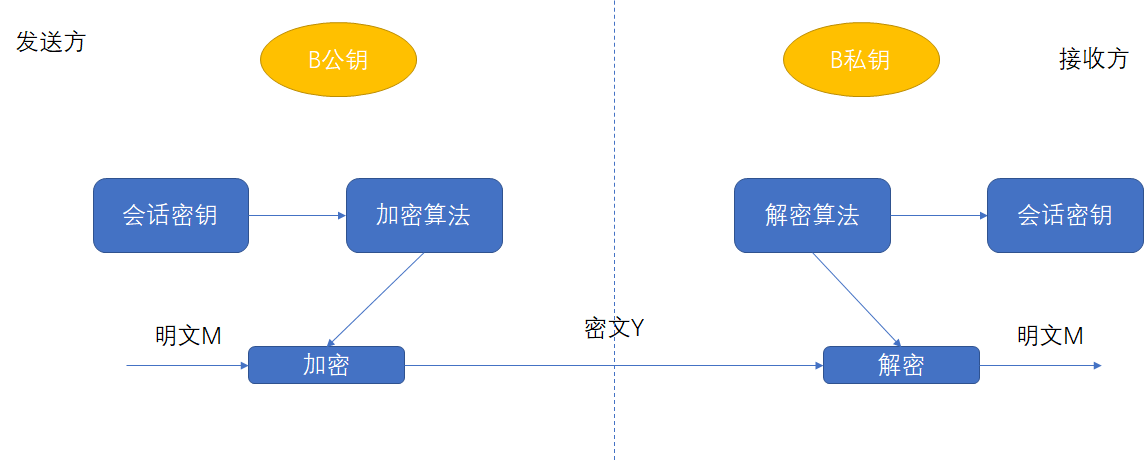
对称加密原理

非对称加密原理

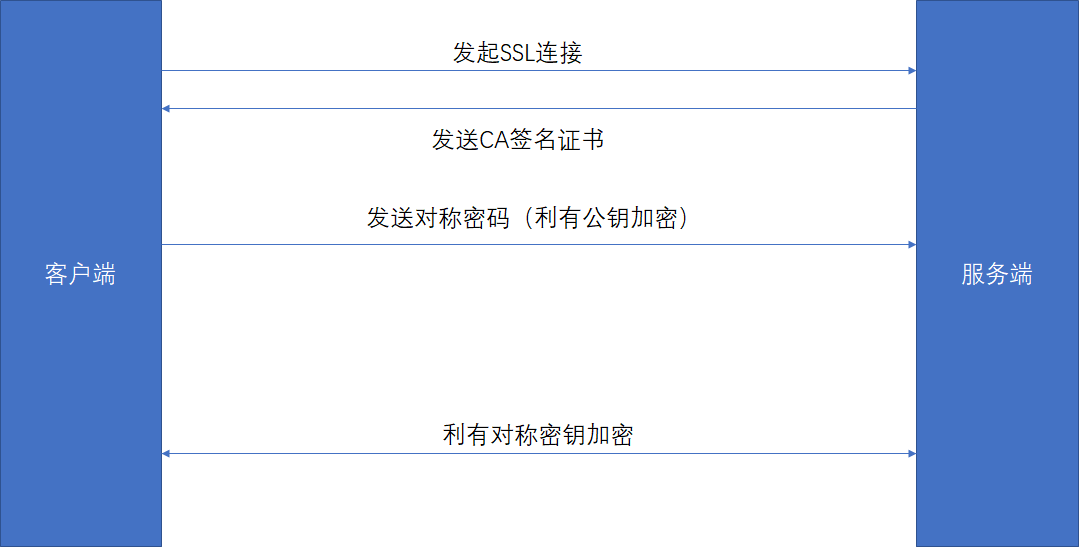
Https加密原理

自建CA证书生成(非受信机构颁发)
步骤一:生成key密钥
openssl genrsa -idea -out kun.key 1024 #idea为加密算法,过程中需要填写密码,需要记住
步骤二:生成证书签名请求文件(CSR文件)
openssl req -new -key kun.key -out kun.csr #如果给第三方机构需要按需填写
步骤三:生成证书签名文件(CA文件)
openssl x509 -req -days 3650 -in kun.csr -signkey kun.key -out kun.crt #days有效期
附key脱密步骤
#当key文件有密码时,每次启动nginx必须输入密码,造成不便
openssl rsa -in kun.key -out kun_nopass.key
根据苹果要求生成证书方式
#1、openssl版本要求1.2以上
#2、HTTPS证书必须使用SHA256以上哈希算法签名
#3、HTTPS证书必须使用RSA 2048位或ECC 256以上公钥算法
#4、使用前向加密技术
openssl genrsa -idea -out kun.key 1024

#-keyout 会重新生成不需要密码访问的key
openssl req -days 3650 -x509 -sha256 -nodes -newkey rsa:2048 -keyout kun.key -out kun_apple.crt
配置应用
-----------------------------------http_ssl_module-----------------------------------
【开启SSl,此语法在1.15.0以后废弃,直接在监听端口后加ssl即可】
Syntax:	 ssl on | off;
Default: ssl off;
Context: http, server

【crt文件位置】
Syntax:  ssl_certificate file;
Default: —
Context: http, server

【key文件位置】
Syntax:  ssl_certificate_key file;
Default: —
Context: http, server

【ssl session缓存】
Syntax:	ssl_session_cache off | none | [builtin[:size]] [shared:name:size];
Default: ssl_session_cache none;
Context: http, server

【ssl session缓存时长】
Syntax:	 ssl_session_timeout time;
Default: ssl_session_timeout 5m;
Context: http, server
配置示例
#如果crt没有脱密,要使用nginx -c /etc/nginx/nginx.conf启动,不可使用服务重启
server{
    #监听443
    listen 443 ssl;
    server_name localhost;

    ssl_certificate /etc/nginx/ssl_key/kun.crt;     #crt文件位置
    ssl_certificate_key /etc/nginx/ssl_key/kun.key; #key文件位置
    ssl_session_cache shared:SSL:10m;               #10m贡献缓存大约可存储8k-10k会话
    ssl_session_timeout 10m;                        #10分钟session过期

    location / {
        root /usr/share/nginx/html;
        index index.html index.htm;
    }
}
建议激活keepalive长连接【减少SSL握手网络的消耗】和设置ssl session缓存
九、Nginx与Lua开发
Nginx直接使用添加Lua模块已经不建议使用,会带来效率损失,已经不稳定。建议使用OpenResty。
OpenResty是一个基于Nginx与Lua的高性能Web平台,其内部集成了大量精良的Lua库、第三方模块以及大多数的依赖项。用于方便地搭建能够处理超高并发、扩展性极高的动态 Web 应用、Web 服务和动态网关。
源码安装步骤
第一步:安装pcre和openssl
yum install -y pcre openssl
第二步:执行构建命令
#配置安装模块,可更具环境自己挑选,使用./configure --help可查看可编译模块
./configure --prefix=/opt/openresty \
            --with-luajit \
            --without-http_redis2_module \
            --with-http_iconv_module
make
make install
第三步:将命令加入PATH变量【可选】
第四步:测试
#将一下代码加入/opt/openresty/nginx/conf/nginx.conf
location /hello_lua {
    default_type 'text/plain';
    content_by_lua 'ngx.say("hello, lua")';
}
#访问http://hostname/hello_lua查看是否打印出hello, lua
Nginx调用Lua模块指令顺序
| 命令 | 时间 |
|---|---|
| init_by_lua、init_by_lua_file | 当nginx master进程在加载nginx配置文件时运行指定的lua脚本,通常用来注册 lua 的全局变量或在服务器启动时预加载lua模块和分配内存 |
| init_worker_by_lua、init_worker_by_lua_file | 在每个nginx worker进程启动时调用指定的lua代码 |
| set_by_lua、set_by_lua_file | 设置一个变量,常用与计算一个逻辑,然后返回结果 该阶段不能运行Output API、Control API、Subrequest API、Cosocket API |
| rewrite_by_lua、rewrite_by_lua_file | 作为rewrite阶段的处理,为每个请求执行指定的lua代码 |
| access_by_lua,access_by_lua_file | 每个请求在访问阶段的调用lua脚本进行处理 |
| content_by_lua,content_by_lua_file | 作为“content handler”为每个请求执行lua代码,为请求者输出响应内容 |
| header_filter_by_lua,header_filter_by_lua_file | 一般用来设置cookie和headers |
| body_filter_by_lua,body_filter_by_lua_file | 一般会在一次请求中被调用多次, 因为这是实现基于 HTTP 1.1 chunked 编码的所谓“流式输出”的 |
| log_by_lua,log_by_lua_file | 在log阶段调用指定的lua脚本,并不会替换access log,而是在那之后进行调用 |
Nginx Lua API
| 名称 | 描述 |
|---|---|
| ngx.cookie_time | 设置cookie时间 |
| ngx.ctx | 当前请求的上下文 |
| ngx.exec | 内部重定向 |
| ngx.var | nginx变量 |
| ngx.req.get_header | 获取请求头 |
| ngx.req.get_url_args | 获取url请求参数 |
| ngx.redirct | 重定向 |
| ngx.print | 输出响应内容体 |
| ngx.say | 同ngx.print,单会加入换行符 |
十、常见问题
server_name多虚拟主机优先级访问
当出现同名同端口的虚拟主机时,nginx在加载配置时会报冲突警告,但是不会报错。
server {
    listen 80;
    server_name www.test_server1.com www.kun.com
    #......
}
server {
    listen 80;
    server_name www.test_server2.com www.kun.com
    #......
}
- 使用
www.test_server1.com或者www.test_server2.com访问会定位到相应的虚拟主机 - 使用
www.kun.com访问会定位到第一个匹配的虚拟主机,即和www.test_server1.com同台 - 使用IP地址访问会匹配第一个出现的虚拟主机,即和
www.test_server1.com同台
Location匹配优先级
Syntax:	 location [ = | ~ | ~* | ^~ ] uri { ... }
         location @name { ... }
Default: —
Context: server, location
~ 和~* 前缀表示正则location
=,^~ 、@ 和无任何前缀的都属于普通location
匹配优先级
- 普通location优先级大于正则location
- 普通location匹配时精确匹配
=级别最高,^~如果同时匹配上多个,匹配长度最长的优先(最大前缀匹配) - 正则location匹配时谁物理顺序先,谁最优先
- 当普通location中的前缀匹配和正则匹配均存在时。匹配到最大前缀匹配之后继续正则匹配,如果正则匹配上则覆盖前缀匹配结果
- 如果使用
=或者^~时,会终止后续的正则匹配
try_files的使用
当资源文件未找到时的自定义处理
Syntax:	 try_files file ... uri;
         try_files file ... =code;
Default: —
Context: server, location
配置示例
location / {
    root   /opt/nginx/app/try_files;
    try_files $uri  @resource_not_ready;
}

#资源未找到,直接返回页面
location @resource_not_ready {
    return "200" "资源未准备好,请稍后再试";
}
alias和root区别
#----------------------------------------root----------------------------------------
location /request_path/image/ {
    root /local_path/image/;
}
#访问 http:www.kun.com/request_path/image/cat.png
#文件 /local_path/image/request_path/image/cat.png

#----------------------------------------root----------------------------------------
location /request_path/image/ {
    alias /local_path/image/;
}
#访问 http:www.kun.com/request_path/image/cat.png
#文件 /local_path/image/cat.png
如何获取用户的真实IP

在第一层代理设置X-Real-IP,后续代理不可设置此头信息
常见错误码
Nginx:413 Request Entity Too Large
原因:用户上传文件时大小受限(文件信息在request body内)
解决方案:合理设置client_max_body_size大小
Syntax:  client_max_body_size size;
Default: client_max_body_size 1m;
Context: http, server, location
502 bad gateway
原因:后端服务未响应
504 Gateway Time-out
原因:后端服务执行超时
十一、Nginx性能优化
文件句柄设置
系统控制
修改/etc/security/limits.conf配置,添加nginx用户限制
nginx    hard    nproc    65535
nginx    soft    nproc    65535
nginx内部控制
此设置值要设置比系统控制小
worker_rlimit_core 65535;
CPU亲和
使用cat /proc/cpuinfo | grep "processor"查看当前CPU核心数
使用ps -eo pid,args,psr |grep nginx查看进程运行在哪些CPU核心
worker_processes  4;                     #设置nginx进程数建议和CPU核心数一致
#worker_cpu_affinity 0001 0010 0100 1000 #指定绑定的CPU核心
#worker_cpu_affinity auto;               #自动绑定
通用配置优化
user  nginx;
worker_processes  4;      #建议和CPU核心数一致
worker_cpu_affinity auto; #自动绑定

error_log  /var/log/nginx/error.log warn;
pid        /var/run/nginx.pid;

events {
    use epoll;                  #使用epoll模式
    worker_connections  10240;  #调节连接数
}


http {
    include       /etc/nginx/mime.types;
    default_type  application/octet-stream;
    charset utf-8;     #设置字符集

    log_format  main  '$remote_addr - $remote_user [$time_local] "$request" '
                      '$status $body_bytes_sent "$http_referer" '
                      '"$http_user_agent" "$http_x_forwarded_for"';

    access_log  /var/log/nginx/access.log  main;

    sendfile        on;     #使用sendfile
    tcp_nopush      on;     #尽量多的合并包发送
    #tcp_nodeny     on;     #实时性较高的场所可使用

    keepalive_timeout  65;

    gzip  on;                   #开启压缩
    gzip_disable "MIS [1-6]\."; #对IE关闭
    gzip_http_version 1.1;      #版本1.1

    include /etc/nginx/conf.d/*.conf;
}
十二、Nginx_Lua防火墙
ngx_lua_waf启动时会报错,但是可以使用,建议使用官方的waf模块
安装步骤
-
第一步:新建文件夹放置waf
#存放Nginx_Lua mkdir /etc/nginx/waf -
第二步:解压文件当waf目录下
-
第三步:nginx.conf的http段加入配置
lua_package_path "/etc/nginx/waf/?.lua"; lua_shared_dict limit 10m; init_by_lua_file /etc/nginx/waf/init.lua; access_by_lua_file /etc/nginx/waf/waf.lua; -
第四步:修改
/etc/nginx/waf/config.luaRulePath = "/etc/nginx/waf/wafconf/" --wafconf规则目录文件 attacklog = "on" --是否开启日志 logdir = "/var/log/nginx/hack/" --hack文件夹需要新建 UrlDeny="on" --是否拦截url访问 Redirect="on" --拦截后是否重定向 CookieMatch="on" --是否拦截cookie攻击 postMatch="on" --是否拦截post攻击 whiteModule="on" --是否开启URL白名单 black_fileExt={"php","jsp"} --填写不允许上传文件后缀类型 ipWhitelist={"127.0.0.1"} --ip白名单,多个ip用逗号分隔 ipBlocklist={"1.0.0.1"} --ip黑名单,多个ip用逗号分隔 CCDeny="on" --是否开启拦截cc攻击 CCrate="100/60" --设置cc攻击频率,单位为秒.每分钟默认钟同一个IP只能请求同一个地址100次 --警告内容,可在中括号内自定义 html=[[ <html xmlns="http://www.w3.org/1999/xhtml"><head> <meta http-equiv="Content-Type" content="text/html; charset=utf-8"> <title>网站防火墙</title> <style> p { line-height:20px; } ul{ list-style-type:none;} li{ list-style-type:none;} </style> </head> <body style=" padding:0; margin:0; font:14px/1.5 Microsoft Yahei, 宋体,sans-serif; color:#555;"> -
重新加载nginx配置文件即可
附录
curl命令
curl http://www.baidu.com                                      #仅返回服务端的的响应报文
curl -v http://www.baidu.com >/dev/null                        #返回请求头和响应头信息并将响应报文重定向空设备
curl -I http://192.168.1.155/wei.png                           #I仅查看返回头信息
curl -I http://192.168.1.155/wei.png -e "http://www.baidu.com" #e设置referer值
ab命令
ab -n50 -c20 http://www.baidu.com/       #压测命令,n代表请求总个数,c代表同时并发个数
ab -n50 -c20 -k http://www.baidu.com/    #-k代表长连接
指标展示
Server Software:        BWS/1.1
Server Hostname:        www.baidu.com
Server Port:            80

Document Path:          /
Document Length:        153380 bytes

Concurrency Level:      20              #并发级别
Time taken for tests:   3.636 seconds   #花费总时才
Complete requests:      50              #完成请求个数
Failed requests:        45              #失败个数
   (Connect: 0, Receive: 0, Length: 45, Exceptions: 0)
Write errors:           0
Keep-Alive requests:    0
Total transferred:      7728364 bytes
HTML transferred:       7680157 bytes
Requests per second:    13.75 [#/sec] (mean)          #QPS【每秒请求量】
Time per request:       1454.312 [ms] (mean)          #一个请求消耗的时间
Time per request:       72.716 [ms] (mean, across all concurrent requests) #服务端处理请求时间,不包含网络时间
Transfer rate:          2075.82 [Kbytes/sec] received                      #网络传输速率

Connection Times (ms)
              min  mean[+/-sd] median   max
Connect:        4    8   2.0      9      14
Processing:   358 1288 716.1   1075    3609
Waiting:        9  196 157.0    193     576
Total:        366 1296 716.6   1086    3617

Percentage of the requests served within a certain time (ms)
  50%   1086
  66%   1408
  75%   1570
  80%   1932
  90%   2421
  95%   2853
  98%   3617
  99%   3617
 100%   3617 (longest request)
gzip命令
gzip –c filename > filename.gz  #压缩为gzip格式,并保留源文件
gunzip filename                 #解压gzip文件haproxy