RabbitMQ的使用
一、主流消息中间件介绍
ActiveMQ
ActiveMQ是Apache出品的能力强劲的开源消息总线,并且它完全支持JMS规范的消息中间件。具有丰富的API、多种集群构建模式。中小型公司应用广泛,但服务性能不是特别好。
Kafka
Kafa是Linkedln开源的分布式发布系统-订阅消息系统,目前归属于Apache顶级项目。Kafka主要特点是基于拉取(Pull)模式处理信息消费,追求高吞吐量,对消息的重复、丢失、错误没有严格要求,适合生产大量数据的互联网服务的数据收集业务。
RocketMQ
RocketMQ是阿里开源的消息中间件,目前归属于Apache顶级项目。纯Java开发,具有高吞吐量、高可用性、适合大规模分布式系统应用的特点。可用于交易、充值、流计算、消息推送、日志流式处理等场景。
RabbitMQ
RabbitMQ是用Erlang语言开发的开源消息队列系统,基于AMQP协议实现。AMQP协议更多是用在企业系统内,对数据一致性、稳定性和可靠性要求高的场景,对性能和吞吐量的要求在次位。
二、AMQP协议
AMQP【Advanced Message Queuing Protocol】一个提供统一消息服务的应用层标准高级消息队列协议,是一个二进制协议,是应用层协议的一个开放标准,为面向消息的中间件设计。基于此协议的客户端与消息中间件可传递消息,并不受客户端中间件不同产品,不同的开发语言等条件的限制。
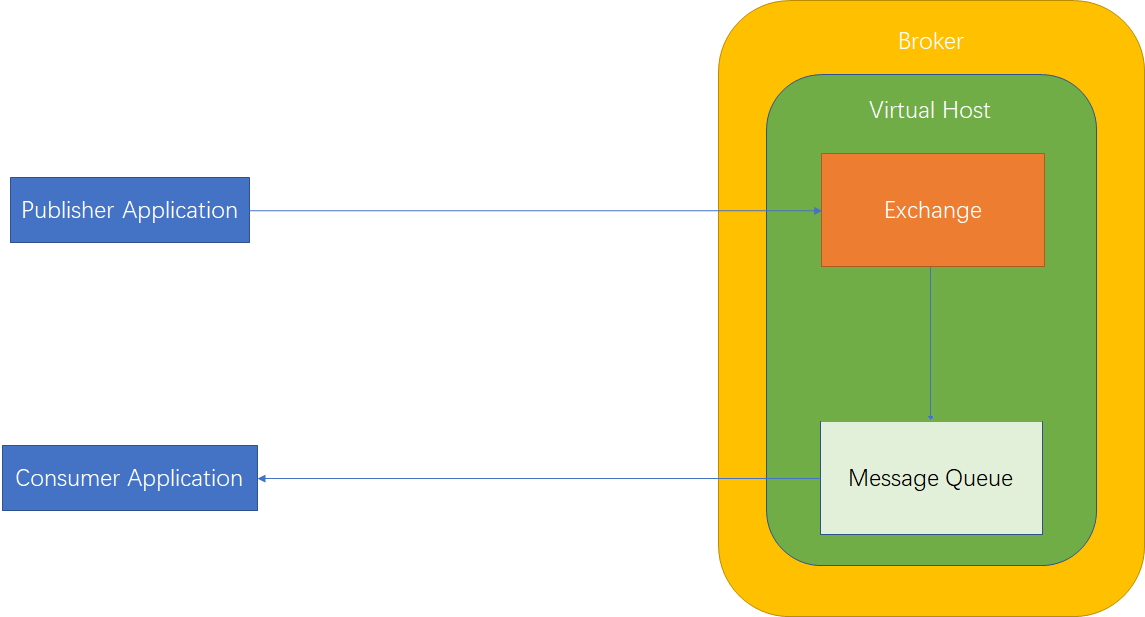
AMQP 中包含的主要元素
- 生产者【Producer】:向Exchange发布消息的应用。
- 消费者【Consumer】:从消息队列中消费消息的应用。
- 消息队列【Message Queue】:服务器组件,用于保存消息,直到发送给消费者。
- 消息【Message】:传输的内容。 由Properties和Body组成。
- 交换器【Exchange】:路由组件,接收Producer发送的消息,并将消息路由转发给消息队列。
- 虚拟主机【Virtual Host】: 一批交换器,消息队列和相关对象。虚拟主机是共享相同身份认证和加密环境的独立服务器域,实现逻辑上的隔离。
- Broker :AMQP的服务端称为Broker。
- 连接【Connection】:一个网络连接,比如TCP/IP套接字连接。
- 信道【Channel】:多路复用连接中的一条独立的双向数据流通道,为会话提供物理传输介质。
- 绑定器【Binding】:消息队列和交换器之间的虚拟连接,Binding中包含Routing key。
- 路由键【Routing key】:一个路由规则,虚拟机用它确定如何进行消息路由。
AMQP协议模型
三、Rabbit安装&基本命令
安装Erlang
第一步:添加一些标准存储库中不存在的包
yum install https://dl.fedoraproject.org/pub/epel/epel-release-latest-7.noarch.rpm
第二步:下载RabbitMQ对应的Erlang包
yum localinstall erlang-[version].x86_64.rpm
安装RabbitMQ
第一步:从官网找到下载RabbitMQ的RPM安装包
wget https://github.com/rabbitmq/rabbitmq-server/releases/download/[version]/rabbitmq-server-[version].el7.noarch.rpm
第二步:安装RabbitMQ
yum localinstall rabbitmq-server-[version]-1.el7.noarch.rpm
第三步:修改/usr/lib/rabbitmq/lib/rabbitmq_server-版本号/ebin/rabbit.app
{loopback_users, ["guest"]}
第四步:启动服务,默认端口5672
systemctl start rabbitmq-server
rabbitmqctl start_app
安装Web管理界面
# 默认端口15672
rabbitmq-plugins enable rabbitmq_management
基本命令
- 开启应用:
rabbitmqctl start_app - 关闭应用:
rabbitmqctl stop_app - 节点状态:
rabbitmqctl status - 移除所有数据:
rabbitmqctl reset
四、Java Client的简单使用
- 消费者
public static void main(String[] args) throws Exception {
  //1.创建连接工厂
  ConnectionFactory connectionFactory = new ConnectionFactory();
  connectionFactory.setHost("192.168.1.155");
  connectionFactory.setPort(5672);

  //2.创建连接
  Connection connection = connectionFactory.newConnection();

  //3.通过连接得到Channel
  Channel channel = connection.createChannel();

  /**
    * 4.声明Queue【创建Queue】
    * queue        - queue名称
    * durable      - 是否持久化,durable是否持久化,如果不持久化,重启之后不会自动建立
    * exclusive    - 是否是模式独占,只有创建这个队列的消费者端才允许连接到该队列
    * autoDelete   - 是否自动删除,当没有关联exchange时删除
    * arguments    - 额外参数
    */
  channel.queueDeclare("RoutingKey-001", true, false, false, null);

  /**
    * 5.创建消费者 pull 模型主动拉取消息,不阻塞
    * queue        - queue名称
    */
  GetResponse response = channel.basicGet("RoutingKey-001", true);
  if(response != null) {
    AMQP.BasicProperties props = response.getProps();
    byte[] body = response.getBody();
    System.out.println("routingKey: "+ response.getEnvelope().getRoutingKey());
    System.out.println("body:"+ new String(body));
  }
  Thread.sleep(1000000L);
  //5.关闭相关连接
  channel.close();
  connection.close();
}
- 生产者
public static void main(String[] args) throws Exception{
  //1.创建连接工厂
  ConnectionFactory connectionFactory = new ConnectionFactory();
  connectionFactory.setHost("192.168.1.155");
  connectionFactory.setPort(5672);

  //2.创建连接
  Connection connection = connectionFactory.newConnection();

  //3.通过连接得到Channel
  Channel channel = connection.createChannel();

  //4.通过channel发生数据
  for (int i = 0; i < 5; i++) {
    String msg = "message " + i;
    /**
      * 5.发送消息
      * exchange     - 交换机名称
      * routingkey   - 路由键
      * props        - 属性
      * body         - 消息内容
      */
    channel.basicPublish("", "RoutingKey-001", null, msg.getBytes());
  }

  //6.关闭相关连接
  channel.close();
  connection.close();
}
五、Exchange交换机
Exchange:接收消息,并根据路由键转发消息所绑定的队列。通俗是将消息分配给消息队列
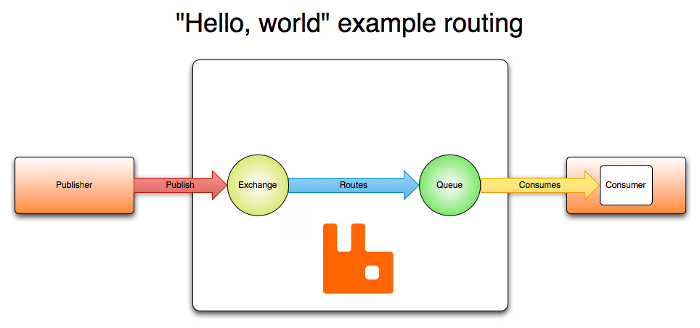
AMQP【0-9-1】的Exchange 有如下四种
| 名称 | 默认预先声明的名字 |
|---|---|
| Direct exchange | (Empty string) and amq.direct |
| Topic exchange | amq.topic |
| Fanout exchange | amq.fanout |
| Headers exchange | amq.match (and amq.headers in RabbitMQ) |
交换机的属性
- Durability :是否持久化
- Auto-delete:当最后一个Exchange绑定的队列删除时也删除交换机
- Internal:当前Exchange是否用于RabbitMQ内部使用,默认为false
Direct Exchange
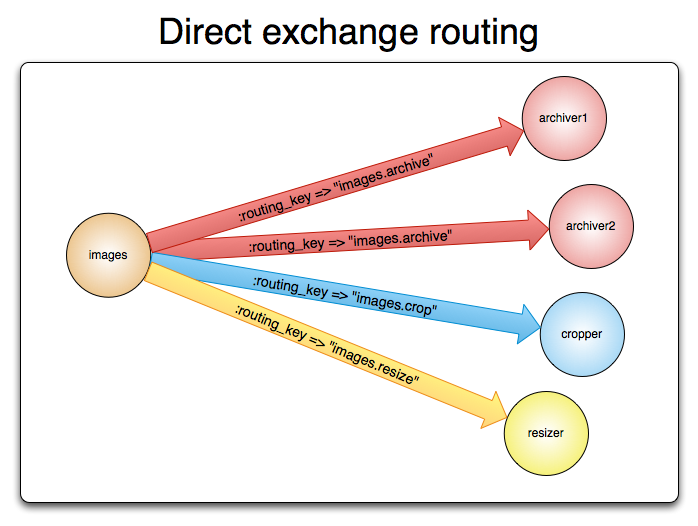
所有发送到Direct Exchange中的消息被转发到绑定对应RoutingKey的Queue中,也可以用于多播路由【一个RoutingKey能绑定多个Queue】
消费者【需要声明Exchange并将Exchange和Queue绑定】
public static void main(String[] args) throws IOException, TimeoutException {
  //1.创建连接工厂
  ConnectionFactory connectionFactory = new ConnectionFactory();
  connectionFactory.setHost("192.168.1.155");
  connectionFactory.setPort(5672);
  connectionFactory.setVirtualHost("/");               //设置虚拟主机
  connectionFactory.setAutomaticRecoveryEnabled(true); //设置自动重连
  connectionFactory.setConnectionTimeout(5000);        //设置超时时间

  //2.创建Connect
  Connection connection = connectionFactory.newConnection();

  //3.创建Channel
  Channel channel = connection.createChannel();

  /**
    * 4.声明Exchange
    * exchange        -交换机名称
    * type            -交换机类型
    * durable         -是否持久化,不持久化重启会消失
    * autoDelete      -当交换机绑定的最后一个Queue删除时是否删除
    * internal        -此交换机是否内部使用
    * arguments       -额外参数
    */
  channel.exchangeDeclare("app_exchange_direct", "direct", true, false, false, null);

  /**
    * 5.声明Queue
    * queue        - queue名称
    * durable      - 是否持久化
    * exclusive    - 是否独占
    * autoDelete   - 是否自动删除
    * arguments    - 额外参数
    */
  channel.queueDeclare("app_queue_direct",true,false,false,null);

  //6.建立绑定关系
  channel.queueBind("app_queue_direct", "app_exchange_direct","direct_routingKey");

  //7.读取消息
  GetResponse response = channel.basicGet("app_queue_direct", true);
  if(response != null) {
    AMQP.BasicProperties props = response.getProps();
    byte[] body = response.getBody();
    System.out.println("routingKey: "+ response.getEnvelope().getRoutingKey());
    System.out.println("body:"+ new String(body));
  }

  //8.关闭资源
  channel.close();
  connection.close();
}
生产者
public static void main(String[] args) throws Exception{
  //1.创建连接工厂
  ConnectionFactory connectionFactory = new ConnectionFactory();
  connectionFactory.setHost("192.168.1.155");
  connectionFactory.setPort(5672);
  connectionFactory.setVirtualHost("/");

  //2.创建连接
  Connection connection = connectionFactory.newConnection();

  //3.通过连接得到Channel
  Channel channel = connection.createChannel();

  /**
    * 4.通过channel发生数据
    * exchange     - 交换机名称
    * routingkey   - 路由键
    * props        - 属性
    * body         - 消息内容
    */
  String msg = "message direct";
  channel.basicPublish("app_exchange_direct", "direct_routingKey", null, msg.getBytes());

  //5.关闭相关连接
  channel.close();
  connection.close();
}
Topic Exchange
-
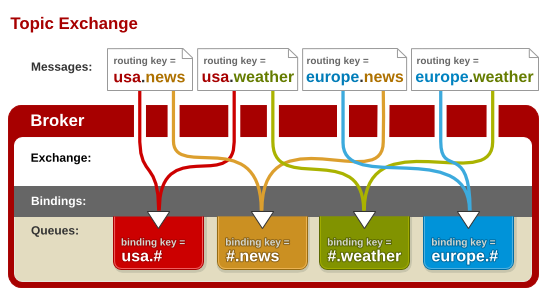
所有发送到Topic Exchange的消息被转发到所有关心的RouteKey的Queue上
- Exchange将RouteKey和Topic进行
模糊匹配#:匹配一个或多个词*:匹配一个词
- Topic Exchange通常用于消息的多播路由
消费者【需要声明Exchange并将Exchange和Queue绑定】
public static void main(String[] args) throws Exception {
  //1.创建连接工厂
  ConnectionFactory connectionFactory = new ConnectionFactory();
  connectionFactory.setHost("192.168.1.155");
  connectionFactory.setPort(5672);
  connectionFactory.setVirtualHost("/");               //设置虚拟主机
  connectionFactory.setAutomaticRecoveryEnabled(true); //设置自动重连
  connectionFactory.setConnectionTimeout(5000);        //设置超时时间

  //2.创建Connect
  Connection connection = connectionFactory.newConnection();

  //3.创建Channel
  Channel channel = connection.createChannel();

  /**
    * 4.声明Exchange
    * exchange        -交换机名称
    * type            -交换机类型
    * durable         -是否持久化
    * autoDelete      -当交换机绑定的最后一个Queue删除时是否删除
    * internal        -此交换机是否内部使用
    * arguments       -额外参数
    */
  channel.exchangeDeclare("app_exchange_topic", "topic", true, false, false, null);

  /**
    * 5.声明Queue
    * queue        - queue名称
    * durable      - 是否持久化
    * exclusive    - 是否独占
    * autoDelete   - 是否自动删除
    * arguments    - 额外参数
    */
  channel.queueDeclare("app_queue_topic", true, false, false, null);

  //6.建立绑定关系
  channel.queueBind("app_queue_topic", "app_exchange_topic", "broadcast.*");

  //7.读取消息
  GetResponse response = channel.basicGet("app_queue_topic", true);
  if(response != null) {
    AMQP.BasicProperties props = response.getProps();
    byte[] body = response.getBody();
    System.out.println("routingKey: "+ response.getEnvelope().getRoutingKey());
    System.out.println("body:"+ new String(body));
  }

  //8.关闭资源
  channel.close();
  connection.close();
}
生产者
public static void main(String[] args) throws Exception {
  //1.创建连接工厂
  ConnectionFactory connectionFactory = new ConnectionFactory();
  connectionFactory.setHost("192.168.1.155");
  connectionFactory.setPort(5672);
  connectionFactory.setVirtualHost("/");

  //2.创建连接
  Connection connection = connectionFactory.newConnection();

  //3.通过连接得到Channel
  Channel channel = connection.createChannel();

  /**
    * 4.通过channel发生数据
    * exchange     - 交换机名称
    * routingkey   - 路由键
    * props        - 属性
    * body         - 消息内容
    */
  channel.basicPublish("app_exchange_topic", "broadcast.user", null, "broadcast user".getBytes());

  channel.basicPublish("app_exchange_topic", "broadcast.news", null, "broadcast news".getBytes());

  //5.关闭相关连接
  channel.close();
  connection.close();
}
Fanout Exchange
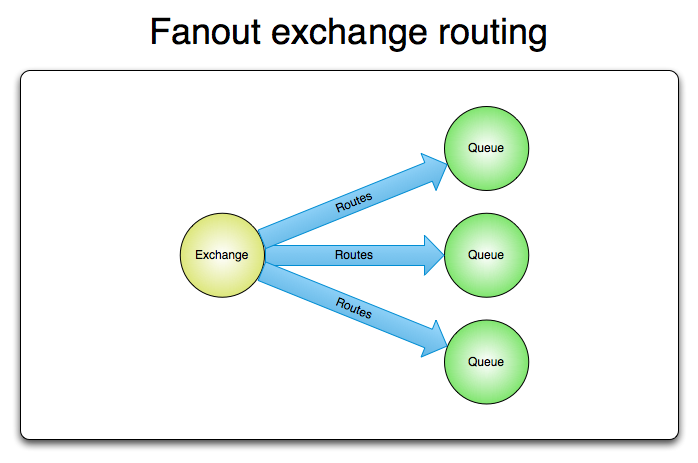
- 不需要RoutingKey,不处理RoutingKey
- 可以理解为路由表的模式
- 需要提前将Exchange与Queue进行绑定
- 一个Exchange可以绑定多个Queue
- 一个Queue可以同多个Exchange进行绑定
- 如果接受到消息的Exchange没有与任何Queue绑定,则消息会被抛弃
- Fanout交换机转发消息是最快的
消费者【需要声明Exchange并将Exchange和Queue绑定但不需要路由键】
public static void main(String[] args) throws Exception {
  //1.创建连接工厂
  ConnectionFactory connectionFactory = new ConnectionFactory();
  connectionFactory.setHost("192.168.1.155");
  connectionFactory.setPort(5672);
  connectionFactory.setVirtualHost("/");               //设置虚拟主机
  connectionFactory.setAutomaticRecoveryEnabled(true); //设置自动重连
  connectionFactory.setConnectionTimeout(5000);        //设置超时时间

  //2.创建Connect
  Connection connection = connectionFactory.newConnection();

  //3.创建Channel
  Channel channel = connection.createChannel();

  /**
    * 4.声明Exchange
    * exchange        -交换机名称
    * type            -交换机类型
    * durable         -是否持久化
    * autoDelete      -当交换机绑定的最后一个Queue删除时是否删除
    * internal        -此交换机是否内部使用
    * arguments       -额外参数
    */
  channel.exchangeDeclare("app_exchange_fanout", "fanout", true, false, false, null);

  /**
    * 5.声明Queue
    * queue        - queue名称
    * durable      - 是否持久化
    * exclusive    - 是否独占
    * autoDelete   - 是否自动删除
    * arguments    - 额外参数
    */
  channel.queueDeclare("app_queue_fanout", true, false, false, null);

  //6.建立绑定关系[routingKey不能为null]
  channel.queueBind("app_queue_fanout", "app_exchange_fanout", "");

  //7.读取消息
  GetResponse response = channel.basicGet("app_queue_fanout", true);
  if(response != null) {
    AMQP.BasicProperties props = response.getProps();
    byte[] body = response.getBody();
    System.out.println("routingKey: "+ response.getEnvelope().getRoutingKey());
    System.out.println("body:"+ new String(body));
  }

  //8.关闭资源
  channel.close();
  connection.close();
}
生产者
public static void main(String[] args) throws Exception {
  //1.创建连接工厂
  ConnectionFactory connectionFactory = new ConnectionFactory();
  connectionFactory.setHost("192.168.1.155");
  connectionFactory.setPort(5672);
  connectionFactory.setVirtualHost("/");

  //2.创建连接
  Connection connection = connectionFactory.newConnection();

  //3.通过连接得到Channel
  Channel channel = connection.createChannel();

  /**
    * 4.通过channel发生数据
    * exchange     - 交换机名称
    * routingkey   - 路由键,不能为null
    * props        - 属性
    * body         - 消息内容
    */
  String msg = "message fanout";
  channel.basicPublish("app_exchange_fanout", "", null, msg.getBytes());

  //5.关闭相关连接
  channel.close();
  connection.close();
}
Headers Exchange
header exchange与topic exchange有点相似,但是topic exchange的路由是基于路由键,而header exchange的路由值基于消息的header数据topic exchange路由键只有是字符串,而头交换机可以是整型和哈希值- 消息header数据里有一个特殊值”x-match”,它有两个值
- all【默认值】: message中header的键值对和交换机的header键值对全部匹配,才可以路由到对应队列
- any:message中header键值对和交换机的header键值对任意一个匹配,就可以路由到对应队列
消费者【需要声明Exchange并将Exchange和Queue绑定需要定义头信息】
{
  //1.创建连接工厂
  ConnectionFactory connectionFactory = new ConnectionFactory();
  connectionFactory.setHost("192.168.1.155");
  connectionFactory.setPort(5672);
  connectionFactory.setVirtualHost("/");               //设置虚拟主机

  //2.创建Connect
  Connection connection = connectionFactory.newConnection();

  //3.创建Channel
  Channel channel = connection.createChannel();

  /**
    * 4.声明Exchange
    * exchange        -交换机名称
    * type            -交换机类型
    * durable         -是否持久化
    * autoDelete      -当交换机绑定的最后一个Queue删除时是否删除
    * internal        -此交换机是否内部使用
    * arguments       -额外参数
    */
  channel.exchangeDeclare("app_exchange_header", BuiltinExchangeType.HEADERS, true, false, null);

  /**
    * 5.声明Queue
    * queue        - queue名称
    * durable      - 是否持久化
    * exclusive    - 是否独占
    * autoDelete   - 是否自动删除
    * arguments    - 额外参数
    */
  channel.queueDeclare("app_queue_header", true, false, false, null);

  //6.定义头信息
  Map<String,Object> headerMap = new HashMap<>();
  headerMap.put("x-match", "any");
  headerMap.put("student", true);
  headerMap.put("teacher", true);

  //7.建立绑定关系[routingKey不能为null]
  channel.queueBind("app_queue_header", "app_exchange_header", "", headerMap);

  //8.读取消息
  GetResponse response = channel.basicGet("app_queue_header", true);
  if (response != null) {
    AMQP.BasicProperties props = response.getProps();
    byte[] body = response.getBody();
    System.out.println("routingKey: " + response.getEnvelope().getRoutingKey());
    System.out.println("body:" + new String(body));
  }

  //9.关闭资源
  channel.close();
  connection.close();
}
生产者
public class Producer {

  public static void main(String[] args) throws Exception {
    //1.创建连接工厂
    ConnectionFactory connectionFactory = new ConnectionFactory();
    connectionFactory.setHost("192.168.1.155");
    connectionFactory.setPort(5672);
    connectionFactory.setVirtualHost("/");               //设置虚拟主机

    //2.创建Connect
    Connection connection = connectionFactory.newConnection();

    //3.创建Channel
    Channel channel = connection.createChannel();

    //4.定义头信息
    Map<String,Object> headerMap = new HashMap<>();
    headerMap.put("student", true);

    AMQP.BasicProperties props = new AMQP.BasicProperties
      .Builder()
      .headers(headerMap)
      .build();

    //5.发布信息
    channel.basicPublish("app_exchange_header", "", props, "I am a student".getBytes());

    //6.关闭相关连接
    channel.close();
    connection.close();
  }
}
六、Message
Message信息
-
服务器与应用程序之间传递的数据
-
本质上是一段数据,由Properties和Payload(Body)组成
-
Properties具有很多属性
名称 含义 delivery_mode 消息是否持久化【2持久化,1非持久化】 headers 可自定义属性 content_type 消息的类型 content_encoding 消息的编码或者压缩方式 priority 优先级,0~9之间,0最低 correlation_id 关联业务id或先前消息的ID,并没有明确指定行为 replay_to 通常用于命名回调队列,并没有明确指定行为 expiration 消息的失效时间 message_id 消息id,消息的唯一标识,并没有明确指定行为 timestamp 发送消息的时间戳 type 类型,例如content_type为流类型,type为Protobuf app_id 应用程序id,差错和定位时使用,并没有明确指定行为 user_id 用户id,RabbitMQ会验证当前连接的用户,若不匹配则丢弃消息,不建议使用 cluster_id 集群id,废弃
消息使用示例
/**
  * 发送消息
  * exchange     - 交换机名称
  * routingkey   - 路由键
  * props        - 属性
  * body         - 消息内容
  */
Map<String,Object> headers = new HashMap<>();
headers.put("username","kun");
AMQP.BasicProperties properties = new AMQP.BasicProperties.Builder()
  .deliveryMode(2)          //2代表持久化投递,1代表非持久化投递
  .contentEncoding("UTF-8") //设置字符集
  .contentType("text/plain")//设置消息类型
  .expiration("10000")      //设置10s后过期
  .headers(headers)         //放置headers
  .build();

String msg = "message";
channel.basicPublish("", "RoutingKey-001", properties, msg.getBytes());
消息确认机制
消息的确认机制是指生产者投递消息后,如果Broker收到消息【集群模式下所有的borker接收到才触发】,则会给生产者一个应答【和消费者无关】,但并不能保证消息一定会被投递到目标queue里【比如路由key没有对应的Queue】。生产者进行接收应答,用来确定这条消息是否正常发送到Broker,这种投递方式也是消息可靠性投递的核心保障。非正常接收的原因有:磁盘容量满、队列到达最大容量等。
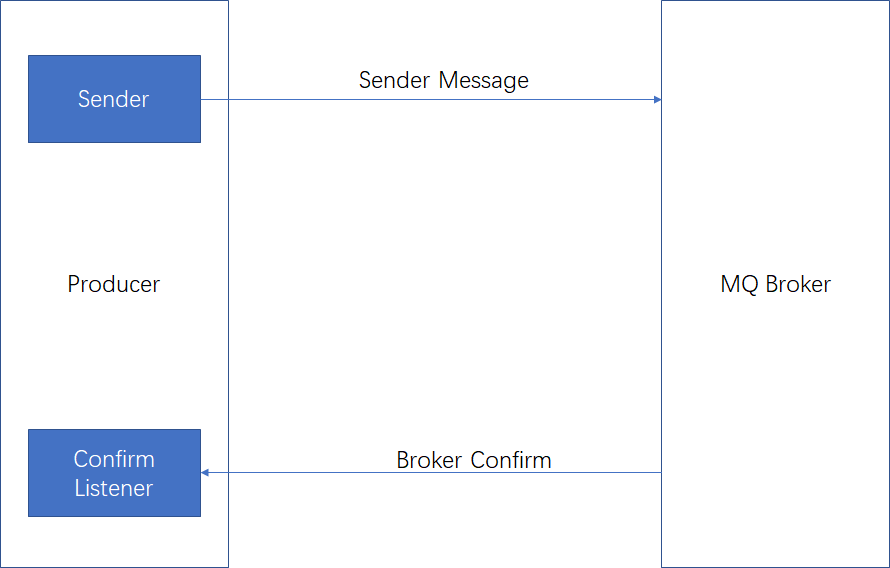
Confirm确认消息实现步骤
第一步:在channel上开启确认模式:channel.confirmSelect();
第二步:在channel添加监听:addConfirmListener
public static void main(String[] args) throws Exception {
  //1.创建连接工厂
  ConnectionFactory connectionFactory = new ConnectionFactory();
  connectionFactory.setPort(5672);
  connectionFactory.setHost("192.168.1.155");
  connectionFactory.setVirtualHost("/");

  //2.创建连接
  Connection connection = connectionFactory.newConnection();

  //3.通过连接得到Channel
  Channel channel = connection.createChannel();

  //4.开启消息确认机制
  channel.confirmSelect();

  //5.准备消息
  String exchange = "confirm_exchange_direct";
  String routingKey = "confirm_key";
  AMQP.BasicProperties properties = null;
  String message = "confirm_message";

  //6.消息入库
  System.out.println("消息存入数据库 " + exchange + "-" + routingKey + "-" + message);

  //7.添加监听
  channel.addConfirmListener(new ConfirmListener() {
    @Override
    public void handleAck(long deliveryTag, boolean multiple) throws IOException {
      System.out.println("此消息被broker接收到");
      System.out.println("deliveryTag "+ deliveryTag);
      System.out.println("multiple " + multiple);
      System.out.println("消息存入数据库,改为状态被接收");
      System.out.println(exchange + "-" + routingKey + "-" + message);
    }

    @Override
    public void handleNack(long deliveryTag, boolean multiple) throws IOException {
      System.out.println("此消息没有被broker接收到");
      System.out.println(deliveryTag +" deliveryTag");
      System.out.println("multiple" + multiple);
      System.out.println("消息存入数据库,改为状态未被接收");
      System.out.println(exchange + "-" + routingKey + "-" + message);
    }
  });

  //8.发送消息
  channel.basicPublish(exchange, routingKey, properties, message.getBytes());

  Thread.sleep(10000);
  //9.关闭资源
  channel.close();
  connection.close();
}
消息返回机制
消息返回机制是用于处理无法路由的消息。在某些情况下,发送的exchange[存在]但是找不到匹配的路由规则,这个时候如果需要监听这种不可达消息,需要使用消息返回机制Return Listener。如果exchange不存在会一直不终止线程。
public static void main(String[] args) throws Exception {
  //1.创建连接工厂
  ConnectionFactory connectionFactory = new ConnectionFactory();
  connectionFactory.setPort(5672);
  connectionFactory.setHost("192.168.1.155");
  connectionFactory.setVirtualHost("/");

  //2.创建连接
  Connection connection = connectionFactory.newConnection();

  //3.通过连接得到Channel
  Channel channel = connection.createChannel();

  //4.消息返回监听
  channel.addReturnListener(new ReturnListener() {
    @Override
    public void handleReturn(int replyCode, String replyText, String exchange,
                             String routingKey, AMQP.BasicProperties properties,
                             byte[] body) throws IOException {
      System.out.println("消息返回,没用对应的路由规则");
      System.out.println(replyCode);  //返回状态码
      System.out.println(replyText);  //返回状态说明
      System.out.println(exchange);   //消息的exchange
      System.out.println(routingKey); //消息的routingKey
      System.out.println(properties); //消息的properties
      System.out.println(body);       //消息的body
    }
  });

  /**
    * 5.发送消息
    * exchange     - 交换机名称
    * routingkey   - 路由键
    * mandatory    - true:监听器接收到路由不可达消息会进行后续处理
    *              - false:broker自动删除不可达消息
    * props        - 属性
    * body         - 消息内容
    */
  channel.basicPublish("return_exchange_direct", "return_key", true, null, "return_message".getBytes());

  Thread.sleep(20000);
  //6.关闭资源
  channel.close();
  connection.close();
}
使用消息确认机制mandatory必须设置为true
TTL消息
TTL是Time To Live的缩写,即生存时间。
- RabbitMQ支持
消息的过期时间,在消费发送时可以进行指定。 - RabbitMQ支持
队列的过期时间,在消息入队列开始计算,只要超过了队列设置的超时时间配置就会自动清除
消息设置过期时间
/**
  * 发送消息
  * exchange     - 交换机名称
  * routingkey   - 路由键
  * props        - 属性
  * body         - 消息内容
  */
AMQP.BasicProperties properties = new AMQP.BasicProperties.Builder()
  .expiration("10000")      //设置10s后过期
  .build();
channel.basicPublish("ttl_exchange", "ttl_key", properties, "ttl msg".getBytes());
队列设置过期时间
/**
  * 声明Queue【创建Queue】
  * queue        - queue名称
  * durable      - 是否持久化
  * exclusive    - 是否独占
  * autoDelete   - 是否自动删除
  * arguments    - 额外参数
  *                x-message-ttl      设置队列中的所有消息的生存周期
  *                x-expires          当队列在指定的时间没有被访问就会被删除
  *                x-max-length       限定队列的消息的最大值长度,超出行为参见x-overflow
  *                x-max-length-bytes 限定队列最大占用的空间大小,超出行为参见x-overflow
  *                x-overflow         设置队列溢出行为drop-head【删除头部】或reject-publish【拒绝加入】
  *                x-dead-letter-exchange        产生死信时路由的交换机
  *                x-dead-letter-routing-key     产生死信时路由的键
  *                x-max-priority      优先级队列,声明队列时先定义最大优先级,0-9数字越大优先级越高
  *                x-queue-mode        【lazy】将消息保存到磁盘上不放内存中,消费时加载到内存发送
  */
Map<String, Object> arguments = new HashMap<>();
arguments.put("x-message-ttl", 1000);
channel.queueDeclare("ttl_queue", true, false, false, arguments);
七、消费端
消费端的自定义监听
更加优雅的处理消息的方式,不用使用循环等手段读取消息,而是使用消息机制推送消息。
public static void main(String[] args) throws Exception {
  //1.创建连接工厂
  ConnectionFactory connectionFactory = new ConnectionFactory();
  connectionFactory.setHost("192.168.1.155");
  connectionFactory.setPort(5672);

  //2.创建连接
  Connection connection = connectionFactory.newConnection();

  //3.通过连接得到Channel
  Channel channel = connection.createChannel();

  //4.定义queue
  channel.queueDeclare("custom_consumer_queue", true, false, false, null);

  //5.定义exchange
  channel.exchangeDeclare("custom_consumer_exchange", "direct", true, false, null);

  //6.绑定queue
  channel.queueBind("custom_consumer_queue", "custom_consumer_exchange", "custom_key");

  //7.自定消费者
  channel.basicConsume("custom_consumer_queue", false, new MyConsumer(channel));

  //8.关闭相关连接
  Thread.sleep(10000);
  channel.close();
  connection.close();
}

//自定义消费者
class MyConsumer extends DefaultConsumer{

  public MyConsumer(Channel channel) {
    super(channel);
  }

  @Override
  public void handleDelivery(String consumerTag, Envelope envelope,
                             AMQP.BasicProperties properties, byte[] body) throws IOException {
    System.out.println("consumerTag " + consumerTag);
    System.out.println("envelope    " + envelope);
    System.out.println("properties  " + properties);
    System.out.println("body        " + body);
    super.getChannel().basicAck(envelope.getDeliveryTag(), false);
  }
}
消费端的限流策略
假设一个场景,由于我们的消费端突然全部不可用了,导致RabbitMQ服务器上有上万条未处理的消息,这时候如果没做任何现在,随便开启一个消费端客户端,就会导致巨量的消息瞬间全部推送过来,但是我们单个客户端无法同时处理这么多的数据,就会导致消费端变得巨卡,有可能直接崩溃不可用。
RabbitMQ提供了一种qos(服务质量保证)功能,即在非自动确认消息的前提下,如果一定数目的消息未被确认不进行消费新的消息。
public static void main(String[] args) throws Exception {
  //1.创建连接工厂
  ConnectionFactory connectionFactory = new ConnectionFactory();
  connectionFactory.setHost("192.168.1.155");
  connectionFactory.setPort(5672);

  //2.创建连接
  Connection connection = connectionFactory.newConnection();

  //3.通过连接得到Channel
  Channel channel = connection.createChannel();

  //4.声明exchange
  channel.exchangeDeclare("qos-exchange", "direct", true, false, null);

  //5.声明Queue
  channel.queueDeclare("qos-queue", true, false, false, null);

  //6.绑定
  channel.queueBind("qos-queue", "qos-exchange", "qos-key");

  /**
    * 7.设置qos
    * prefetchSize     - 限制抓取消息的大小,一般为0不做限制
    * prefetchCount    - 每次最多抓取多少个
    * global           - 一般设置为false,在channel新能并不好
    *                  -   true:运用在channel
    *                  -   false:运用在consumer
    */
  channel.basicQos(0, 1, false);

  //8.创建消费者,使用qos时autoAck必须设置为false
  GetResponse response = channel.basicGet("qos-queue", false);
  if(response != null) {
    AMQP.BasicProperties props = response.getProps();
    byte[] body = response.getBody();
    System.out.println("routingKey: "+ response.getEnvelope().getRoutingKey());
    System.out.println("body:"+ new String(body));
    channel.basicAck(response.getEnvelope().getDeliveryTag(), false);
  }

  Thread.sleep(1000000L);
  //9.关闭相关连接
  channel.close();
  connection.close();
}
消费端ACK与重回队列机制
消费端的手工ACK和NACK
- 消息通过ACK确认是否被正确接收,每个Message都要被确认,可以手动去ACK或自动ACK
- 自动确认会在消息发送给消费者后立即确认,但存在丢失消息的可能,如果消费端消费逻辑抛出异常,也就是消费端没有处理成功这条消息,那么就相当于丢失了消息
- 如果手动确认则当消费者调用
ack、nack、reject进行确认,如果消息未被 ACK 则会发送到下一个消费者
消费端的重回队列
- 消息重回队列是为了对没有处理成功的消息,把消息再次退回Broker
- 一般情况下关闭重回队列
public static void main(String[] args) throws Exception {
  //1.创建连接工厂
  ConnectionFactory connectionFactory = new ConnectionFactory();
  connectionFactory.setHost("192.168.1.155");
  connectionFactory.setPort(5672);

  //2.创建连接
  Connection connection = connectionFactory.newConnection();

  //3.通过连接得到Channel
  Channel channel = connection.createChannel();

  //4.声明Queue【创建Queue】
  channel.queueDeclare("ack_queue", true, false, false, null);

  //5.声明Exchange
  channel.exchangeDeclare("ack_exchange", "direct", true);

  //6.绑定queue
  channel.queueBind("ack_queue", "ack_exchange", "ack_key");

  /**
    * 7.接收消息
    * queue        - queue名称
    * autoAck      - 自动签收
    * Consumer     - 自定义消费者
    */
  channel.basicConsume("ack_queue", false, new MyConsumer(channel));

  //8.关闭资源
  Thread.sleep(10000);
  channel.close();
  connection.close();
}

//自定义消费者
class MyConsumer extends DefaultConsumer {

  public MyConsumer(Channel channel) {
    super(channel);
  }

  private int i = 1;

  @Override
  public void handleDelivery(String consumerTag, Envelope envelope,
                             AMQP.BasicProperties properties, byte[] body) throws IOException {
    System.out.println("consumerTag " + consumerTag);
    System.out.println("envelope    " + envelope);
    System.out.println("properties  " + properties);
    System.out.println("body        " + body);
    if (i % 3 == 0) {
      /**
        * nack签收
        * deliveryTag    - 消息tag
        * multiple       - 是否批量签收
        * requeue        - 是否重回broker队列尾部,如果false不再重回
        *
        * 与 void basicReject(long deliveryTag, boolean requeue) 区别
        * basicReject  一次只能拒绝接收一个消息
        * basicNack    方法可以支持一次一个或多个消息的拒收
        */
      super.getChannel().basicNack(envelope.getDeliveryTag(), false,false);
    }else {
      /**
        * nack签收
        * deliveryTag    - 消息tag
        * multiple       - 是否批量签收
        * requeue        - 是否重回队列
        */
      super.getChannel().basicAck(envelope.getDeliveryTag(), false);
    }
    i++;
  }
}
死信队列【DLX - Dead-Letter-Exchange】
当消息在一个队列中变成死信(dead message)后,它能够被重新publish到另一个Exchange,这个Exchange就是DLX。
DLX也是一个正常的和其它Exchange没任何区别的交换机,它能在任何队列上被指定。
消息变成死信的情况:
- 消息被拒绝(basic.reject / basic.nack)并且requeue=false
- 消息TTL过期
- 队列到达最大长度
死信队列的应用
实现延迟队列:数据进入正常的queue中且没有消费者(根据业务设置相应的失效时间【延迟时间】)进入死信队列,消费者消费死信队列中的数据
public static void main(String[] args) throws Exception {
  //1.创建连接工厂
  ConnectionFactory connectionFactory = new ConnectionFactory();
  connectionFactory.setHost("192.168.1.155");
  connectionFactory.setPort(5672);

  //2.创建连接
  Connection connection = connectionFactory.newConnection();

  //3.通过连接得到Channel
  Channel channel = connection.createChannel();

  //4.创建死信队列
  channel.queueDeclare("dlx_queue", true, false, false, null);
  channel.exchangeDeclare("dlx_exchange", "topic", true);
  channel.queueBind("dlx_queue", "dlx_exchange", "#");

  /**
    * 5.声明Queue【创建Queue】
    * x-dead-letter-exchange       - 死信队列的交换机
    * x-dead-letter-routing-key    - 死信队列的路由键
    */
  Map<String, Object> arguments = new HashMap<>();
  arguments.put("x-dead-letter-exchange","dlx_exchange");
  arguments.put("x-dead-letter-routing-key","dlx_key");
  channel.queueDeclare("dlx_test_queue", true, false, false, arguments);

  //6.声明Exchange
  channel.exchangeDeclare("dlx_test_exchange", "direct", true);

  //7.绑定queue
  channel.queueBind("dlx_test_queue", "dlx_test_exchange", "dlx_test_key");

  /**
    * 8.接收消息
    * queue        - queue名称
    * autoAck      - 自动签收
    * Consumer     - 自定义消费者
    */
  channel.basicConsume("dlx_test_queue", false, new MyConsumer(channel));

  //9.关闭资源
  Thread.sleep(10000);
  channel.close();
  connection.close();
}
延迟队列
八、消息可靠性保障
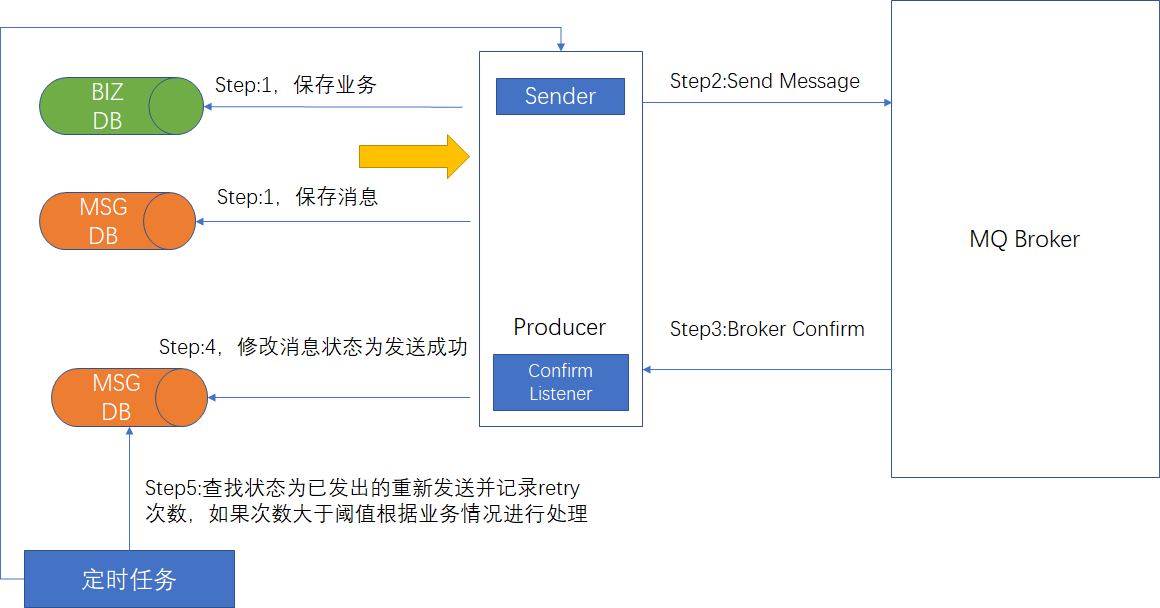
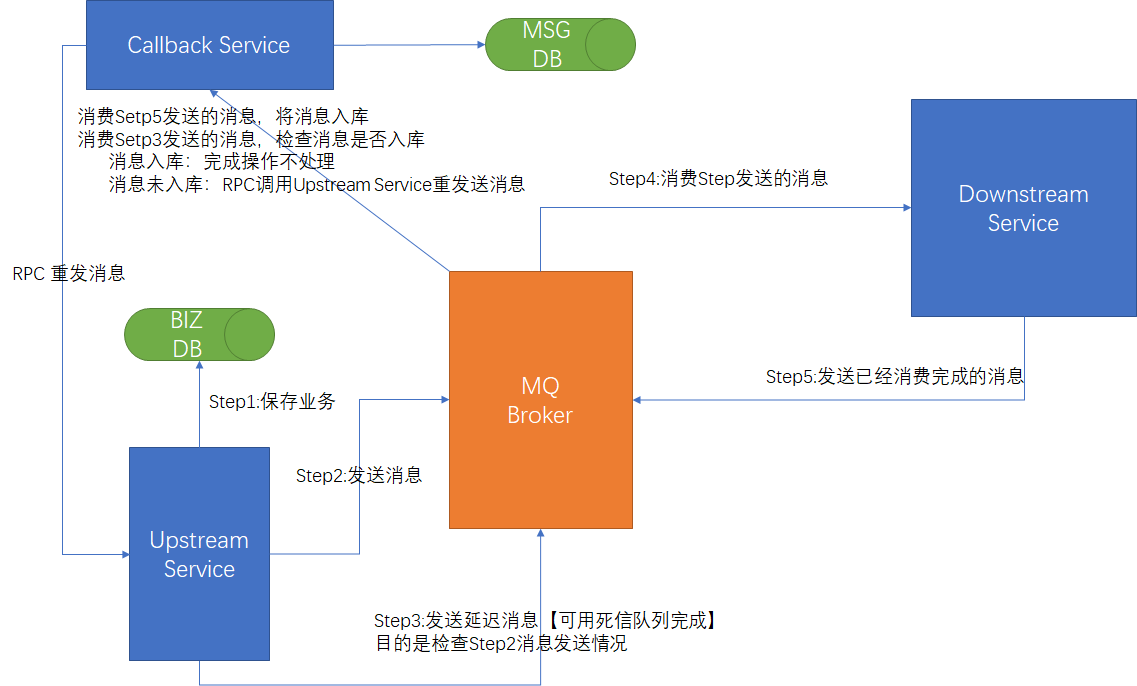
保障100%投递成功
方案一:消息落库,对消息进行打标
方案二:消息的延迟投递,做二次确认,回调检查
 幂等性保障
幂等性保障
唯一ID + 指纹码机制
原理就是利用数据库主键去重,业务完成后插入主键标识
-- 唯一ID指的是业务的ID,例如订单ID,商品ID,UUID
-- 指纹码指每次正常操作的码,例如时间戳+业务编号方式
select count(*) from t_check where ID = 唯一ID + 指纹码
好处:实现简单
坏处:高并发下数据库瓶颈
解决方案:根据ID进行分库分表进行算法路由
利用Redis的原子性实现
原理利用Redis的原子性,将标示消息的唯一ID【业务生成的】放入redis,在消费消息前判断是否存在此消息
好处:效率高
坏处:如果数据需要立即落库,那么数据库和redis要保持“事务一致性”
如果数据不需要立即落库由别的服务进行落库,那么如何要保持同步
九、集群搭建
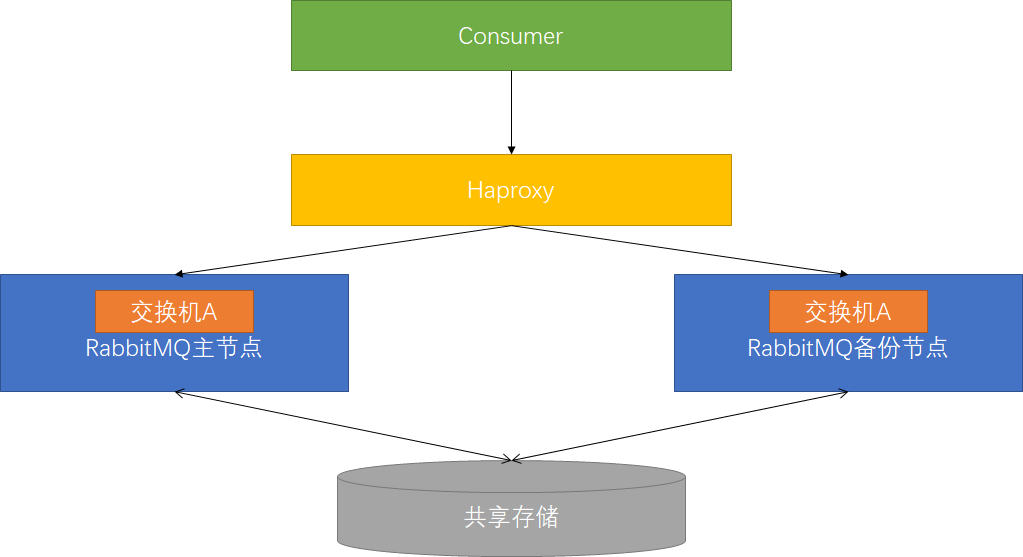
主备模式
实现Rabbit高可用,一般用于并发和流量不高的情况,从节点不可读写。主备模式也称为Warren模式。当主节点出现故障时备用节点切换为主节点。
远程模式
远程模式可以实现多活,简称Shovel模式。远距离通讯和复制,即将消息进行不同中心的复制工作,可以跨地域的让俩MQ集群互联。将源节点的消息发布到目标节点,这个过程中Shovel就是一个客户端,它负责连接源节点,读取某个队列的消息,然后将消息写入到目标节点的exchange中。不建议使用此模式,已经被Federation多活取代。
镜像模式
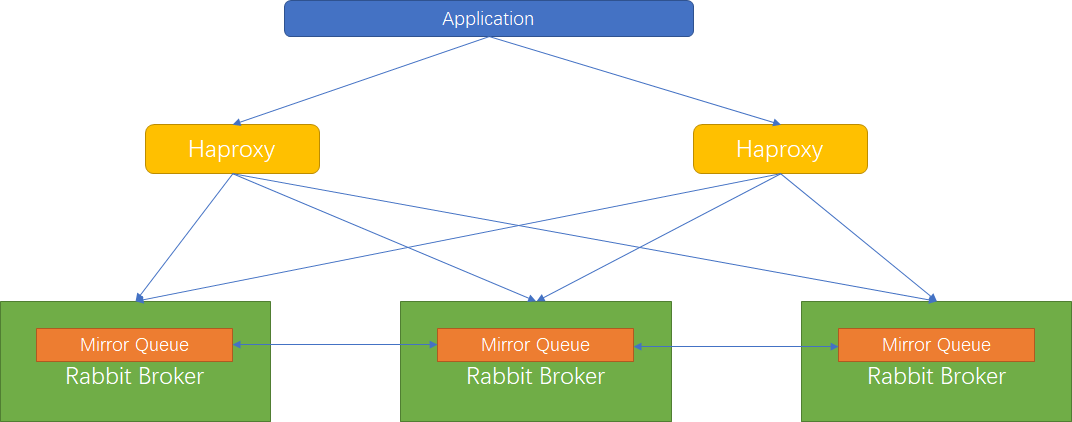
镜像(Mirror)模式保证了100%数据不丢失,一般常用镜像模式搭建RabbitMQ集群。
镜像(Mirror)队列的目的是为了保证数据的高可靠性解决方案,主要是为了实现数据同步,一般来讲是2-3个节点实现同步。
搭建高可用镜像模式步骤
集群搭建
第一步:修改集群用户与连接心跳检测
# /usr/lib/rabbitmq/lib/rabbitmq_server-3.6.5/ebin/rabbit.app
{heartbeat, 1} #将60改为1
第二步:安装管理插件
# 也是web管理插件 lsof -i:15672 或者 netstat -tnlp|grep 15672 查看是否启动成功
rabbitmq-plugins enable rabbitmq_management
第三步:选取主节点,同步cookie。选取一个做为主节点,将/var/lib/rabbitmq/.erlang.cookie复制到其它节点,注意权限。
第四步:停止所有节点服务
rabbitmqctl stop
第五步:启动集群
rabbitmq-server -detached
第六步:主机名检查,必须要有主机名【/etc/hostname】,注意设置完成之后重启
第七步:网络检查,测试各节点之间是否可以用hostName连通,如果不可以需要修改【/etc/hosts】
第八步:普通node节点执行
rabbitmqctl stop_app
rabbitmqctl join_cluster rabbit@[masterHostName]
rabbitmqctl start_app
第九步:任意节点执行rabbitmqctl set_policy ha-all "^" '{"ha-mode":"all"}'
查看集群状态:
rabbitmqctl cluster_status
修改集群名称:
rabbitmqctl set_cluster_name [cluster_name]
移除节点:
rabbitmqctl forget_cluster_node rabbit@hostName
Haproxy配置
global
    ......

defaults
	  ......

# rabbitmq集群节点配置
listen rabbitmq_cluster
    bind 0.0.0.0:5672
    # 配置TCP模式
    mode tcp
    # 简单的轮询
    balance roundrobin
    # inter每隔五秒对mq集群做健康检查,2次正确证明服务器可用,3次失败证明服务器不可用
    server rabbit155 192.168.1.155:5672 check inter 5000 rise 2 fall 3
    server rabbit149 192.168.1.149:5672 check inter 5000 rise 2 fall 3
    server rabbit151 192.168.1.151:5672 check inter 5000 rise 2 fall 3

#配置haproxy web监控,查看统计信息
listen stats
    bind 0.0.0.0:8100
    mode http
    option httplog
    stats enable
    # 设置haproxy监控地址为http://localhost:8100/rabbitmq-stats
    stats uri /rabbitmq-stats
    stats refresh 5s
Keepalived配置
! Configuration File for keepalived

global_defs {
   router_id rabbit149   # 标识节点的字符串,通常为hostname
}

vrrp_script chk_haproxy {
    # 执行脚本位置,需要执行权限
    script "/etc/keepalived/haproxy_check.sh"
    # 检测时间间隔
    interval 2
    # 如果条件成立则权重减20
    weight -20
}

vrrp_instance VI_1 {
    state MASTER          # 主节点为MASTER,备份节点为BACKUP
    interface enp0s3      # 绑定虚拟IP的网络接口(网卡)
    virtual_router_id 60  # 虚拟路由ID号(主备节点一定要相同)
    mcast_src_ip 192.168.1.149 # 本机ip地址
    priority 100          #优先级配置(0-254的值),备机要比MASTER低
    nopreempt
    advert_int 1          # 组播信息发送间隔,俩个节点必须配置一致,默认1s
    authentication {      # 认证匹配
        auth_type PASS
        auth_pass 1111
    }

    track_script {
        chk_haproxy
    }

    virtual_ipaddress {
        192.168.1.60      # 虚拟ip,可以指定多个
    }
}
检查脚本【chk_haproxy】
#!/bin/bash

A=`ps -C haproxy --no-header |wc -l`

if [ $A -eq 0 ];then
    echo "`date` haproxy is dead" >> /tmp/lvs.log
    haproxy  -f /etc/haproxy/haproxy.cfg
    sleep 2
fi

if [ `ps -C haproxy --no-header |wc -l` -eq 0 ];then
    echo "`date` haproxy cannot start,stop keepalived" >> /tmp/lvs.log
    # 杀死keepalived
    ps -C keepalived --no-header | awk '{print $1}'|xargs kill -9
    exit 0
else
    echo "`date` haproxy restart" >> /tmp/lvs.log
    exit 1
fi
集群关键配置
配置文件位置:/usr/lib/rabbitmq/lib/rabbitmq_server-[version]/ebin/rabbit.app
-
tcp_listerners:设置rabbimq的监听端口,默认为[5672] -
disk_free_limit【DISK模式下有效】:磁盘低水位线,若磁盘容量低于指定值则停止接收数据,默认值为{mem_relative, 1.0},即与内存相关联1:1 vm_memory_high_watermark【RAM模式下有效】:设置内存低水位线,若低于该水位线,则开启流控机制,默认值是0.4,即内存总量的40%hipe_compile:将部分rabbimq代码用High Performance Erlang compiler编译,可提升性能,该参数是实验性,若出现erlang vm segfaults,需要关掉force_fine_statistics:该参数属于rabbimq_management,若为true则进行精细化的统计,但会影响性能
集群恢复与故障转移
场景一:A先停止,B(Master)后停止
处理方法:改场景下先启动B,再启动A。或者先启动A,隔30s内启动B即可
场景二:A、B同时停机(同时断点)
处理方法:30s内同时启动A、B即可
场景三:A先停止,B(Master)后停止,且A无法恢复
处理方法:B启动之后调用rabbitmqctl forget_cluster_node rabbit@nodeA解除与A的cluster关系,再加入新的节点即可
场景四:A先停止,B(Master)后停止,且B无法恢复
处理方法:在A节点上调用rabbitmqctl forget_cluster_node --offline rabbit@nodeB,之后启动A节点作为Master,再加入新的Slave节点即可
多活模式
Federation模式是异地数据复制的主流模式,因为Shovel模式配置复杂,Federation配置简单。可以实现Broker和Cluster之间的消息传输,连接双方可以使用不同的users和vritual hosts,使用的是AMQP协议所以双方也可以使用不同版本的erlang和RabbitMQ。
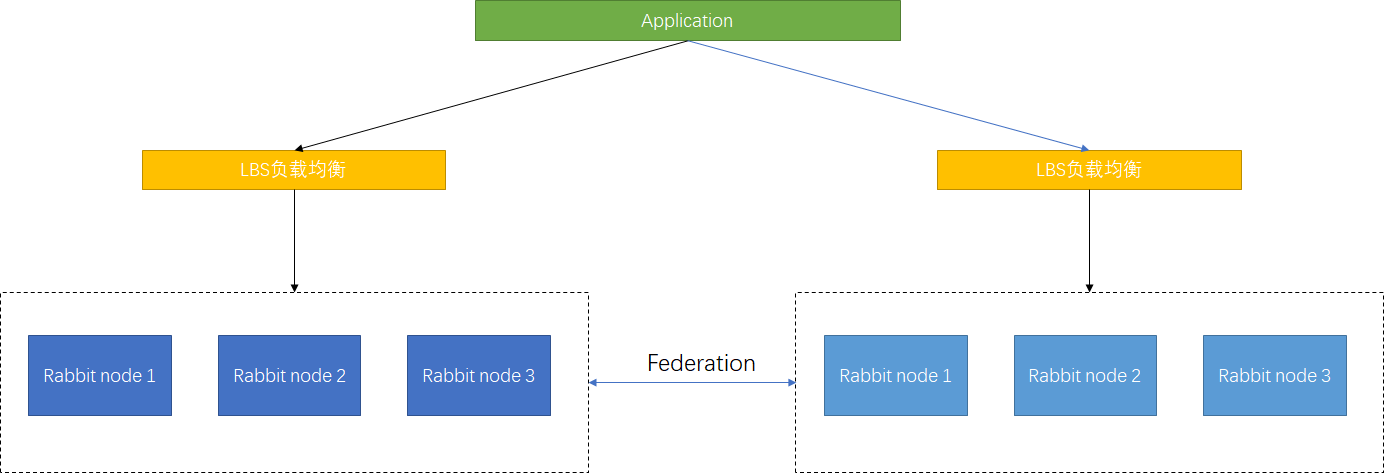
Federation Exchanges,可以看成Downstream从Upstream主动拉取消息,但并不是拉取所有消息,之须是在Downstream上已经明确定义Bindings关系的Exchange,也就是有实际的物理Queue来接收消,才会Upstream拉取消息到Downstream。Downstream会将绑定关系组合在一起,绑定/解除绑定命令将发送到Upstream交换机。因此FederationExchange只接收具有订阅的消息。
十、延迟插件的使用
方式一:使用死信队列,参见此链接
方式二:使用rabbitmq_delayed_message_exchange插件【更加简单优秀】
- 官网下载插件,解压到指定位置【usr/lib/rabbitmq/lib/rabbitmq_server-[version]/plugins/ 】
- 安装插件
rabbitmq-plugins enable rabbitmq_delayed_message_exchange - 使用Spring AMQP设置
x-delay消息头参数
// 定义交换机和队列
@Configuration
public class DelayExchangeConfigure {
  @Bean
  public Queue delayQueue() {
    return new Queue(DELAY_QUEUE_NAME, true);
  }

  // 定义一个延迟交换机
  @Bean
  public CustomExchange delayExchange() {
    Map<String, Object> args = new HashMap<String, Object>();
    // 定义交换机类型
    args.put("x-delayed-type", "direct");
    return new CustomExchange(DELAY_EXCHANGE_NAME, "x-delayed-message", true, false, args);
  }

  // 绑定队列到这个延迟交换机上
  @Bean
  public Binding delayBinding(Queue delayQueue, CustomExchange delayExchange) {
    return BindingBuilder.bind(delayQueue).to(delayExchange).with(DELAY_ROUTING_KEY).noargs();
  }
}

// 生产者
@Controller
@RequiredArgsConstructor
public class DelayExchangeController {

  private final RabbitTemplate rabbitTemplate;

  @GetMapping("/delay/send")
  public void delayExchangeSend() {
    rabbitTemplate.convertAndSend(
      RabbitConstant.DELAY_EXCHANGE_NAME,
      RabbitConstant.DELAY_EXCHANGE_ROUTING_KEY,
      "delay_test_message" ,
      message -> {
        // Spring AMQP已经在方法上已经支持了x-delay这个属性
        message.getMessageProperties().setDelay(5000);
        return message;
      });
  }
}

// 消费者
@Component
public class DelayConsumer {

  @RabbitListener(queues = RabbitConstant.DELAY_EXCHANGE_QUEUE_NAME)
  public void process(String data) {
    System.out.println(data);
  }
}