HBase使用
一、简介&安装
简介
HBase是一种分布式、可扩展、支持海量数据存储的NoSQL数据库。
逻辑上,HBase的数据模型同关系型数据库很类似,数据存储在一张表中,有行有列。 但从HBase的底层物理存储结构(K-V)来看,HBase更像是一个多维度的map
术语
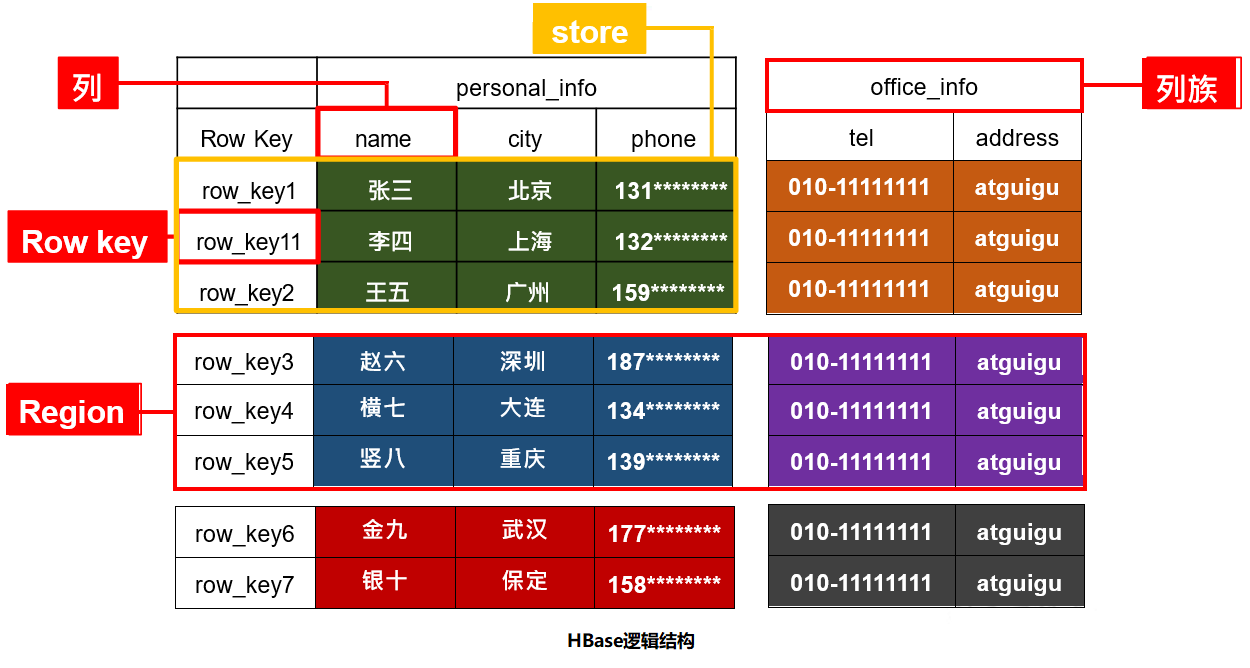
1)Namespace
命名空间,类似于关系型数据库的DataBase概念,每个命名空间下有多个表。HBase有两个自带的命名空间分别是hbase和default。hbase中存放的是HBase内置的表, default表是用户默认使用的命名空间。
2)Region
按照数据量切分的行组成的切片称为Region。
3)Row
HBase表中的每行数据都由一个RowKey和多个Column(列)组成,数据是按照RowKey的字典顺序存储的,并且查询数据时只能根据 RowKey 进行检索,所以RowKey的设计十分重要。
4)Column
HBase中的每个列都由Column Family(列族)和Column Qualifier(列限定符)进行限定。建表时只需指明列族,而列限定符无需预先定义。
5)Timestamp
用于标识数据的不同版本(version),每条数据写入时,如果不指定时间戳,系统会自动为其加上该字段,其值为写入HBase的时间。
6)Cell
由{rowkey, column Family:column Qualifier, timestamp}唯一确定的单元。cell中的数据是没有类型的,全部是字节码形式存储。
安装
前提条件:已安装zookeeper,Hadoop
第一步:解压
tar -zxvf hbase-2.3.2-bin.tar.gz -C /opt/module
第二步:配置hbase-env.sh
# JAVA_HOME配置
export JAVA_HOME=/opt/module/jdk8
# 不使用内置的zk
export HBASE_MANAGES_ZK=false
第三步:修改hbase-site.xml
<!-- 每个regionServer的共享目录,用来持久化Hbase,默认情况下在/tmp/hbase下面 -->
<property>
  <name>hbase.rootdir</name>
  <value>/hbase</value>
</property>

<!-- hbase集群模式,false表示hbase的单机,true表示是分布式模式 -->
<property>
  <name>hbase.cluster.distributed</name>
  <value>true</value>
</property>

<!-- hbase master节点的端口 -->
<property>
  <name>hbase.master.port</name>
  <value>16000</value>
</property>

<!-- hbase master的web ui页面的端口 -->
<property>
  <name>hbase.master.info.port</name>
  <value>16010</value>
</property>

<!-- hbase master的web ui页面绑定的地址 -->
<property>
  <name>hbase.master.info.bindAddress</name>
  <value>0.0.0.0</value>
</property>

<!-- hbase依赖的zk地址 -->
<property>
  <name>hbase.zookeeper.quorum</name>
  <value>centos161,centos162,centos163</value>
</property>

<!-- zookeeper的工作目录 -->
<property>
  <name>hbase.zookeeper.property.dataDir</name>
  <value>/opt/module/zookeeper/data</value>
</property>

<!-- 一个region进行major compaction合并的周期,在这个点的时候,这个region下的所有hfile会进行合并,默认是7天。major
        compaction非常耗资源,建议生产关闭(设置为0),在应用空闲时间手动触发【compact 表名】 -->
<property>
  <name>hbase.hregion.majorcompaction</name>
  <value>604800000</value>
</property>

<!-- 一个抖动比例,意思是说上一个参数设置是7天进行一次合并,也可以有50%的抖动比例,生产环境majorcompaction应该被关闭,此参数就不重要了 -->
<property>
  <name>hbase.hregion.majorcompaction.jitter</name>
  <value>0.50</value>
</property>

<!-- 一个store里面允许存的hfile的个数,超过这个个数会被写到新的一个hfile里面 也即是每个region的每个列族对应的memstore在fulsh为hfile的时候,默认情况下当达到3个hfile的时候就会对这些文件进行合并重写为一个新文件,设置个数越大可以减少触发合并的时间,但是每次合并的时间就会越长 -->
<property>
  <name>hbase.hstore.compactionThreshold</name>
  <value>3</value>
</property>

<!-- #######################################以下是非必须配置参数####################################### -->
<!-- regionServer的全局memstore的大小,超过该大小会触发flush到磁盘的操作,默认是堆大小的40%,而且regionserver级别的flush会阻塞客户端读写 -->
<property>
  <name>hbase.regionserver.global.memstore.size</name>
  <value></value>
</property>

<!-- 可以理解为一个安全的设置,有时候集群的“写负载”非常高,写入量一直超过flush的量,这时我们就希望memstore不要超过一定的安全设置。在这种情况下,写操作就要被阻塞一直到memstore恢复到一个“可管理”的大小,这个大小就是默认值是堆大小*0.4*0.95,也就是当regionserver级别的flush操作发送后,会阻塞客户端写,一直阻塞到整个regionserver级别的memstore的大小为堆大小*0.4*0.95为止 -->
<property>
  <name>hbase.regionserver.global.memstore.size.lower.limit</name>
  <value></value>
</property>

<!-- 内存中的文件在自动刷新之前能够存活的最长时间,默认是1h -->
<property>
  <name>hbase.regionserver.optionalcacheflushinterval</name>
  <value>3600000</value>
</property>


<!-- 单个region里memstore的缓存大小,超过那么整个HRegion就会flush,默认128M -->
<property>
  <name>hbase.hregion.memstore.flush.size</name>
  <value>134217728</value>
</property>
第四步:修改regionservers
centos161
centos162
centos163
第五步:软连接Hadoop配置文件到HBase
ln -s /opt/module/hadoop/etc/hadoop/core-site.xml /opt/module/hbase/conf/core-site.xml
ln -s /opt/module/hadoop/etc/hadoop/hdfs-site.xml /opt/module/hbase/conf/hdfs-site.xml
第六步:配置/etc/profile,加入HBASE_HOME和PATH路径
第七步:HBase远程发送到其他集群机器
第八步:启动
bin/start-hbase.sh
# 进入命令行模式
bin/hbase shell
二、命令行操作
创建命名空间
create_namespace 'bigdata'
删除命名空间,需要命名空间下的没有表
drop_namespace 'bigdata'
创建表
# 创建一张person表,列族为base_info和addr
create 'bigdata:person','base_info','addr'
插入数据到表
put 'bigdata:person','1001','base_info:name','Jack'
put 'bigdata:person','1001','base_info:age','18'
put 'bigdata:person','1001','addr:city','beijing'
put 'bigdata:person','1002','base_info:name','tom'
put 'bigdata:person','1003','base_info:name','rose'
put 'bigdata:person','1003','base_info:name','rose'
# 插入数据并指定时间戳
put 'bigdata:person','1001','addr:city','shanghai',1603437570384
扫描表数据
# 全表扫描
scan 'bigdata:person'
# 左闭右开扫描
scan 'bigdata:person',{STARTROW => '1001', ENDROW => '1003'}
# 从指定STARTROW开始扫描
scan 'bigdata:person',{STARTROW => '1001'}
# 从指定STARTROW开始扫描指定个数
scan 'bigdata:person',{STARTROW => '1001', LIMIT => 10}
查看表结构信息
describe 'bigdata:person'
更新指定字段的数据
put 'bigdata:person','1001','base_info:name','Jane'
查看指定行或指定行的指定列数据
# 查看指定行内容
get 'bigdata:person','1001'
# 查看指定行的指定列祖数据
get 'bigdata:person','1001','base_info'
# 查看指定行的指定列数据
get 'bigdata:person','1001','base_info:name'
# 获得指定列族下的版本数据
get 'bigdata:person','1001',{COLUMN=>'base_info',VERSIONS=>3}
# 获得指定列族下的指定列版本数据
get 'bigdata:person','1001',{COLUMN=>'base_info:name',VERSIONS=>3}
统计表指定行数
count 'bigdata:person'
删除数据
# 删除某rowkey的全部数据
deleteall 'bigdata:person','1003'
# 删除某rowkey的某一列数据
delete 'bigdata:person','1001','base_info:age'
# 清空表数据
truncate 'bigdata:person'
删除表
# 首先先将表变成不可用状态
disable 'bigdata:person'
# drop表
drop 'bigdata:person'
变更表信息
alter 'bigdata:person',{NAME=>'base_info',VERSIONS=>3}
三、HBase架构及其原理
-
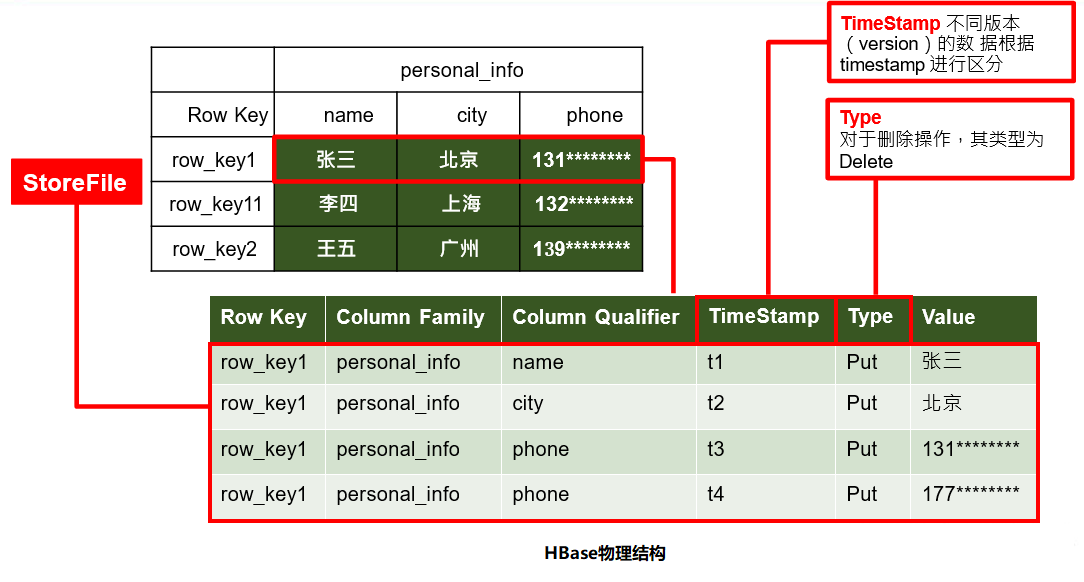
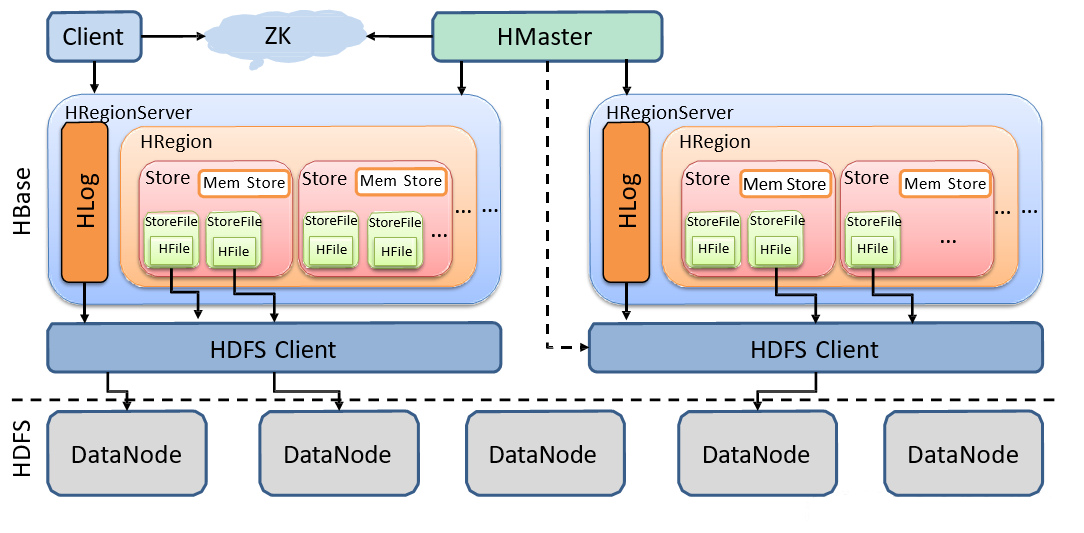
StoreFile
保存实际数据的物理文件,StoreFile以HFile的形式存储在HDFS上。每个Store会有一个或多个StoreFile,数据在每个StoreFile中都是有序的
-
MemStore
写缓存,由于HFile中的数据要求是有序的,所以数据是先存储在MemStore中,排好序后等到达刷写时机才会刷写到HFile,每次刷写都会形成一个新的HFile
-
HLog【WAL】
由于数据要经MemStore排序后才能刷写到HFile,但把数据保存在内存中会导致数据丢失,为了解决这个问题数据会先写在一个叫做Write-Ahead logfile的文件中,然后再写入MemStore中。所以在系统出现故障的时候,数据可以通过这个日志文件重建
写数据流程
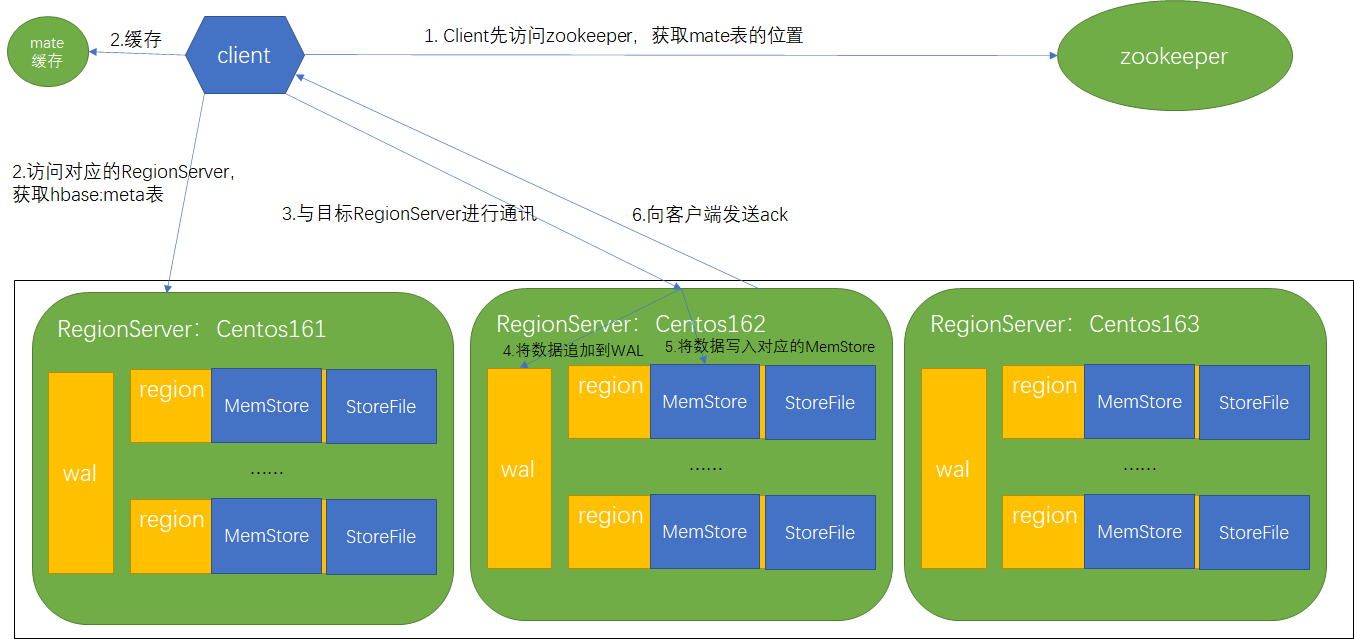
1)Client先访问zookeeper,获取hbase:meta表位于哪个RegionServer,mate表存储了每个region的信息
2)访问对应的RegionServer,获取hbase:meta表,根据读请求的namespace:table/rowkey, 查询出目标数据位于哪个RegionServer中的Region中。并将该table的region信息以及meta表的位置信息缓存在客户端的meta cache,方便下次访问
3)与目标RegionServer进行通讯
4)将数据顺序写入(追加)到WAL
5)将数据写入对应的MemStore,数据会在MemStore进行排序
6)向客户端发送ack
7)等达到MemStore的刷写时机后,将数据刷写到HFile
实际操作是先写入wal内存,再写入memstore,之后wal内存数据刷盘到hdfs,如果过程中出现异常进行回滚操作
MemStore刷写为HFILE时机
-
当某个memstroe的大小达到了
hbase.hregion.memstore.flush.size(默认值128M),其所在region的所有memstore都会刷写。当memstore的大小达到了hbase.hregion.memstore.flush.size*hbase.hregion.memstore.block.multiplier(默认值4)时,会阻止继续往该memstore写数据。 -
当RegionServer中memstore的总大小达到
java_heapsize*hbase.regionserver.global.memstore.size(默认值0.4)*
hbase.regionserver.global.memstore.size.lower.limit(默认值 0.95)会按照其所有memstore的大小顺序(由大到小)依次进行刷写。直到RegionServer中所有memstore的总大小减小到上述值以下。 当RegionServer中memstore的总大小达到java_heapsize*hbase.regionserver.global.memstore.size时,会阻止继续往所有的 memstore 写数据。 -
到达自动刷写的时间。自动刷新的时间间隔由该属性进行配置
hbase.regionserver.optionalcacheflushinterval(默认1小时)。 -
当WAL文件的数量超过
hbase.regionserver.max.logs会按照时间顺序依次进行刷写,直到 WAL 文件数量减小到其值以下(该属性名已经废弃, 现无需手动设置,最大值为 32)。
读数据流程
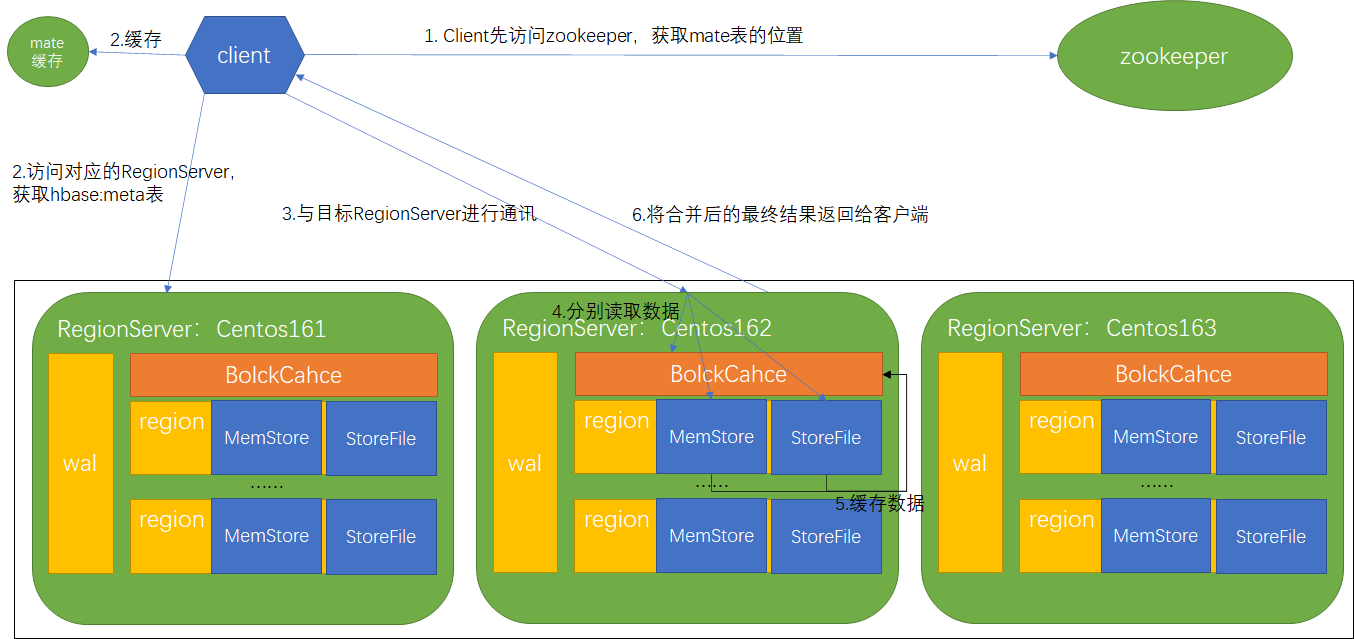
1)Client先访问zookeeper,获取hbase:meta表的RegionServer
2)访问对应的RegionServer,获取hbase:meta表,根据读请求的namespace:table/rowkey, 查询出目标数据的RegionServer中的Region。并将该table的region信息以及meta表的位置信息缓存在客户端的metacache,方便下次访问
3)与目标RegionServer进行通讯
4)分别在BlockCache(读缓存),MemStore和StoreFile(HFile)中查询目标数据,并将查到的所有数据进行合并。此处所有数据是指同一条数据的不同版本(timestamp)或者不同的类型(Put/Delete)
5)将从文件中查询到的数据块(Block,HFile数据存储单元,默认大小为64KB)缓存到BlockCache
6)将合并后的最终结果返回给客户端
BlockCahce会记录rowkey和落盘文件及对应数据,如果落盘文件已被缓存那么已被缓存的文件不需要再次读取
文件合并
由于memstore每次刷写都会生成一个新的HFile,且同一个字段的不同版本(timestamp)和不同类型(Put/Delete)有可能会分布在不同的HFile中,因此查询时需要遍历所有的HFile。为了减少HFile的个数,以及清理过期和删除的数据,会进行StoreFile Compaction。 Compaction分为两种,分别是Minor Compaction和Major Compaction。Minor Compaction会将临近的若干个较小的HFile合并成一个较大的 HFile,但不会清理过期和删除的数据。Major Compaction会将一个Store下的所有的HFile合并成一个大HFile,并且会清理掉过期和删除的数据。
可使用
scan tableName,{RAW=>true,VERSIONS=>10}查看先保存的所有数据
Region Split
默认情况下,每个Table起初只有一个Region,随着数据的不断写入,Region会自动进行拆分。刚拆分时,两个子Region都位于当前的RegionServer,但处于负载均衡的考虑, HMaster有可能会将某个Region转移给其他的RegionServer。
当1个region中的某个Store下所有StoreFile的总大小超过以下公式触发,其中R为当前RegionServer中属于该Table的个数
Min(R^2 * hbase.hregion.memstore.flush.size, hbase.hregion.max.filesize)
- hbase.hregion.max.filesize默认10G
- hbase.hregion.memstore.flush.size默认128M
默认情况下,当我们通过创建一张表时,只有一个region正处于混沌时期,start-end key无边界可谓海纳百川。所有的rowkey都写入到这个region里,然后数据越来越多,region的size越来越大时,大到一定的阀值hbase就会将region一分为二,成为2个region,这个过程称为分裂(region-split)。
如果我们就这样默认建表,表里不断的put数据,更严重的是我们的rowkey还是顺序增大的,是比较可怕的。存在的缺点比较明显:
- 首先是热点写,我们总是向最大的start key所在的region写数据,因为我们的rowkey总是会比之前的大,并且hbase的是按升序方式排序的。所以写操作总是被定位到无上界的那个region中
- 其次,由于热点,我们总是往最大的start key的region写记录,之前分裂出来的region不会被写数据,有点打入冷宫的感觉,他们都处于半满状态,这样的分布也是不利的
四、HBase API
创建命名空间
@Test
public void createNamespace() throws IOException {
  Configuration configuration = new Configuration();
  configuration.set(HConstants.ZOOKEEPER_QUORUM, "centos161,centos162,centos163");
  Connection connection = ConnectionFactory.createConnection(configuration);
  Admin admin = connection.getAdmin();
  NamespaceDescriptor namespaceDescriptor = NamespaceDescriptor.create("bigdata").build();
  admin.createNamespace(namespaceDescriptor);
  admin.close();
  connection.close();
}
判断表是否存在
@Test
public void tableExists() throws IOException {
  Configuration configuration = new Configuration();
  configuration.set(HConstants.ZOOKEEPER_QUORUM, "centos161,centos162,centos163");
  Connection connection = ConnectionFactory.createConnection(configuration);
  Admin admin = connection.getAdmin();
  boolean result = admin.tableExists(TableName.valueOf("bigdata:person"));
  System.out.println("table exists " + result);
  admin.close();
  connection.close();
}
创建表
@Test
public void createTable() throws IOException {
  Configuration configuration = new Configuration();
  configuration.set(HConstants.ZOOKEEPER_QUORUM, "centos161,centos162,centos163");
  Connection connection = ConnectionFactory.createConnection(configuration);
  Admin admin = connection.getAdmin();
  TableDescriptorBuilder tableDescriptorBuilder = TableDescriptorBuilder.newBuilder(TableName.valueOf("bigdata", "student"));
  ColumnFamilyDescriptorBuilder familyDescriptorBuilder = ColumnFamilyDescriptorBuilder.newBuilder(Bytes.toBytes("info"));
  familyDescriptorBuilder.setMaxVersions(3);
  tableDescriptorBuilder.setColumnFamily(familyDescriptorBuilder.build());
  admin.createTable(tableDescriptorBuilder.build());
  admin.close();
  connection.close();
}
删除表
@Test
public void dropTable() throws IOException {
  Configuration configuration = new Configuration();
  configuration.set(HConstants.ZOOKEEPER_QUORUM, "centos161,centos162,centos163");
  Connection connection = ConnectionFactory.createConnection(configuration);
  Admin admin = connection.getAdmin();
  admin.disableTable(TableName.valueOf("bigdata", "student"));
  admin.deleteTable(TableName.valueOf("bigdata", "student"));
  admin.close();
  connection.close();
}
向表中插入数据
@Test
public void addData() throws IOException {
  Configuration configuration = new Configuration();
  configuration.set(HConstants.ZOOKEEPER_QUORUM, "centos161,centos162,centos163");
  Connection connection = ConnectionFactory.createConnection(configuration);
  Table stuTable = connection.getTable(TableName.valueOf("bigdata", "student"));
  Put put = new Put(Bytes.toBytes("1001"));
  put.addColumn(Bytes.toBytes("info"), Bytes.toBytes("name"), Bytes.toBytes("zhangsan"));
  stuTable.put(put);
  stuTable.close();
  connection.close();
}
删除数据
@Test
public void delData() throws IOException {
  Configuration configuration = new Configuration();
  configuration.set(HConstants.ZOOKEEPER_QUORUM, "centos161,centos162,centos163");
  Connection connection = ConnectionFactory.createConnection(configuration);
  Table stuTable = connection.getTable(TableName.valueOf("bigdata", "student"));
  Delete delete = new Delete(Bytes.toBytes("1001"));
  stuTable.delete(delete);
  stuTable.close();
  connection.close();
}
扫描数据
@Test
public void scanData() throws IOException {
  Configuration configuration = new Configuration();
  configuration.set(HConstants.ZOOKEEPER_QUORUM, "centos161,centos162,centos163");
  Connection connection = ConnectionFactory.createConnection(configuration);
  Table stuTable = connection.getTable(TableName.valueOf("bigdata", "student"));
  Scan scan = new Scan();
  ResultScanner scanner = stuTable.getScanner(scan);
  for (Result result : scanner) {
    Cell[] cells = result.rawCells();
    for (Cell cell : cells) {
      System.out.println("行键:" + Bytes.toString(CellUtil.cloneRow(cell)));
      System.out.println("列族:" + Bytes.toString(CellUtil.cloneFamily(cell)));
      System.out.println("列:" + Bytes.toString(CellUtil.cloneQualifier(cell)));
      System.out.println("值:" + Bytes.toString(CellUtil.cloneValue(cell)));
    }
  }
  stuTable.close();
  connection.close();
}
获取某一行数据
@Test
public void getRow() throws IOException {
  Configuration configuration = new Configuration();
  configuration.set(HConstants.ZOOKEEPER_QUORUM, "centos161,centos162,centos163");
  Connection connection = ConnectionFactory.createConnection(configuration);
  Table stuTable = connection.getTable(TableName.valueOf("bigdata", "student"));
  Get get = new Get(Bytes.toBytes("1001"));
  //设置读取所有版本
  //get.readAllVersions();
  //设置时间戳
  //get.setTimestamp()
  Result result = stuTable.get(get);
  for (Cell cell : result.rawCells()) {
    System.out.println("行键:" + Bytes.toString(result.getRow()));
    System.out.println("列族:" + Bytes.toString(CellUtil.cloneFamily(cell)));
    System.out.println("列:" + Bytes.toString(CellUtil.cloneQualifier(cell)));
    System.out.println("值:" + Bytes.toString(CellUtil.cloneValue(cell)));
    System.out.println("时间戳:" + cell.getTimestamp());
  }
  stuTable.close();
  connection.close();
}
获取某一行指定”列族:列”的数据
@Test
public void getRowQualifier() throws IOException {
  Configuration configuration = new Configuration();
  configuration.set(HConstants.ZOOKEEPER_QUORUM, "centos161,centos162,centos163");
  Connection connection = ConnectionFactory.createConnection(configuration);
  Table stuTable = connection.getTable(TableName.valueOf("bigdata", "student"));
  Get get = new Get(Bytes.toBytes("1001"));
  get.addColumn(Bytes.toBytes("info"), Bytes.toBytes("name"));
  Result result = stuTable.get(get);
  for (Cell cell : result.rawCells()) {
    System.out.println("行键:" + Bytes.toString(result.getRow()));
    System.out.println("列族:" + Bytes.toString(CellUtil.cloneFamily(cell)));
    System.out.println("列:" + Bytes.toString(CellUtil.cloneQualifier(cell)));
    System.out.println("值:" + Bytes.toString(CellUtil.cloneValue(cell)));
    System.out.println("时间戳:" + cell.getTimestamp());
  }
  stuTable.close();
  connection.close();
}
五、扩展优化
HBase API与MR交互
通过HBase的相关JavaAPI,我们可以实现伴随HBase操作MapReduce过程,比如使用MapReduce将数据从本地文件系统导入到HBase 的表中,比如我们从HBase中读取一些原始数据后使用MapReduce做数据分析。
配置环境变量&运行官方案例
临时配置
export HBASE_HOME=/opt/module/hbase
export HADOOP_HOME=/opt/module/hadoop
export HADOOP_CLASSPATH=`${HBASE_HOME}/bin/hbase mapredcp`
永久配置
配置/etc/profile
export HBASE_HOME=/opt/module/hbase
export HADOOP_HOME=/opt/module/hadoop
配置hadoop-env.sh(注意:在 for 循环之后配)
export HADOOP_CLASSPATH=$HADOOP_CLASSPATH:/opt/module/hbase/lib/*
运行官方案例
测试运行官方的MapReduce任务统计行数
yarn jar lib/hbase-mapreduce-[version].jar rowcounter "bigdata:person"
使用 MapReduce将本地数据导入到HBase
# 在本地创建一个 tsv 格式的文件:fruit.tsv
# 1001	Apple	Red
# 1002	Pear	Yellow
# 1003	Pineapple Yellow

# HBase shell执行
create 'fruit','info'

hdfs dfs -mkdir /input_fruit
hdfs dfs -put fruit.tsv /input_fruit

yarn jar lib/hbase-mapreduce-[version].jar importtsv \
-Dimporttsv.columns=HBASE_ROW_KEY,info:name,info:color fruit hdfs://centos161:9000/input_fruit

scan 'fruit'
自定义
实现从HDFS读取数据送入HBase
public class FruitMapper extends Mapper<LongWritable, Text, LongWritable, Text> {
  @Override
  protected void map(LongWritable key, Text value, Context context) throws IOException, InterruptedException {
    context.write(key, value);
  }
}


public class FruitReducer extends TableReducer<LongWritable, Text, NullWritable> {

  private String inputColumnFamilyColumnNamesArg;
  private List<ColumnFamilyColumnName> columnFamilyColumnNames = new ArrayList<>();

  @Override
  protected void setup(Context context) throws IOException, InterruptedException {
    Configuration configuration = context.getConfiguration();
    this.inputColumnFamilyColumnNamesArg = configuration.get("columnFamily-columnName");
    String[] inputColumnFamilyColumnNamesArgArray = inputColumnFamilyColumnNamesArg.split(",");
    for (String item : inputColumnFamilyColumnNamesArgArray) {
      String[] columnFamilyColumnName = item.split(":");
      columnFamilyColumnNames.add(new ColumnFamilyColumnName(columnFamilyColumnName[0], columnFamilyColumnName[1]));
    }
    for (ColumnFamilyColumnName columnFamilyColumnName : columnFamilyColumnNames) {
      System.out.println("family: " + columnFamilyColumnName.getFamily());
      System.out.println("column: " + columnFamilyColumnName.getColumnName());
    }
  }

  @Override
  protected void reduce(LongWritable key, Iterable<Text> values, Context context) throws IOException, InterruptedException {
    for (Text value : values) {
      String[] fields = value.toString().split("\t");
      System.out.println("length :" + fields.length);
      Put put = new Put(Bytes.toBytes(fields[0]));
      int fieldIndex = 1;
      for (ColumnFamilyColumnName columnFamilyColumnName : columnFamilyColumnNames) {
        if (fieldIndex < fields.length && fieldIndex <= columnFamilyColumnNames.size()) {
          System.out.println(fields[fieldIndex]);
          put.addColumn(
            Bytes.toBytes(columnFamilyColumnName.getFamily()),
            Bytes.toBytes(columnFamilyColumnName.getColumnName()),
            Bytes.toBytes(fields[fieldIndex]));
        }
        fieldIndex++;
      }
      context.write(NullWritable.get(), put);
    }
  }

  @Data
  @AllArgsConstructor
  private static class ColumnFamilyColumnName {
    private String family;
    private String columnName;
  }
}

public class FruitDriver implements Tool {

  private Configuration configuration;

  @Override
  public int run(String[] args) throws Exception {
    // 1.获取Job对象
    Job job = Job.getInstance(configuration);
    // 2.获取驱动类路径
    job.setJarByClass(FruitDriver.class);
    // 3.设置Mapper&Mapper输出类型
    job.setMapperClass(FruitMapper.class);
    job.setMapOutputKeyClass(LongWritable.class);
    job.setMapOutputValueClass(Text.class);
    // 4.设置Reducer
    TableMapReduceUtil.initTableReducerJob("bigdata:student", FruitReducer.class, job);
    // 5.设置输入路径
    FileInputFormat.setInputPaths(job, new Path("hdfs://192.168.22.161:9000/data"));
    // 6.提交任务
    job.submit();
    return job.waitForCompletion(true) ? 0 : -1;
  }

  @Override
  public void setConf(Configuration conf) {
    configuration = conf;
  }

  @Override
  public Configuration getConf() {
    return this.configuration;
  }

  public static void main(String[] args) throws Exception {
    Configuration configuration = new Configuration();
    configuration.set("fs.defaultFS", "hdfs://192.168.22.161:9000");
    configuration.set("columnFamily-columnName", "info:name,info:sex");
    configuration.set(HConstants.ZOOKEEPER_QUORUM, "centos161,centos162,centos163");
    int res = ToolRunner.run(configuration, new FruitDriver(), args);
    System.exit(res);
  }
}
HBase API与Hive对接
hive的lib下的hive-hbase-handler-[version].jar可能不兼容,如果有问题需要重新编译
环境准备
首先配置好HBASE_HOME,HIVE_HOME,然后建立软链接
ln -s $HBASE_HOME/lib/hbase-common-[version].jar $HIVE_HOME/lib/hbase-common-[version].jar
ln -s $HBASE_HOME/lib/hbase-server-[version].jar $HIVE_HOME/lib/hbase- server-[version].jar
ln -s $HBASE_HOME/lib/hbase-client-[version].jar $HIVE_HOME/lib/hbase-client-[version].jar
ln -s $HBASE_HOME/lib/hbase-protocol-[version].jar $HIVE_HOME/lib/hbase-protocol-[version].jar
ln -s $HBASE_HOME/lib/hbase-it-[version].jar $HIVE_HOME/lib/hbase-it-[version].jar
ln -s $HBASE_HOME/lib/hbase-hadoop2-compat-[version].jar $HIVE_HOME/lib/hbase-hadoop2-compat-[version].jar
ln -s $HBASE_HOME/lib/hbase-hadoop-compat-[version].jar $HIVE_HOME/lib/hbase-hadoop-compat-[version].jar
配置hive-site.xml
<property>
  <name>hive.zookeeper.quorum</name>
  <value>centos161,centos162,centos163</value>
</property>
<property>
  <name>hive.zookeeper.client.port</name>
  <value>2181</value>
</property>
案例
建立Hive表并关联HBase表,插入数据到Hive表的同时能够影响HBase表
①、创建关联表
CREATE TABLE hive_hbase_emp_table(
  empno int, ename string,
  job string, mgr int,
  hiredate string, sal double,
  comm double, deptno int)
  STORED BY 'org.apache.hadoop.hive.hbase.HBaseStorageHandler'
  WITH SERDEPROPERTIES ("hbase.columns.mapping"=":key,info:ename,info:job,info:mgr,info:hiredate,info:sal,info:comm,info:deptno")
TBLPROPERTIES ("hbase.table.name" = "hbase_emp_table");
完成之后,可以分别进入 Hive 和 HBase 查看,都生成了对应的表
②、在Hive中创建临时中间表,用于load文件中的数据
CREATE TABLE emp(
  empno int,
  ename string,
  job string, mgr int,
  hiredate string,
  sal double, comm double,
  deptno int
)
row format delimited fields terminated by '\t';
③、向Hive中间表中load数据
load data local inpath '/opt/module/hive/input/emp.txt' into table emp;
④、通过insert命令将中间表中的数据导入到Hive关联Hbase的那张表中
insert into table hive_hbase_emp_table select * from emp;
⑤、查看Hive以及关联的HBase表中是否已经成功的同步插入了数据
hive:  select * from hive_hbase_emp_table;
Hbase: scan 'hbase_emp_table'
HIVE使用外部表,直接关联HBASE
①、创建关联表
CREATE EXTERNAL TABLE relevance_hbase_emp(
  empno int, ename string, job string, mgr int,
  hiredate string, sal double,
  comm double,
  deptno int)
  STORED BY 'org.apache.hadoop.hive.hbase.HBaseStorageHandler'
  WITH SERDEPROPERTIES ("hbase.columns.mapping" = ":key,info:ename,info:job,info:mgr,info:hiredate,info:sal,info:co mm,info:deptno")
TBLPROPERTIES ("hbase.table.name" = "hbase_emp_table");
②、 关联后就可以使用Hive函数进行一些分析操作了
select count(*) from relevance_hbase_emp;
HBase优化
Master高可用
-
关闭HBase集群(如果没有开启则跳过此步)
-
在conf目录下创建backup-masters
touch conf/backup-masters -
在backup-masters文件中配置高可用HMaster节点
echo centos161 >> conf/backup-masters echo centos162 >> conf/backup-masters -
将整个conf目录scp到其他节点
-
打开页面测试查看
http://192.168.22.161:16010
预分区
每一个region维护着StartRow与EndRow,如果加入的数据符合某个Region维护的RowKey 范围,则该数据交给这个Region维护。那么依照这个原则,我们可以将数据所要投放的分区提前大致的规划好,以提高HBase性能。
预分区设置完成以后自动切分规则依然有效,最好预估每个RegionServer上放2~3个Region来保证性能
方式一:手动设置预分区
create 'staff','info','partition',SPLITS => ['1000','2000','3000','4000']
方式二:生成 16 进制序列预分区
create 'staff','info','partition',{NUMREGIONS => 15, SPLITALGO => 'HexStringSplit'}
方式三:按照文件中设置的规则预分区
# 创建 splits.txt 文件内容如下:
# aaaa
# bbbb
# cccc
# dddd

create 'staff','partition',SPLITS_FILE => 'splits.txt'
方式四:使用JavaAPI创建预分区
/**
  * 预分区
  */
@Test
public void preSplit() throws IOException {
  Configuration configuration = new Configuration();
  configuration.set(HConstants.ZOOKEEPER_QUORUM, "centos161,centos162,centos163");
  Connection connection = ConnectionFactory.createConnection(configuration);
  Admin admin = connection.getAdmin();
  byte[][] splitKeys = new byte[][]{Bytes.toBytes("30000"), Bytes.toBytes("60000")};
  TableDescriptorBuilder tableDescriptorBuilder = TableDescriptorBuilder.newBuilder(
    TableName.valueOf(NamespaceDescriptor.DEFAULT_NAMESPACE_NAME_STR, "staff"));
  ColumnFamilyDescriptorBuilder familyDescriptorBuilder = ColumnFamilyDescriptorBuilder.newBuilder(Bytes.toBytes("info"));
  tableDescriptorBuilder.setColumnFamily(familyDescriptorBuilder.build());
  admin.createTable(tableDescriptorBuilder.build(), splitKeys);
  admin.close();
  connection.close();
}
RowKey设计原则
RowKey要具有唯一性,散列性,长度原则【尽量长】
举例场景:
数据:主叫手机->被叫手机 时间 时长
业务:用手机号查询月份详情
数据:
15712904478->13269081322 2020-10-28 11:24:10 500

rowkey设计,如果数据量3000G数据预计划分300个区
rowKye第一部分:手机号%300
rowKye第二部分:手机号
rowKye第三部分:时间

001_15712904478_2020-10-28 11:24:10

查询2月份账单
ROWSTART: 001_15712904478_2020-02
ROWEND:   001_15712904478_2020-03
内存优化&基础优化
内存优化
HBase操作过程中需要大量的内存开销,毕竟Table是可以缓存在内存中的,一般会分配整个可用内存的70%给HBase的Java 堆。但是不建议分配非常大的堆内存,因为GC过程持续太久会导致RegionServer处于长期不可用状态,一般16~48G内存就可以了,如果因为框架占用内存过高导致系统内存不足,框架一样会被系统服务拖死。
优化DataNode允许的最大文件打开数
配置hdfs-site.xml
<!-- HBase一般都会同一时间操作大量的文件,根据集群的数量和规模以及数据动作设置为4096或者更高。默认值:4096 -->
<property>
  <name>dfs.datanode.max.transfer.threads</name>
  <value>4096</value>
</property>
优化延迟高的数据操作的等待时间
配置hdfs-site.xml
<!-- 如果对于某一次数据操作来讲,延迟非常高,socket 需要等待更长的时间,建议把该值设置为更大的值(默认 60000 毫秒) -->
<property>
  <name>dfs.image.transfer.timeout</name>
  <value>60000</value>
</property>
优化数据的写入效率
配置mapred-site.xml
<!-- 如果对于某一次数据操作来讲,延迟非常高,socket 需要等待更长的时间,建议把该值设置为更大的值(默认 60000 毫秒) -->
<property>
  <name>mapreduce.map.output.compress</name>
  <value>false</value>
</property>

<!-- 可设置压缩方式为 org.apache.hadoop.io.compress.GzipCodec,默认 DefaultCodec-->
<property>
  <name>mapreduce.map.output.compress.codec</name>
  <value>org.apache.hadoop.io.compress.DefaultCodec	</value>
</property>
设置RPC监听数量
配置hbase-site.xml
<!-- regionServer端默认开启的RPC监控实例数,也即RegionServer能够处理的IO请求线程数,默认30 -->
<property>
  <name>hbase.regionserver.handler.count</name>
  <value>30</value>
</property>
优化HStore文件大小
配置hbase-site.xml
<!--HStoreFile最大的大小,当某个region的某个列族超过这个大小会进行region拆分,默认10G -->
<property>
  <name>hbase.hregion.max.filesize</name>
  <value>10737418240</value>
</property>
优化 HBase 客户端缓存
配置hbase-site.xml
<!-- hbase客户端每次写缓冲的大小(也就是客户端批量提交到server端),这块大小会同时占用客户端和服务端,缓冲区更大可以减少RPC次数,但是更大意味着内存占用更多,默认2M -->
<property>
  <name>hbase.client.write.buffer</name>
  <value>2097152</value>
</property>
指定scan.next 扫描HBase所获取的行数
配置hbase-site.xml
<!-- 在执行hbase scan操作的时候,客户端缓存的行数,设置小意味着更多的rpc次数,设置大比较吃内存 -->
<property>
  <name>hbase.client.scanner.caching</name>
  <value>2147483647</value>
</property>
flush、compact、split 机制
配置hbase-site.xml
<!-- regionServer的全局memstore的大小,超过该大小会触发flush到磁盘的操作,默认是堆大小的40%,而且regionserver级别的flush会阻塞客户端读写 -->
<property>
  <name>hbase.regionserver.global.memstore.size</name>
  <value></value>
</property>

<!-- 可以理解为一个安全的设置,有时候集群的“写负载”非常高,写入量一直超过flush的量,这时我们就希望memstore不要超过一定的安全设置。在这种情况下,写操作就要被阻塞一直到memstore恢复到一个“可管理”的大小,这个大小就是默认值是堆大小*0.4*0.95,也就是当regionserver级别的flush操作发送后,会阻塞客户端写,一直阻塞到整个regionserver级别的memstore的大小为堆大小*0.4*0.95为止 -->
<property>
  <name>hbase.regionserver.global.memstore.size.lower.limit</name>
  <value></value>
</property>